
Hello guys, here is another tutorial for one of the most common things in any android application, navigation drawer. So in this Android Navigation Drawer Example you will learn how you can use the Android Navigation Drawer from the predefined template.
You may already know what is Android Navigation Drawer but if you are confused in implementing it with multiple fragments then don’t worry, this android navigation drawer example will clear all your doubts. So lets begin our Android Navigation Drawer Example.
- You can also watch this complete video tutorial if you are having problem understanding the written tutorial.
Creating a new project
- So first we will create a new project. I am using Android Studio. (No reason of using eclipse nowdays 😛 )
- Create a new project. I created NavigationDrawerExample.
- Now when you are asked to select an activity from the template, select the navigation drawer activity.
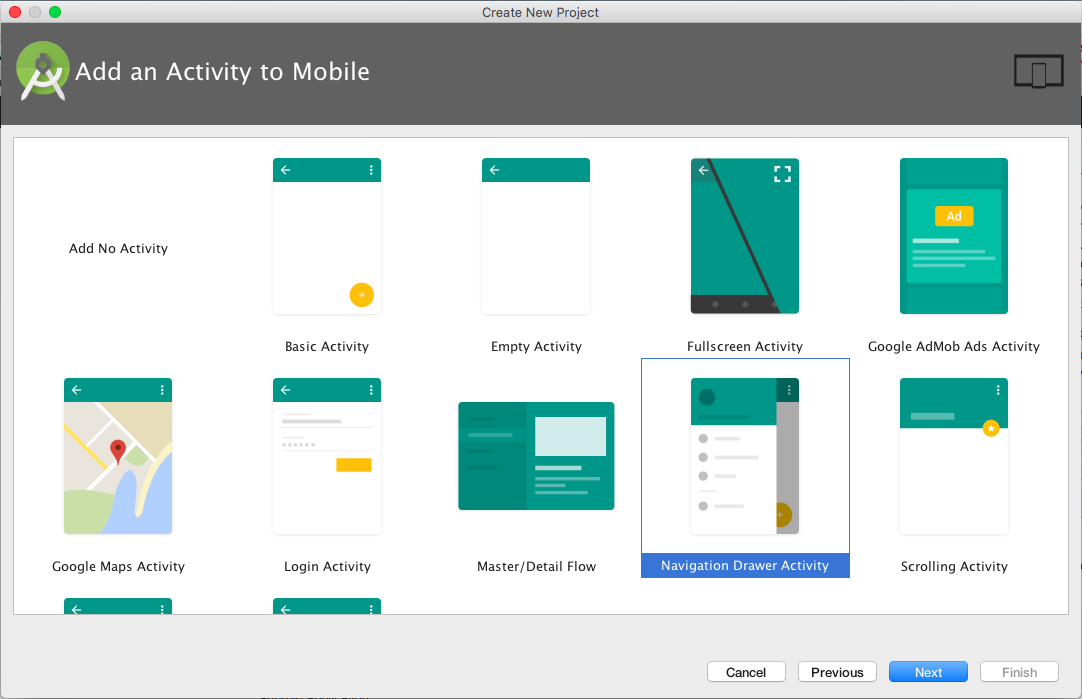
- If you want to add Navigation Drawer Activity to your existing project you can simply add it by going to your package -> right click -> new -> activity -> navigation drawer activity

- Once your project is loaded your navigation drawer activity is ready. You can now run your application. 😛

- Pretty easy right? Yeah its quite easy. Now we will learn to customise the menus and to add the screens for the menus using fragment.
- Now you can change the menus given in the drawer to whatever you want. To change the menu open the activity_main_drawer.xml inside menu folder. Here is my activity_main_drawer.xml file I deleted the menus and now we have only 3 menus (You can add as many as you want).
|
1 2 3 4 5 6 7 8 9 10 11 12 13 14 15 16 17 18 19 20 21 22 23 |
<?xml version="1.0" encoding="utf-8"?> <menu xmlns:android="http://schemas.android.com/apk/res/android"> <group android:checkableBehavior="single"> <item android:id="@+id/nav_menu1" android:icon="@mipmap/ic_launcher" android:title="Menu 1" /> <item android:id="@+id/nav_menu2" android:icon="@mipmap/ic_launcher" android:title="Menu 2" /> <item android:id="@+id/nav_menu3" android:icon="@mipmap/ic_launcher" android:title="Menu 3" /> </group> </menu> |
- I changed the text to Menu 1, Menu 2 and Menu3 and for icons I used the default android icon. You can use custom icons just paste the icon image inside drawer folder and you can use them.
- If you try to run app now it will give error, as we have changed the menu items and ids. So first go inside MainActivity.java (or the java file for your navigation drawer activity). And modify the overriden method onNavigationItemSelected(MenuItem item) as follows.
|
1 2 3 4 5 6 7 8 9 10 11 12 13 14 15 16 17 18 19 |
@SuppressWarnings("StatementWithEmptyBody") @Override public boolean onNavigationItemSelected(MenuItem item) { // Handle navigation view item clicks here. int id = item.getItemId(); if (id == R.id.nav_menu1) { // Handle the camera action } else if (id == R.id.nav_menu2) { } else if (id == R.id.nav_menu3) { } DrawerLayout drawer = (DrawerLayout) findViewById(R.id.drawer_layout); drawer.closeDrawer(GravityCompat.START); return true; } |
- Here we removed the previous if else conditions and added our own according to the customised menu ids.
- You can also customise the navigation drawer header. For this you need to go to the nav_header_main.xml file. I also changed this file as below.
|
1 2 3 4 5 6 7 8 9 10 11 12 13 14 15 16 17 18 19 20 21 22 23 24 |
<?xml version="1.0" encoding="utf-8"?> <LinearLayout xmlns:android="http://schemas.android.com/apk/res/android" android:layout_width="match_parent" android:layout_height="@dimen/nav_header_height" android:background="@color/colorPrimaryDark" android:gravity="bottom" android:orientation="vertical" android:paddingBottom="@dimen/activity_vertical_margin" android:paddingLeft="@dimen/activity_horizontal_margin" android:paddingRight="@dimen/activity_horizontal_margin" android:paddingTop="@dimen/activity_vertical_margin" android:theme="@style/ThemeOverlay.AppCompat.Dark"> <TextView android:layout_width="match_parent" android:layout_height="wrap_content" android:paddingTop="@dimen/nav_header_vertical_spacing" android:text="Navigation Drawer Example" android:textAppearance="?android:textAppearanceLarge" /> </LinearLayout> |
- Now you can run your application.

- You can see a circular red button in your activity. You can remove it if you do not need it. To remove this button go to app_bar_main.xml inside the layout folder and remove the floating button from there.
|
1 2 3 4 5 6 7 8 9 10 11 12 13 14 15 16 17 18 19 20 21 22 23 24 25 26 27 28 |
<?xml version="1.0" encoding="utf-8"?> <android.support.design.widget.CoordinatorLayout xmlns:android="http://schemas.android.com/apk/res/android" xmlns:app="http://schemas.android.com/apk/res-auto" xmlns:tools="http://schemas.android.com/tools" android:layout_width="match_parent" android:layout_height="match_parent" android:fitsSystemWindows="true" tools:context="net.simplifiedcoding.navigationdrawerexample.MainActivity"> <android.support.design.widget.AppBarLayout android:layout_width="match_parent" android:layout_height="wrap_content" android:theme="@style/AppTheme.AppBarOverlay"> <android.support.v7.widget.Toolbar android:id="@+id/toolbar" android:layout_width="match_parent" android:layout_height="?attr/actionBarSize" android:background="?attr/colorPrimary" app:popupTheme="@style/AppTheme.PopupOverlay" /> </android.support.design.widget.AppBarLayout> <include layout="@layout/content_main" /> </android.support.design.widget.CoordinatorLayout> |
- To remove the default Hello World text view go to the content_main.xml file.
- As we have removed the button we also need to modify the code inside onCreate() method of MainActivity.java so modify it as follow or you will get error.
|
1 2 3 4 5 6 7 8 9 10 11 12 13 14 15 16 17 18 19 20 21 |
@Override protected void onCreate(Bundle savedInstanceState) { super.onCreate(savedInstanceState); setContentView(R.layout.activity_main); Toolbar toolbar = (Toolbar) findViewById(R.id.toolbar); toolbar.setTitle("Menu 1"); setSupportActionBar(toolbar); DrawerLayout drawer = (DrawerLayout) findViewById(R.id.drawer_layout); ActionBarDrawerToggle toggle = new ActionBarDrawerToggle( this, drawer, toolbar, R.string.navigation_drawer_open, R.string.navigation_drawer_close); drawer.setDrawerListener(toggle); toggle.syncState(); NavigationView navigationView = (NavigationView) findViewById(R.id.nav_view); navigationView.setNavigationItemSelectedListener(this); } |
- Now we will create fragments for our navigation menus.
Now whenever we click on a navigation item from the drawer a respective screen should open, for this we will use fragments. As we have three navigation menus we will create three layouts inside our layout folder.
- Right click on layouts folder and create a new layout resource file. I named it fragment_menu_1.xml, fragment_menu_2.xml and fragment_menu_3.xml. Write the following xml code inside all these files.
|
1 2 3 4 5 6 7 8 9 10 11 12 13 14 15 16 17 |
<?xml version="1.0" encoding="utf-8"?> <RelativeLayout xmlns:android="http://schemas.android.com/apk/res/android" android:layout_width="match_parent" android:layout_height="match_parent"> <TextView android:layout_width="wrap_content" android:layout_height="wrap_content" android:textAppearance="?android:attr/textAppearanceLarge" android:text="Menu 1" android:id="@+id/textView" android:layout_centerVertical="true" android:layout_centerHorizontal="true" /> </RelativeLayout> |
- All the three files contains the same code only for the text I changed it to Menu 1, Menu 2 and Menu3 for the respective files.
- You can design the screens according to your application requirement but for now I am justing putting a normal TextView as it is an example demonstrating the concept only.
- So we have the layouts now we will put these screens inside your activity using fragments. For this we need a FrameLayout so go inside content_main.xml file and add a FrameLayout.
|
1 2 3 4 5 6 7 8 9 10 11 12 13 14 15 16 17 18 19 20 21 22 23 |
<?xml version="1.0" encoding="utf-8"?> <RelativeLayout xmlns:android="http://schemas.android.com/apk/res/android" xmlns:app="http://schemas.android.com/apk/res-auto" xmlns:tools="http://schemas.android.com/tools" android:layout_width="match_parent" android:layout_height="match_parent" android:paddingBottom="@dimen/activity_vertical_margin" android:paddingLeft="@dimen/activity_horizontal_margin" android:paddingRight="@dimen/activity_horizontal_margin" android:paddingTop="@dimen/activity_vertical_margin" app:layout_behavior="@string/appbar_scrolling_view_behavior" tools:context="net.simplifiedcoding.navigationdrawerexample.MainActivity" tools:showIn="@layout/app_bar_main"> <FrameLayout android:id="@+id/content_frame" android:layout_width="match_parent" android:layout_height="match_parent" /> </RelativeLayout> |
- Now we will create the Fragments.
- So create 3 java classes inside your package named Menu1, Menu2 and Menu3 and write the following code.
|
1 2 3 4 5 6 7 8 9 10 11 12 13 14 15 16 17 18 19 20 21 22 23 24 25 26 27 28 29 30 31 32 33 34 |
package net.simplifiedcoding.navigationdrawerexample; import android.os.Bundle; import android.support.annotation.Nullable; import android.support.v4.app.Fragment; import android.view.LayoutInflater; import android.view.View; import android.view.ViewGroup; /** * Created by Belal on 18/09/16. */ public class Menu1 extends Fragment { @Nullable @Override public View onCreateView(LayoutInflater inflater, @Nullable ViewGroup container, @Nullable Bundle savedInstanceState) { //returning our layout file //change R.layout.yourlayoutfilename for each of your fragments return inflater.inflate(R.layout.fragment_menu_1, container, false); } @Override public void onViewCreated(View view, @Nullable Bundle savedInstanceState) { super.onViewCreated(view, savedInstanceState); //you can set the title for your toolbar here for different fragments different titles getActivity().setTitle("Menu 1"); } } |
- For the other two classes code will be the same, you only need to change R.layout.fragment_menu_1 with the respective layout file for your fragment.
- Now come inside MainActivity.java and empty the method onNavigationItemSelected(MenuItem item) as follows.
|
1 2 3 4 5 6 7 8 9 |
@SuppressWarnings("StatementWithEmptyBody") @Override public boolean onNavigationItemSelected(MenuItem item) { //make this method blank return true; } |
- Now here we will create one more method named displaySelectedScreen(int itemId).
|
1 2 3 4 5 6 7 8 9 10 11 12 13 14 15 16 17 18 19 20 21 22 23 24 25 26 27 28 29 30 |
private void displaySelectedScreen(int itemId) { //creating fragment object Fragment fragment = null; //initializing the fragment object which is selected switch (itemId) { case R.id.nav_menu1: fragment = new Menu1(); break; case R.id.nav_menu2: fragment = new Menu2(); break; case R.id.nav_menu3: fragment = new Menu3(); break; } //replacing the fragment if (fragment != null) { FragmentTransaction ft = getSupportFragmentManager().beginTransaction(); ft.replace(R.id.content_frame, fragment); ft.commit(); } DrawerLayout drawer = (DrawerLayout) findViewById(R.id.drawer_layout); drawer.closeDrawer(GravityCompat.START); } |
- We will call this method whenever a navigation menu item is selected. So inside onNavigationItemSelected(MenuItem item) we need to add the following line.
|
1 2 3 4 5 6 7 8 9 10 11 |
@SuppressWarnings("StatementWithEmptyBody") @Override public boolean onNavigationItemSelected(MenuItem item) { //calling the method displayselectedscreen and passing the id of selected menu displaySelectedScreen(item.getItemId()); //make this method blank return true; } |
- Now when the activity is first loaded we will display Menu1. For this just add the following line inside onCreate() method of MainActivity.java.
|
1 2 3 4 5 6 7 8 9 10 11 12 13 14 15 16 17 18 19 20 21 22 23 |
@Override protected void onCreate(Bundle savedInstanceState) { super.onCreate(savedInstanceState); setContentView(R.layout.activity_main); Toolbar toolbar = (Toolbar) findViewById(R.id.toolbar); setSupportActionBar(toolbar); DrawerLayout drawer = (DrawerLayout) findViewById(R.id.drawer_layout); ActionBarDrawerToggle toggle = new ActionBarDrawerToggle( this, drawer, toolbar, R.string.navigation_drawer_open, R.string.navigation_drawer_close); drawer.setDrawerListener(toggle); toggle.syncState(); NavigationView navigationView = (NavigationView) findViewById(R.id.nav_view); navigationView.setNavigationItemSelectedListener(this); //add this line to display menu1 when the activity is loaded displaySelectedScreen(R.id.nav_menu1); } |
- So the final code for MainActivity.java is.
|
1 2 3 4 5 6 7 8 9 10 11 12 13 14 15 16 17 18 19 20 21 22 23 24 25 26 27 28 29 30 31 32 33 34 35 36 37 38 39 40 41 42 43 44 45 46 47 48 49 50 51 52 53 54 55 56 57 58 59 60 61 62 63 64 65 66 67 68 69 70 71 72 73 74 75 76 77 78 79 80 81 82 83 84 85 86 87 88 89 90 91 92 93 94 95 96 97 98 99 100 101 102 103 104 105 106 107 108 109 110 111 112 113 114 115 116 117 118 |
package net.simplifiedcoding.navigationdrawerexample; import android.os.Bundle; import android.support.design.widget.FloatingActionButton; import android.support.design.widget.Snackbar; import android.support.v4.app.Fragment; import android.support.v4.app.FragmentTransaction; import android.view.View; import android.support.design.widget.NavigationView; import android.support.v4.view.GravityCompat; import android.support.v4.widget.DrawerLayout; import android.support.v7.app.ActionBarDrawerToggle; import android.support.v7.app.AppCompatActivity; import android.support.v7.widget.Toolbar; import android.view.Menu; import android.view.MenuItem; public class MainActivity extends AppCompatActivity implements NavigationView.OnNavigationItemSelectedListener { @Override protected void onCreate(Bundle savedInstanceState) { super.onCreate(savedInstanceState); setContentView(R.layout.activity_main); Toolbar toolbar = (Toolbar) findViewById(R.id.toolbar); setSupportActionBar(toolbar); DrawerLayout drawer = (DrawerLayout) findViewById(R.id.drawer_layout); ActionBarDrawerToggle toggle = new ActionBarDrawerToggle( this, drawer, toolbar, R.string.navigation_drawer_open, R.string.navigation_drawer_close); drawer.setDrawerListener(toggle); toggle.syncState(); NavigationView navigationView = (NavigationView) findViewById(R.id.nav_view); navigationView.setNavigationItemSelectedListener(this); //add this line to display menu1 when the activity is loaded displaySelectedScreen(R.id.nav_menu1); } @Override public void onBackPressed() { DrawerLayout drawer = (DrawerLayout) findViewById(R.id.drawer_layout); if (drawer.isDrawerOpen(GravityCompat.START)) { drawer.closeDrawer(GravityCompat.START); } else { super.onBackPressed(); } } @Override public boolean onCreateOptionsMenu(Menu menu) { // Inflate the menu; this adds items to the action bar if it is present. getMenuInflater().inflate(R.menu.main, menu); return true; } @Override public boolean onOptionsItemSelected(MenuItem item) { // Handle action bar item clicks here. The action bar will // automatically handle clicks on the Home/Up button, so long // as you specify a parent activity in AndroidManifest.xml. int id = item.getItemId(); //noinspection SimplifiableIfStatement if (id == R.id.action_settings) { return true; } return super.onOptionsItemSelected(item); } private void displaySelectedScreen(int itemId) { //creating fragment object Fragment fragment = null; //initializing the fragment object which is selected switch (itemId) { case R.id.nav_menu1: fragment = new Menu1(); break; case R.id.nav_menu2: fragment = new Menu2(); break; case R.id.nav_menu3: fragment = new Menu3(); break; } //replacing the fragment if (fragment != null) { FragmentTransaction ft = getSupportFragmentManager().beginTransaction(); ft.replace(R.id.content_frame, fragment); ft.commit(); } DrawerLayout drawer = (DrawerLayout) findViewById(R.id.drawer_layout); drawer.closeDrawer(GravityCompat.START); } @SuppressWarnings("StatementWithEmptyBody") @Override public boolean onNavigationItemSelected(MenuItem item) { //calling the method displayselectedscreen and passing the id of selected menu displaySelectedScreen(item.getItemId()); //make this method blank return true; } } |
- Thats it now just run your application.

- Bingo! Its working absolutely fine. If you are having troubles you can get the source code from the below github repository.
Android Navigation Drawer Example Source Code
So thats it for this Android Navigation Drawer Example friends. Feel free to leave your queries by comments. And please do share this post in your social networks if you found it useful. Thank You 🙂


