
In this post, we will build an Android QR Code Scanner Example Project, with Firebase ML Kit.
This guide is part of my “Unlocking the Power of Machine Learning: ML-Kit’s Vision API on Android” course, which is absolutely free and you can check the full playlist below.
Table of Contents
Introduction
For building this Android QR Code Scanner project, we will be using
CameraX
It is a Jetpack Library, that helps in developing camera apps. For our Android QR Code Scanner, we need Camera, and for the camera part of this project we will use CameraX.
ML-Kit’s Barcode Scanning API
It is Google’s Mobile SDK for machine learning. With ML-Kit we can use many Machine Learning APIs of Google. Barcode Scanning is one of the APIs of ML-Kit that we are going to use for building this project.
Project Setup
Ok, now after enough overview, let’s get started.
- Create an Empty Project using the Empty Activity template in Android Studio.
- Now open the app/build.gradle file and put the following dependencies in the dependencies block.
|
1 2 3 4 5 6 |
implementation "com.google.mlkit:barcode-scanning:17.0.3" implementation "androidx.camera:camera-camera2:1.2.1" implementation "androidx.camera:camera-lifecycle:1.2.1" implementation "androidx.camera:camera-view:1.2.1" |
- We have added the required dependencies for this project.
- Now enable viewBinding for the project.
|
1 2 3 4 5 |
buildFeatures { viewBinding true } |
QR Code Scanner App Structure
This project contains two activities
- MainActivity: It is the entry point of our application. Here we have an area to display the QR Data and a Button to launch the QR Scanner.
- ScannerActivity: It is the main activity where the actual QR Scanner will happen. I have created a separate activity for the scanner because now you can reuse it anywhere you need to scan the QR Code. You can launch this activity and get the QR Data back. (Shortly you will understand how).
Now let’s start with the ScannerActivity.
Scanner Activity to Scan QR Code
Create a new Empty Activity in your project. It is our Scanner Activity, so we must show Camera Preview on this screen.
For displaying Camera Preview, we need PreviewView. So inside the layout file for this activity (activity_scanner.xml) put the following XML code.
|
1 2 3 4 5 6 7 8 9 10 11 12 13 14 15 16 17 18 19 20 |
<?xml version="1.0" encoding="utf-8"?> <androidx.constraintlayout.widget.ConstraintLayout xmlns:android="http://schemas.android.com/apk/res/android" xmlns:app="http://schemas.android.com/apk/res-auto" xmlns:tools="http://schemas.android.com/tools" android:layout_width="match_parent" android:layout_height="match_parent" tools:context=".ScannerActivity"> <androidx.camera.view.PreviewView android:id="@+id/preview_view" android:layout_width="match_parent" android:layout_height="match_parent" app:layout_constraintBottom_toBottomOf="parent" app:layout_constraintEnd_toEndOf="parent" app:layout_constraintStart_toStartOf="parent" app:layout_constraintTop_toTopOf="parent" /> </androidx.constraintlayout.widget.ConstraintLayout> |
As you can see in the above design we just have a PreviewView, but if you need you can put more effort into designing an awesome-looking Scanner Screen.
I want to use this activity as a Stand Alone activity that will just Scan the QR and give the Scanned Data. And that is why I will define a companion object here, because I want to call a function to start this scanner.
|
1 2 3 4 5 6 7 8 9 10 11 12 13 |
companion object { private val TAG = ScannerActivity::class.simpleName private var onScan: ((barcodes: List<Barcode>) -> Unit)? = null fun startScanner(context: Context, onScan: (barcodes: List<Barcode>) -> Unit) { this.onScan = onScan Intent(context, ScannerActivity::class.java).also { context.startActivity(it) } } } |
In the above code, you can see we have TAG (for logging purposes), and then we have onScan: ((barcodes: List<Barcode>) -> Unit)? = null. We can call this onScan() to send the result back to calling place.
Finally, inside the function startScanner() I am assigning the onScan value and starting the ScannerActivity. This way whenever we need to start the scanner we can use the following code.
|
1 2 3 4 5 6 7 |
fun startScanner() { ScannerActivity.startScanner(this) { barcodes -> } } |
Here inside the trailing lambda, we will get the scanned barcode.
Please note that, opening this ScannerActivity requires Camera Permission, and I am assuming here that the caller has got the camera permission already before starting this activity.
Now let’s make our QR Scanner.
Remember that in this project we are using viewBinding, which means first you need to change your Empty Activity as below.
|
1 2 3 4 5 6 7 8 9 10 11 12 |
class ScannerActivity : AppCompatActivity() { private lateinit var binding: ActivityScannerBinding override fun onCreate(savedInstanceState: Bundle?) { super.onCreate(savedInstanceState) binding = ActivityScannerBinding.inflate(layoutInflater) setContentView(binding.root) } } |
Now we need a few objects in our Scanner Activity.
|
1 2 3 4 5 6 7 |
private lateinit var cameraSelector: CameraSelector private lateinit var cameraProviderFuture: ListenableFuture<ProcessCameraProvider> private lateinit var processCameraProvider: ProcessCameraProvider private lateinit var cameraPreview: Preview private lateinit var imageAnalysis: ImageAnalysis |
Let’s describe every object one by one.
- CameraSelector: It is needed because in almost all devices we have two cameras (Front Facing and Rear Facing). For this example, we will use the Rear Facing camera only.
- ListenableFuture<ProcessCameraProvider>: The class ProcessCameraProvider provides a listenable future that returns ProcessCameraProvider.
- ProcessCameraProvider: We need to ProcessCameraProvider instance to show the Camera Preview and Scan the QR. We will get its instance from the ListenableFuture<ProcessCameraProvider> instance.
- Preview: It is required to display the Camera Preview.
- ImageAnalysis: All the above instances are related to Camera only, but ImageAnalysis is the main object which is needed to analyse the camera images to read QR Codes if any.
Now let’s get the ProcessCameraProvider inside the onCreate() function.
|
1 2 3 4 5 6 7 8 9 10 11 12 13 14 15 16 17 18 19 20 21 22 23 24 |
override fun onCreate(savedInstanceState: Bundle?) { super.onCreate(savedInstanceState) binding = ActivityScannerBinding.inflate(layoutInflater) setContentView(binding.root) cameraSelector = CameraSelector.Builder().requireLensFacing(CameraSelector.LENS_FACING_BACK).build() cameraProviderFuture = ProcessCameraProvider.getInstance(this) cameraProviderFuture.addListener( { try { processCameraProvider = cameraProviderFuture.get() bindCameraPreview() bindInputAnalyser() } catch (e: ExecutionException) { Log.e(TAG, "Unhandled exception", e) } catch (e: InterruptedException) { Log.e(TAG, "Unhandled exception", e) } }, ContextCompat.getMainExecutor(this) ) } |
In the above code, you can see we got the processCameraProvider from the cameraProviderFuture ( processCameraProvider = cameraProviderFuture.get()).
And after getting the processCameraProvider, we are calling two functions.
- bindCameraPreview(): This function will bind the camera preview to the PreviewView that we created in the layout file.
- bindInputAnalyser: This function will bind the Input Analyser, which will actually get the QR Data from the camera images if any.
Now let’s code the bindCameraPreview() .
|
1 2 3 4 5 6 7 8 9 10 11 12 13 14 15 |
private fun bindCameraPreview() { cameraPreview = Preview.Builder() .setTargetRotation(binding.previewView.display.rotation) .build() cameraPreview.setSurfaceProvider(binding.previewView.surfaceProvider) try { processCameraProvider.bindToLifecycle(this, cameraSelector, cameraPreview) } catch (illegalStateException: IllegalStateException) { Log.e(TAG, illegalStateException.message ?: "IllegalStateException") } catch (illegalArgumentException: IllegalArgumentException) { Log.e(TAG, illegalArgumentException.message ?: "IllegalArgumentException") } } |
In the above function, we performed the following operation.
- Initialized cameraPreview using Preview.Builder() .
- We set the PreviewSurface.
- We bound the processCameraProvider to LifeCycle and here we are passing the current activity, cameraSelection and the cameraPreview.
We have the Camera Preview ready.
Now let’s complete the bindInputAnalyser().
|
1 2 3 4 5 6 7 8 9 10 11 12 13 14 15 16 17 18 19 20 21 22 23 24 25 26 |
private fun bindInputAnalyser() { val barcodeScanner: BarcodeScanner = BarcodeScanning.getClient( BarcodeScannerOptions.Builder() .setBarcodeFormats(Barcode.FORMAT_QR_CODE) .build() ) imageAnalysis = ImageAnalysis.Builder() .setTargetRotation(binding.previewView.display.rotation) .build() val cameraExecutor = Executors.newSingleThreadExecutor() imageAnalysis.setAnalyzer(cameraExecutor) { imageProxy -> processImageProxy(barcodeScanner, imageProxy) } try { processCameraProvider.bindToLifecycle(this, cameraSelector, imageAnalysis) } catch (illegalStateException: IllegalStateException) { Log.e(TAG, illegalStateException.message ?: "IllegalStateException") } catch (illegalArgumentException: IllegalArgumentException) { Log.e(TAG, illegalArgumentException.message ?: "IllegalArgumentException") } } |
Here we did the following things.
- Got the BarCodeScanning Client, here the getClient() function takes BarcodeScannerOptions and for the option, we are setting the Barcode Format as Barcode.FORMAT_QR_CODE as we want to scan QR Codes.
- Built the imageAnalysis object using ImageAnalysis.Builder() it is needed to analyse the camera images for QR Code.
- Called setAnalyzer() function from imageAnalysis, and here inside the trailing lambda, we get the imageProxy that we will process and find the QR Code if any. (We need to define the processImageProxy() function)
- Finally, we are again binding the processCameraProvider but this time the last parameter is imageAnalysis to analyze camera images for QR Code.
Now let’s define the processImageProxy() function.
|
1 2 3 4 5 6 7 8 9 10 11 12 13 14 15 16 17 18 19 20 21 22 23 |
private fun processImageProxy( barcodeScanner: BarcodeScanner, imageProxy: ImageProxy ) { val inputImage = InputImage.fromMediaImage(imageProxy.image!!, imageProxy.imageInfo.rotationDegrees) barcodeScanner.process(inputImage) .addOnSuccessListener { barcodes -> if (barcodes.isNotEmpty()) { onScan?.invoke(barcodes) onScan = null finish() } } .addOnFailureListener { Log.e(TAG, it.message ?: it.toString()) }.addOnCompleteListener { imageProxy.close() } } |
In the above function, we did the following thing.
- First, we got the inputImage from ImageProxy.
- Then with the help of barcodeScanner we processed the inputImage.
- Inside the success callback, if we have one or more barcodes, we are making the call to onScan which will send the result to the caller. And after this, we are also finishing the current activity.
- Inside the complete listener, we are closing the imageProxy.
- Inside the failure listener, we are logging the failure.
Now let’s complete the MainActivity that will launch our Scanner.
Launching QR Scanner
The entry point to our application is MainActivity. This activity is responsible to launch the scanner, and for this, we need to perform the following things.
- Ask Camera Permissions
- If Camera Permission is Granted, launch the Scanner Activity.
- Show the QR Data that is scanned using Scanner Activity.
Let’s first start with designing the UI.
Put the following XML code in your activity_main.xml file.
|
1 2 3 4 5 6 7 8 9 10 11 12 13 14 15 16 17 18 19 20 21 22 23 24 25 26 27 28 29 30 31 32 33 34 35 36 37 38 39 40 41 42 43 44 45 46 47 48 49 50 51 52 53 54 55 56 57 58 59 60 61 62 63 64 65 66 |
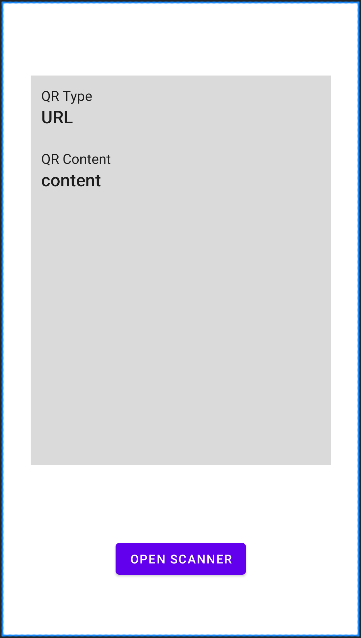
<?xml version="1.0" encoding="utf-8"?> <androidx.constraintlayout.widget.ConstraintLayout xmlns:android="http://schemas.android.com/apk/res/android" xmlns:app="http://schemas.android.com/apk/res-auto" xmlns:tools="http://schemas.android.com/tools" android:layout_width="match_parent" android:layout_height="match_parent" tools:context=".MainActivity"> <LinearLayout android:layout_width="match_parent" android:layout_height="450dp" android:layout_marginStart="32dp" android:layout_marginTop="32dp" android:layout_marginEnd="32dp" android:layout_marginBottom="32dp" android:background="#DADADA" android:orientation="vertical" android:padding="12dp" app:layout_constraintBottom_toTopOf="@+id/button_open_scanner" app:layout_constraintEnd_toEndOf="parent" app:layout_constraintStart_toStartOf="parent" app:layout_constraintTop_toTopOf="parent"> <TextView style="@style/TextAppearance.AppCompat.Subhead" android:layout_width="match_parent" android:layout_height="wrap_content" android:text="QR Type" /> <TextView android:id="@+id/text_view_qr_type" style="@style/TextAppearance.AppCompat.Title" android:layout_width="match_parent" android:layout_height="wrap_content" android:text="URL" /> <TextView style="@style/TextAppearance.AppCompat.Subhead" android:layout_width="match_parent" android:layout_height="wrap_content" android:layout_marginTop="24dp" android:text="QR Content" /> <TextView android:id="@+id/text_view_qr_content" style="@style/TextAppearance.AppCompat.Title" android:layout_width="match_parent" android:layout_height="wrap_content" android:text="content" /> </LinearLayout> <Button android:id="@+id/button_open_scanner" android:layout_width="wrap_content" android:layout_height="wrap_content" android:layout_marginBottom="64dp" android:text="Open Scanner" app:layout_constraintBottom_toBottomOf="parent" app:layout_constraintEnd_toEndOf="parent" app:layout_constraintStart_toStartOf="parent" /> </androidx.constraintlayout.widget.ConstraintLayout> |
With the above XML code you will see the following UI.
In this activity, we will display the Type and Content of the QR Code. And it is actually very easy because all the work is already done in the Scanner Activity. We just need to define the following function.
|
1 2 3 4 5 6 7 8 9 10 11 12 13 14 15 16 17 18 19 20 21 22 |
private fun startScanner() { ScannerActivity.startScanner(this) { barcodes -> barcodes.forEach { barcode -> when (barcode.valueType) { Barcode.TYPE_URL -> { binding.textViewQrType.text = "URL" binding.textViewQrContent.text = barcode.url.toString() } Barcode.TYPE_CONTACT_INFO -> { binding.textViewQrType.text = "Contact" binding.textViewQrContent.text = barcode.contactInfo.toString() } else -> { binding.textViewQrType.text = "Other" binding.textViewQrContent.text = barcode.rawValue.toString() } } } } } |
As you can see in the above code snippet, we just started the scanner and in the trailing lambda, we are displaying the barcode content to the UI. Simple and Straightforward. We can call this function on the button click, but an important thing needed is the Camera Permission and we need to handle asking for Camera Permission in this activity.
I won’t discuss runtime permissions in this post, as it is a separate topic that we will cover in another post. But for now, here is my MainActivity.
|
1 2 3 4 5 6 7 8 9 10 11 12 13 14 15 16 17 18 19 20 21 22 23 24 25 26 27 28 29 30 31 32 33 34 35 36 37 38 39 40 41 42 43 44 45 46 47 48 49 50 51 52 53 54 55 56 57 58 59 60 61 62 63 64 65 |
class MainActivity : AppCompatActivity() { private val cameraPermission = android.Manifest.permission.CAMERA private lateinit var binding: ActivityMainBinding private val requestPermissionLauncher = registerForActivityResult(RequestPermission()) { isGranted -> if (isGranted) { startScanner() } } override fun onCreate(savedInstanceState: Bundle?) { super.onCreate(savedInstanceState) binding = ActivityMainBinding.inflate(layoutInflater) setContentView(binding.root) binding.buttonOpenScanner.setOnClickListener { requestCameraAndStartScanner() } } private fun requestCameraAndStartScanner() { if (isPermissionGranted(cameraPermission)) { startScanner() } else { requestCameraPermission() } } private fun requestCameraPermission() { when { shouldShowRequestPermissionRationale(cameraPermission) -> { cameraPermissionRequest( positive = { openPermissionSetting() } ) } else -> { requestPermissionLauncher.launch(cameraPermission) } } } private fun startScanner() { ScannerActivity.startScanner(this) { barcodes -> barcodes.forEach { barcode -> when (barcode.valueType) { Barcode.TYPE_URL -> { binding.textViewQrType.text = "URL" binding.textViewQrContent.text = barcode.url.toString() } Barcode.TYPE_CONTACT_INFO -> { binding.textViewQrType.text = "Contact" binding.textViewQrContent.text = barcode.contactInfo.toString() } else -> { binding.textViewQrType.text = "Other" binding.textViewQrContent.text = barcode.rawValue.toString() } } } } } } |
Make sure you add Camera Permission in the Manifest File as well.
|
1 2 3 |
<uses-permission android:name="android.permission.CAMERA" /> |
Now, try the application and scan some QR Codes.
Android QR Code Scanner Source Code
In case you need my source code then you can get it from the following GitHub Repository.
Android QR Code Scanner Source Code
So that is all for this post friends, make sure you tell your friends about this tutorial. Thank You


