
Hello friends, today we will see a simple SQLite CRUD Example in Android using ActiveAndroid Library. I have also posted about SQLite CRUD Example in Android before. But in this post we will do it using ActiveAndroid Library. You can check the previous tutorials about SQLite from below.
- Android SQLite Database Tutorial – Insert Into SQLite DB
- How to Fetch Data From SQLite Database In Android?
- SQLite Database In Android Using SQLiteOpenHelper Class
What is ActiveAndroid Library?
It is an android library which allows you to perform SQLite Database operations without writing even a single SQL statement.
The best thing of using this library for SQLite operation in your application is it will simplify the SQLite operation. You don’t need to write SQL statements. And you can perform SQLite operations very easily.
SQLite CRUD Example in Android using ActiveAndroid Library
So lets begin our tutorial of SQLite CRUD Example for Android using ActiveAndroid Library. So the first thing we need to do is create a new Android Project. And follow the below given steps.
Adding ActiveAndroid Library to your Android Project
- In the project you just created go to the project level build.gradle file and add these two lines inside allprojects block.
|
1 2 3 4 5 6 7 8 9 10 |
allprojects { repositories { jcenter() //Add these two lines mavenCentral() maven { url "https://oss.sonatype.org/content/repositories/snapshots/" } } } |
- Now come to app level build.gradle file and inside dependencies block add the following line.
|
1 2 3 4 5 6 7 8 9 10 |
dependencies { compile fileTree(dir: 'libs', include: ['*.jar']) testCompile 'junit:junit:4.12' compile 'com.android.support:appcompat-v7:23.4.0' //Add this line compile 'com.michaelpardo:activeandroid:3.1.0-SNAPSHOT' } |
- Sync your project now and its done.
Initializing ActiveAndroid Library in Your Project
- First add the following meta tags inside your AndroidManifest.xml (If you are getting confused then in bottom you can see the whole AndroidManifest.xml file).
|
1 2 3 4 |
<meta-data android:name="AA_DB_NAME" android:value="MyDatabase.db" /> <meta-data android:name="AA_DB_VERSION" android:value="5" /> |
- Create a class named MyApplication to initialize ActiveAndroid library. This class will be launched on the application launch.
- Write the following code in this class.
|
1 2 3 4 5 6 7 8 9 10 11 12 13 14 15 16 17 18 19 20 21 22 |
package net.simplifiedcoding.activeandroid; import android.app.Application; import com.activeandroid.ActiveAndroid; /** * Created by Belal on 5/26/2016. */ public class MyApplication extends Application { @Override public void onCreate() { super.onCreate(); //Initializing Active Android ActiveAndroid.initialize(this); } } |
- Now you have to define the above class in your AndroidManifest.xml file. To do this add the following code inside application tag.
|
1 2 3 4 5 6 |
<application android:name=".MyApplication" . . |
Creating Table Model
- To create table using ActiveAndroid library you need to create a class that will extend the Model class. In this post I will create a small table named Inventory.
Create a class named Inventory and write the following code.
|
1 2 3 4 5 6 7 8 9 10 11 12 13 14 15 16 17 18 19 20 21 22 23 |
package net.simplifiedcoding.activeandroid; import com.activeandroid.Model; import com.activeandroid.annotation.Column; import com.activeandroid.annotation.Table; import java.util.List; /** * Created by Belal on 5/26/2016. */ //This is our table name @Table(name = "Inventory") public class Inventory extends Model { //The table consist only one field name @Column(name = "name") public String name; } |
- If you want to add more columns just repeat the code by changing name value and variable name. You also need to define your models inside manifest. So for the above model write the following meta data inside AndroidManifest.xml.
|
1 2 3 4 5 |
<meta-data android:name="AA_MODELS" android:value="net.simplifiedcoding.activeandroid.Inventory" /> |
Performing SQLite CRUD
- The first thing in CRUD is C means create. So we need a User interface to Create a new Inventory. For this we will create a simple layout as shown below.

- To make the above layout use the following xml code and paste it to your activity_main.xml file.
|
1 2 3 4 5 6 7 8 9 10 11 12 13 14 15 16 17 18 19 20 21 22 23 24 25 26 27 28 29 30 31 32 33 34 35 36 37 38 39 40 41 42 43 44 |
<?xml version="1.0" encoding="utf-8"?> <LinearLayout xmlns:android="http://schemas.android.com/apk/res/android" xmlns:tools="http://schemas.android.com/tools" android:layout_width="match_parent" android:layout_height="match_parent" android:orientation="vertical" android:paddingBottom="@dimen/activity_vertical_margin" android:paddingLeft="@dimen/activity_horizontal_margin" android:paddingRight="@dimen/activity_horizontal_margin" android:paddingTop="@dimen/activity_vertical_margin" tools:context="net.simplifiedcoding.activeandroid.MainActivity"> <!-- from this edit text we will get the inventory name to store in sqlite--> <EditText android:id="@+id/editTextInventoryName" android:hint="Enter Inventory Name" android:layout_width="match_parent" android:layout_height="wrap_content" /> <!-- We will store the input name in sqlite when user will press this button --> <Button android:id="@+id/buttonSaveInventory" android:text="Add Inventory" android:layout_width="match_parent" android:layout_height="wrap_content" /> <!-- a normal textview for displaying heading --> <TextView android:textAlignment="center" android:layout_width="match_parent" android:layout_height="wrap_content" android:textAppearance="?android:attr/textAppearanceLarge" android:text="Inventories" /> <!-- this listview will show all the inventories stored in sqlite --> <ListView android:id="@+id/listViewInventories" android:layout_width="match_parent" android:layout_height="wrap_content"> </ListView> </LinearLayout> |
- We can use the following code to save name to SQLite.
|
1 2 3 4 5 6 7 8 9 10 11 12 13 14 15 16 17 18 19 20 21 22 |
private void saveInventory() { //Getting name from editText String name = editTextInventoryName.getText().toString().trim(); //Checking if name is blank if (name.equalsIgnoreCase("")) { Toast.makeText(this, "Please enter a name", Toast.LENGTH_LONG).show(); return; } //If name is not blank creating a new Inventory object Inventory inventory = new Inventory(); //Adding the given name to inventory name inventory.name = name; //Saving name to sqlite database inventory.save(); //Displaying a toast message for successfull insertion Toast.makeText(this, "Inventory Saved Successfully", Toast.LENGTH_LONG).show(); } |
- As you can see how simple it is. We haven’t written a single SQL Query to store to database. Now lets move to the R in CRUD, which stands for READING from database. To read from database we can use the following code.
|
1 2 3 4 5 6 7 8 9 |
private List<Inventory> getAll() { //Getting all items stored in Inventory table return new Select() .from(Inventory.class) .orderBy("Name ASC") .execute(); } |
- By using it I have made my activity little enhanced like when you add an item to the inventory it will be displayed in the listview we created. The final code I have written is below.
|
1 2 3 4 5 6 7 8 9 10 11 12 13 14 15 16 17 18 19 20 21 22 23 24 25 26 27 28 29 30 31 32 33 34 35 36 37 38 39 40 41 42 43 44 45 46 47 48 49 50 51 52 53 54 55 56 57 58 59 60 61 62 63 64 65 66 67 68 69 70 71 72 73 74 75 76 77 78 79 80 81 82 83 84 85 86 87 88 89 90 91 92 93 94 95 96 97 98 99 100 101 102 103 104 105 106 107 108 109 110 111 112 113 114 115 116 117 118 119 120 |
package net.simplifiedcoding.activeandroid; import android.support.v7.app.AlertDialog; import android.support.v7.app.AppCompatActivity; import android.os.Bundle; import android.view.LayoutInflater; import android.view.View; import android.widget.AdapterView; import android.widget.ArrayAdapter; import android.widget.Button; import android.widget.EditText; import android.widget.ListView; import android.widget.TextView; import android.widget.Toast; import com.activeandroid.ActiveAndroid; import com.activeandroid.query.Select; import java.util.ArrayList; import java.util.List; public class MainActivity extends AppCompatActivity implements View.OnClickListener { //Creating Views private EditText editTextInventoryName; private Button buttonSaveInventory; private ListView listViewInventories; //Array list for storing all the inventoryItems private ArrayList<String> inventoryItems; //Adapter for listview private ArrayAdapter inventoryItemsAdapter; @Override protected void onCreate(Bundle savedInstanceState) { super.onCreate(savedInstanceState); setContentView(R.layout.activity_main); //Initializing views editTextInventoryName = (EditText) findViewById(R.id.editTextInventoryName); buttonSaveInventory = (Button) findViewById(R.id.buttonSaveInventory); listViewInventories = (ListView) findViewById(R.id.listViewInventories); //Initializing arraylist inventoryItems = new ArrayList<>(); //Adding listener to button buttonSaveInventory.setOnClickListener(this); //calling method to display the inventory list showInventoryList(); } private List<Inventory> getAll() { //Getting all items stored in Inventory table return new Select() .from(Inventory.class) .orderBy("Name ASC") .execute(); } private void showInventoryList() { //Creating a list and getting all inventories from the method List<Inventory> inventories = getAll(); //Adding all the items of the inventories to arraylist for (int i = 0; i < inventories.size(); i++) { Inventory inventory = inventories.get(i); inventoryItems.add(inventory.name); } //Creating our adapter inventoryItemsAdapter = new ArrayAdapter<String>(this, android.R.layout.simple_list_item_1, inventoryItems); //Adding adapter to listview listViewInventories.setAdapter(inventoryItemsAdapter); //Updating the inventory list updateInventoryList(); } private void saveInventory() { //Getting name from editText String name = editTextInventoryName.getText().toString().trim(); //Checking if name is blank if (name.equalsIgnoreCase("")) { Toast.makeText(this, "Please enter a name", Toast.LENGTH_LONG).show(); return; } //If name is not blank creating a new Inventory object Inventory inventory = new Inventory(); //Adding the given name to inventory name inventory.name = name; //Saving name to sqlite database inventory.save(); inventoryItems.add(name); Toast.makeText(this, "Inventory Saved Successfully", Toast.LENGTH_LONG).show(); } private void updateInventoryList() { inventoryItemsAdapter.notifyDataSetChanged(); } @Override public void onClick(View v) { saveInventory(); } } |
- The final AndroidManifest.xml is
|
1 2 3 4 5 6 7 8 9 10 11 12 13 14 15 16 17 18 19 20 21 22 23 24 25 26 27 28 29 30 31 32 |
<?xml version="1.0" encoding="utf-8"?> <manifest xmlns:android="http://schemas.android.com/apk/res/android" package="net.simplifiedcoding.activeandroid"> <application android:name=".MyApplication" android:allowBackup="true" android:icon="@mipmap/ic_launcher" android:label="@string/app_name" android:supportsRtl="true" android:theme="@style/AppTheme"> <meta-data android:name="AA_DB_NAME" android:value="MyDatabase.db" /> <meta-data android:name="AA_DB_VERSION" android:value="5" /> <meta-data android:name="AA_MODELS" android:value="net.simplifiedcoding.activeandroid.Inventory" /> <activity android:name=".MainActivity"> <intent-filter> <action android:name="android.intent.action.MAIN" /> <category android:name="android.intent.category.LAUNCHER" /> </intent-filter> </activity> </application> </manifest> |
- Now run your app and you will see the following output.
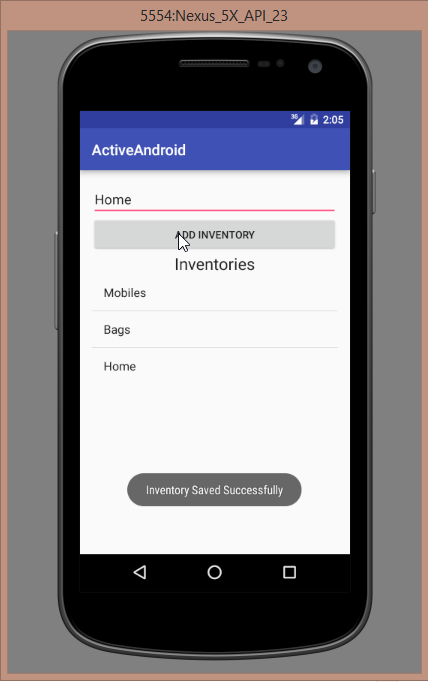
- Bingo! its working fine. So I am wrapping up this post here. We have done half C and R (Create and Read) in the next tutorial we will do U and D (Update and Delete).
- If you are having trouble you can get my source code from the link given below.
[sociallocker id=1372] SQLite CRUD Example in Android Source Code [/sociallocker]
So thats all for this SQLite CRUD Example in Android friends. Leave your comments if having any confusions regarding this SQLite CRUD Example in Android Tutorial. Thank You 🙂


