
Believe it or not, but Jetpack Compose is the future of android development. I’ve already published a crash course on jetpack compose so that you can quickly get started with it. In this post, I will walk you through pagination in Jetpack Compose. As you might already know; now we have paging 3 in AndroidX. Paging 3 integrates very cleanly with the existing recommended app architecture and the jetpack libraries. If you are willing to know how to use it with jetpack compose then this article is for you.
Table of Contents
Before we start
A lot of other things are needed for this project. For example, I require paginated data, and for this, I am using a dummy API using dummyapi.io. As the project requires API integration, I am using Retrofit here. I am using many other things; so let’s first list them out.
- Retrofit for Network Calls
- Coil for Image Loading
- Hilt for Dependency Injection
- ViewModel and Coroutine Flows
I don’t want to make this article long and complicated and that is the reason I am not going to cover the above-mentioned things. And another reason is I’ve already covered these things. But to make things easier for you I’ve created a repository for the project on GitHub. The repository has two branches, the first one is the start branch, and I would suggest that you should clone the repository and start from the code that is already in the start branch. The finished code can be found in the final branch.
Clone the repository from here.
Now we can move ahead. When you clone the repositories all the dependencies are already added and everything required to get the paginated data from the API is already setup so let’s quickly jump to the main thing.
Creating a Paging Source
The first step requires creating a Paging Data Source, and we do it by writing an implementation of PagingSource<Key, Value> . It includes load() function where we need to define how to retrieve paged data. In our case we will, call the API https://dummyapi.io/data/v1/user?page=1&limit=10 to get the data. As you can see in the API I am passing the page value as a query parameter. All the API call implementations are already written in the project that you just cloned. If you go to the project there is a UserRepository implementation that contains the function getUser() and we need to call this function inside our PagingSource implementation.
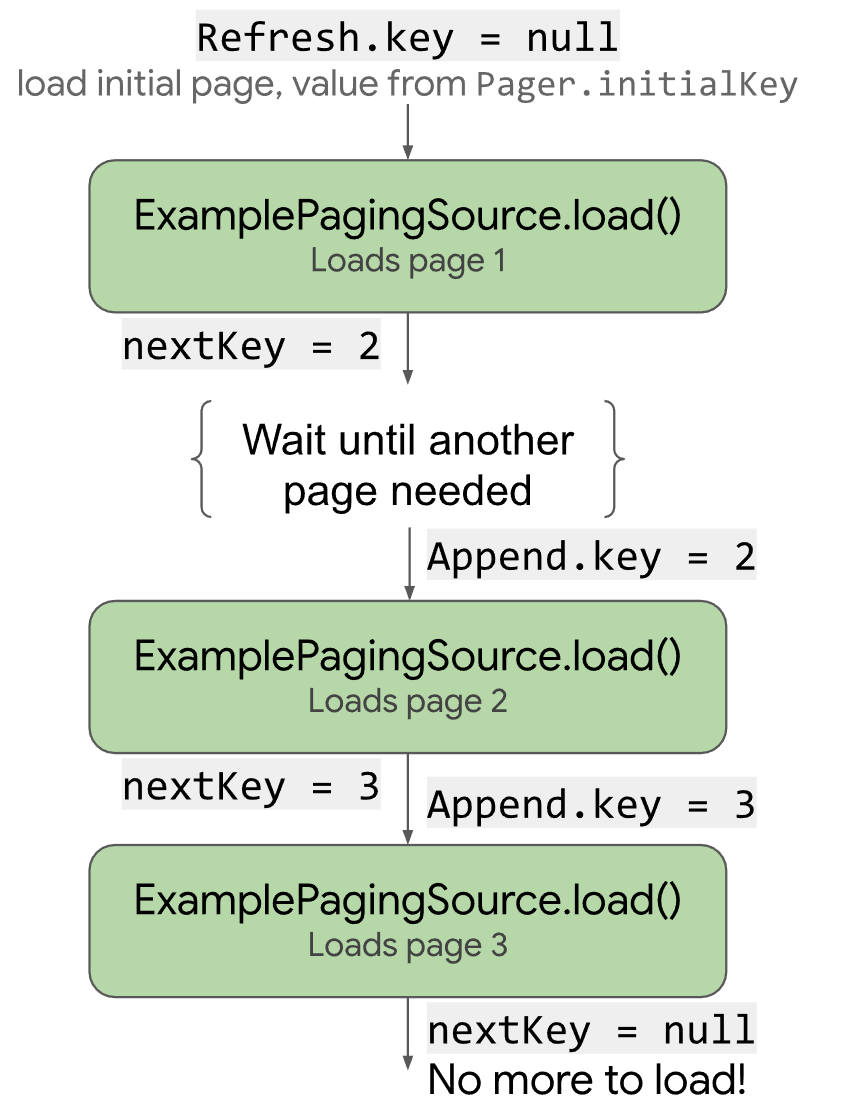
The following image defines how the PagingSource loads the paginated data.
Now let’s define our PagingSource, and for this I’ve created this class.
|
1 2 3 4 5 6 7 8 9 10 11 12 13 14 15 16 17 18 19 20 21 22 23 24 25 26 27 |
class UsersDataSource( private val repo: UserRepository ) : PagingSource<Int, User>() { override fun getRefreshKey(state: PagingState<Int, User>): Int? { return state.anchorPosition?.let { anchorPosition -> val anchorPage = state.closestPageToPosition(anchorPosition) anchorPage?.prevKey?.plus(1) ?: anchorPage?.nextKey?.minus(1) } } override suspend fun load(params: LoadParams<Int>): LoadResult<Int, User> { return try { val nextPageNumber = params.key ?: 1 val response = repo.getUsers(nextPageNumber, 10) LoadResult.Page( data = response.users, prevKey = null, nextKey = if (response.users.isNotEmpty()) response.page + 1 else null ) } catch (e: Exception) { LoadResult.Error(e) } } } |
Now let’s understand the two overridden function defined in the above PagingSource .
-
getRefreshKey() : For simplicity, you can consider the key as the page number, and this function will return the page number that is needed. The page number can be null if no pages have been loaded.
if prev is null; we are on the first page.
if next is null; we are at the last page.
if both are null; nothing has loaded and we are at the initial page. - load() : This is the main function that will actually load the paged data. This returns LoadResult<Key, Value> . As you can see here we are calling the getUsers() from our repository and wrapping the result with LoadResult . And in case of any error, we can return LoadResult.Error .
Now with the help of this PagingSource , we will define a pager inside our ViewModel.
Pager
Defining a pager is very easy; just come inside the MainViewModel class and write the following code.
|
1 2 3 4 5 6 7 8 9 10 11 12 |
@HiltViewModel class MainViewModel @Inject constructor( private val repo: UserRepository ) : ViewModel() { val usersPager = Pager(PagingConfig(pageSize = 20)) { UsersDataSource(repo) }.flow.cachedIn(viewModelScope) } |
In the above code usersPager is a Flow of PagingData, and we will collect it inside our composable function. The flow is cached in viewModelScope, using a predefined scope helps to avoid memory leaks.
Paginated List
Rendering paginated list is very similar as rendering a normal list. You can check jetpack compose recycler view, to understand it in detail.
|
1 2 3 4 5 6 7 8 9 10 11 12 13 14 15 16 17 18 19 20 21 22 23 24 25 26 |
@Composable fun User(viewModel: MainViewModel) { val usersData = viewModel.usersPager.collectAsLazyPagingItems() LazyColumn { items(usersData) { user -> user?.let { UserCard(user = it) } } when (usersData.loadState.append) { is LoadState.NotLoading -> Unit LoadState.Loading -> { item { LoadingItem() } } is LoadState.Error -> { item { ErrorItem(message = (usersData.loadState.append as LoadState.Error).error.message.toString()) } } } } } |
As you can see we just need to use collectAsLazyPagingItems() to collect the flow from viewModel. And to create the list we use the same LazyColumn. One more thing I am doing here is I am displaying the ProgressBar at the bottom when the list loads a new page. And I am also showing an error item at the bottom of the list; if there is any error loading a page. You can use the following composables for these two things.
|
1 2 3 4 5 6 7 8 9 10 11 12 13 14 15 16 17 18 19 20 21 22 23 24 25 26 27 28 29 30 31 32 33 34 35 36 37 |
@Composable fun ErrorItem(message: String) { Card( elevation = 2.dp, modifier = Modifier .padding(6.dp) .fillMaxWidth() .wrapContentHeight() ) { Row( modifier = Modifier .fillMaxWidth() .background(Color.Red) .padding(8.dp) ) { Image( modifier = Modifier .clip(CircleShape) .width(42.dp) .height(42.dp), painter = painterResource(id = R.drawable.ic_error), contentDescription = "", colorFilter = ColorFilter.tint(Color.White) ) Text( color = Color.White, text = message, fontSize = 16.sp, modifier = Modifier .padding(start = 12.dp) .align(CenterVertically) ) } } } |
Now finally in the MainActivity call the User Composable.
|
1 2 3 4 5 6 7 8 9 10 11 12 13 14 15 16 17 18 19 20 21 22 |
@AndroidEntryPoint class MainActivity : ComponentActivity() { private val viewModel by viewModels<MainViewModel>() override fun onCreate(savedInstanceState: Bundle?) { super.onCreate(savedInstanceState) setContent { PagingSampleTheme { // A surface container using the 'background' color from the theme Surface( modifier = Modifier.fillMaxSize(), color = MaterialTheme.colors.background ) { User(viewModel = viewModel) } } } } } |
Now you can try running the application. It should work. And you can see the working application in the following video tutorial.
Source code can be found in the same repository you just need to switch to a different branch. That is all for this post friends; in case you have any confusion please leave your comments and I will try to help you out. Thank You 🙂


