
In the last android retrofit tutorial I explained how to retrieve JSON using HTTP GET request. In this android retrofit tutorial we will use post request.
So today we will insert some values from our android app to our MySQL Database.
In this tutorial I will be using Hostinger. Though you can use any hosting or local server (using wamp/xampp) as well.
So lets begin our android retrofit post request example. 🙂
Retrofit Android Tutorial – Using Retrofit 2.2 with PHP Restful API
Creating MySQL Database and PHP Scripts
- As I told that I am using Hostinger. And this is the snapshot of my database.
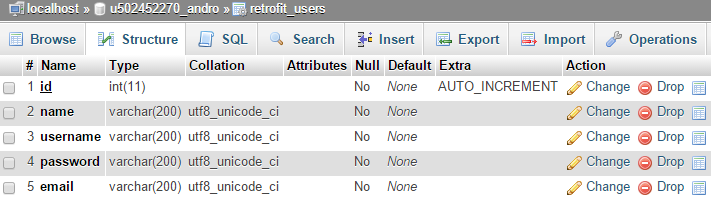
- This is my database, you should create the same database if you are going to copy my code. 😛
- Now we will create a script to connect to our database. I have created dbConnect.php.
|
1 2 3 4 5 6 7 8 9 10 11 |
<?php //Change the values according to your database define('HOST','mysql.hostinger.in'); define('USER','u502452270_andro'); define('PASS','belal_123'); define('DB','u502452270_andro'); $con = mysqli_connect(HOST,USER,PASS,DB) or die('Unable to Connect'); |
- Our second script will receive and insert the data to mysql database. I have created insert.php.
|
1 2 3 4 5 6 7 8 9 10 11 12 13 14 15 16 17 18 19 20 21 22 23 24 25 26 27 28 29 30 31 32 33 34 35 36 37 38 39 40 41 42 43 44 45 46 47 48 49 50 51 52 53 54 55 56 |
<?php //checking if the script received a post request or not if($_SERVER['REQUEST_METHOD']=='POST'){ //Getting post data $name = $_POST['name']; $username = $_POST['username']; $password = $_POST['password']; $email = $_POST['email']; //checking if the received values are blank if($name == '' || $username == '' || $password == '' || $email == ''){ //giving a message to fill all values if the values are blank echo 'please fill all values'; }else{ //If the values are not blank //Connecting to our database by calling dbConnect script require_once('dbConnect.php'); //Creating an SQL Query to insert into database //Here you may need to change the retrofit_users because it is the table I created //if you have a different table write your table's name //This query is to check whether the username or email is already registered or not $sql = "SELECT * FROM retrofit_users WHERE username='$username' OR email='$email'"; //If variable check has some value from mysqli fetch array //That means username or email already exist $check = mysqli_fetch_array(mysqli_query($con,$sql)); //Checking check has some values or not if(isset($check)){ //If check has some value that means username already exist echo 'username or email already exist'; }else{ //If username is not already exist //Creating insert query $sql = "INSERT INTO retrofit_users (name,username,password,email) VALUES('$name','$username','$password','$email')"; //Trying to insert the values to db if(mysqli_query($con,$sql)){ //If inserted successfully echo 'successfully registered'; }else{ //In case any error occured echo 'oops! Please try again!'; } } //Closing the database connection mysqli_close($con); } }else{ echo 'error'; } |
- Now upload both files to your hosting. And notedown the URL for your insert.php file. In my case it is
http://simplifiedcoding.16mb.com/RetrofitExample/insert.php
Actually we are going to use retrofit So in retrofit we keep the root URL and the Main URL separately. In the above URL the unbold part is our root URL. We will understand it in our Android Project. Lets create an Android Studio Project.
Android Retrofit Tutorial
- Create a new Android Project. I have created project named RetrofitPostExample.
- Add the following dependency to build.gradle file.
|
1 2 3 |
compile 'com.squareup.retrofit:retrofit:1.9.0' |
- Add internet permission to your manifest.
|
1 2 3 |
<uses-permission android:name="android.permission.INTERNET"/> |
- Finally come to activity_main.xml. We have to create the following layout for this android retrofit tutorial.
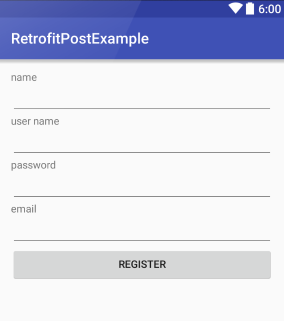
- Use the following xml code for the above layout.
|
1 2 3 4 5 6 7 8 9 10 11 12 13 14 15 16 17 18 19 20 21 22 23 24 25 26 27 28 29 30 31 32 33 34 35 36 37 38 39 40 41 42 43 44 45 46 47 48 49 50 51 52 53 54 55 56 57 58 59 60 61 62 63 64 |
<?xml version="1.0" encoding="utf-8"?> <LinearLayout xmlns:android="http://schemas.android.com/apk/res/android" xmlns:tools="http://schemas.android.com/tools" android:layout_width="match_parent" android:orientation="vertical" android:layout_height="match_parent" android:paddingLeft="@dimen/activity_horizontal_margin" android:paddingRight="@dimen/activity_horizontal_margin" android:paddingTop="@dimen/activity_vertical_margin" android:paddingBottom="@dimen/activity_vertical_margin" tools:context=".MainActivity"> <TextView android:text="name" android:layout_width="wrap_content" android:layout_height="wrap_content" /> <EditText android:id="@+id/editTextName" android:layout_width="match_parent" android:layout_height="wrap_content" /> <TextView android:text="user name" android:layout_width="wrap_content" android:layout_height="wrap_content" /> <EditText android:id="@+id/editTextUsername" android:layout_width="match_parent" android:layout_height="wrap_content" /> <TextView android:text="password" android:layout_width="wrap_content" android:layout_height="wrap_content" /> <EditText android:id="@+id/editTextPassword" android:inputType="textPassword" android:layout_width="match_parent" android:layout_height="wrap_content" /> <TextView android:text="email" android:layout_width="wrap_content" android:layout_height="wrap_content" /> <EditText android:id="@+id/editTextEmail" android:inputType="textEmailAddress" android:layout_width="match_parent" android:layout_height="wrap_content" /> <Button android:id="@+id/buttonRegister" android:text="Register" android:layout_width="match_parent" android:layout_height="wrap_content" /> </LinearLayout> |
- Now come to MainActivity.java and write the following code.
|
1 2 3 4 5 6 7 8 9 10 11 12 13 14 15 16 17 18 19 20 21 22 23 24 25 26 27 28 29 30 31 32 33 34 35 36 37 38 39 40 41 42 43 44 45 |
//Class for our main activity with OnClickListener public class MainActivity extends AppCompatActivity implements View.OnClickListener { //Declaring views private EditText editTextName; private EditText editTextUsername; private EditText editTextPassword; private EditText editTextEmail; private Button buttonRegister; //This is our root url public static final String ROOT_URL = "http://simplifiedcoding.16mb.com/"; @Override protected void onCreate(Bundle savedInstanceState) { super.onCreate(savedInstanceState); setContentView(R.layout.activity_main); //Initializing Views editTextName = (EditText) findViewById(R.id.editTextName); editTextUsername = (EditText) findViewById(R.id.editTextUsername); editTextPassword = (EditText) findViewById(R.id.editTextPassword); editTextEmail = (EditText) findViewById(R.id.editTextEmail); buttonRegister = (Button) findViewById(R.id.buttonRegister); //Adding listener to button buttonRegister.setOnClickListener(this); } private void insertUser(){ //Here we will handle the http request to insert user to mysql db } //Overriding onclick method @Override public void onClick(View v) { //Calling insertUser on button click insertUser(); } } |
- For retrofit we have to create an Interface. So create an Interface named RegisterAPI and write the following code.
|
1 2 3 4 5 6 7 8 9 10 11 12 13 14 15 16 17 18 19 20 21 22 23 |
package net.simplifiedcoding.retrofitpostexample; import retrofit.Callback; import retrofit.client.Response; import retrofit.http.Field; import retrofit.http.FormUrlEncoded; import retrofit.http.POST; /** * Created by Belal on 11/5/2015. */ public interface RegisterAPI { @FormUrlEncoded @POST("/RetrofitExample/insert.php") public void insertUser( @Field("name") String name, @Field("username") String username, @Field("password") String password, @Field("email") String email, Callback<Response> callback); } |
- So as you can see this is a common java interface. Inside it we are having
- @FormUrlEncoded, we have to write this if we want to send post data to the server.
- @POST, because we are using an HTTP Post request we have written this. Inside it we have the URL of the script that will be receiving the post request. Note that the URL is excluding the root URL. And we have defined the root URL in our MainActivity.
- public void insert() this is the method that will actually send the request. Inside this method we are having.
- @Field(“key”) String variable inside key we have to write what we have written inside $_POST[‘key’] in our script. And we have to specify it for all the values we are going to send.
- Callback<Response> callback it is also inside the retrofit library. It will receive the output from the server.
- But this is only an interface and the method is abstract. We will define the method inside insertUser() method that is declared inside MainActivity.java.
- So come to method insertUser() inside MainActivity.java
|
1 2 3 4 5 6 7 8 9 10 11 12 13 14 15 16 17 18 19 20 21 22 23 24 25 26 27 28 29 30 31 32 33 34 35 36 37 38 39 40 41 42 43 44 45 46 47 48 49 50 51 52 53 54 |
private void insertUser(){ //Here we will handle the http request to insert user to mysql db //Creating a RestAdapter RestAdapter adapter = new RestAdapter.Builder() .setEndpoint(ROOT_URL) //Setting the Root URL .build(); //Finally building the adapter //Creating object for our interface RegisterAPI api = adapter.create(RegisterAPI.class); //Defining the method insertuser of our interface api.insertUser( //Passing the values by getting it from editTexts editTextName.getText().toString(), editTextUsername.getText().toString(), editTextPassword.getText().toString(), editTextEmail.getText().toString(), //Creating an anonymous callback new Callback<Response>() { @Override public void success(Response result, Response response) { //On success we will read the server's output using bufferedreader //Creating a bufferedreader object BufferedReader reader = null; //An string to store output from the server String output = ""; try { //Initializing buffered reader reader = new BufferedReader(new InputStreamReader(result.getBody().in())); //Reading the output in the string output = reader.readLine(); } catch (IOException e) { e.printStackTrace(); } //Displaying the output as a toast Toast.makeText(MainActivity.this, output, Toast.LENGTH_LONG).show(); } @Override public void failure(RetrofitError error) { //If any error occured displaying the error as toast Toast.makeText(MainActivity.this, error.toString(),Toast.LENGTH_LONG).show(); } } ); } |
- Now just run your application.
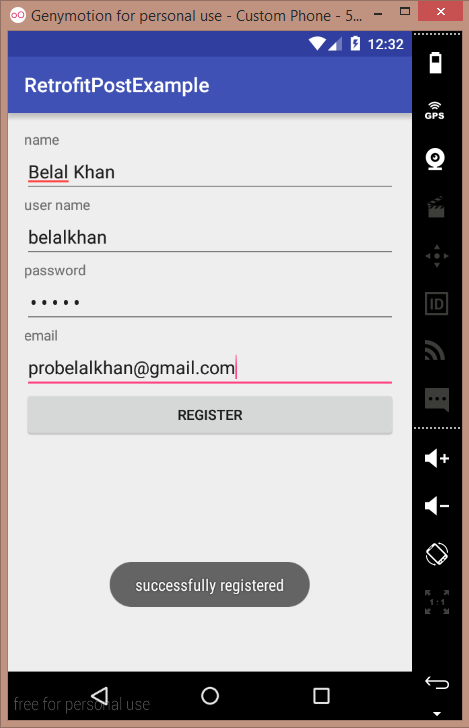
- And if you just got the success message as shown in the above image. Check your database.

- Bingo! It is working absolutely fine. If you are having troubles then you can download my php scripts and android project from below.
Get the Source Code of this Android Retrofit Tutorial
[sociallocker id=1372] [download id=”1557″] [/sociallocker]
Here are few more tutorials for android application development you should check
- Android Retrofit Tutorial to Get JSON From Server
- Retrieve Data from MySQL Database using Volley Library
- Android Volley Tutorial to Create a Login Application
So thats all for this android retrofit tutorial guys. Feel free to ask anything regarding this android retrofit tutorial by your comments. And don’t forget to share this tutorial if you found it useful. Thank You 🙂


