
We have an enhanced ListView in android called RecyclerView. And here is Android RecyclerView and CardView Tutorial.
It is recommended not to use ListView for large data sets. If you have a big List with custom UI components then you should use RecyclerView. RecyclerView is much more customizable than ListView and in terms of performance it is also very far ahead. So lets see how we use RecyclerView in our application.
Below you can see a simple RecyclerView and this is actually what we will be building in this post.
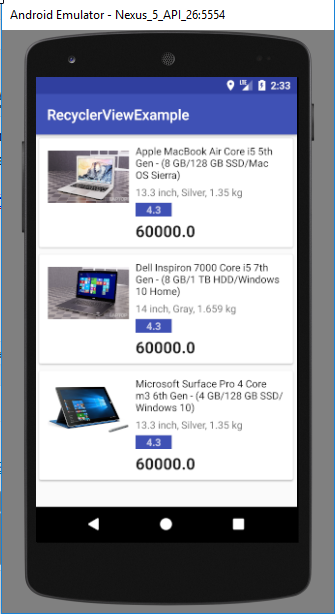
Remember we don’t use RecyclerView for a List where we display only a Single item. Actually we can use it for displaying a single name or string as well. But the main use of RecyclerView is in displaying a complex list, as you can see above. So lets see how we can build a List as shown above.
Table of Contents
Android RecyclerView and CardView Tutorial
Creating a new Android Studio Project
- The first step is always creating the new project 😛 . So create a new android studio project. I have create a project named RecyclerViewExample.
- Remember RecyclerView and CardView are not available by default. You need to add it to your project.
Adding RecyclerView and CardView
- Click on File -> Project Structure.

- Now from the left select app and then from the top click on Dependencies. Here you will see a green plus icon, click on it and then select Library dependency.

- Now you will see another dialog, and from here you can select RecyclerView. Select RecyclerView and press ok.

- The same way you have to add CardView as well.
Creating RecyclerView Layouts
RecyclerView
- Now you can create a RecyclerView inside your activity_main.xml.
|
1 2 3 4 5 6 7 8 9 10 11 12 13 14 15 16 |
<?xml version="1.0" encoding="utf-8"?> <RelativeLayout xmlns:android="http://schemas.android.com/apk/res/android" xmlns:app="http://schemas.android.com/apk/res-auto" xmlns:tools="http://schemas.android.com/tools" android:layout_width="match_parent" android:layout_height="match_parent" tools:context="net.simplifiedlearning.recyclerviewexample.MainActivity"> <android.support.v7.widget.RecyclerView android:id="@+id/recyclerView" android:layout_width="match_parent" android:layout_height="match_parent" /> </RelativeLayout> |
RecyclerView Item Layout using CardView
- We also need a separate layout for items inside RecyclerView. For example we have the following layout.

- We have a CardView and inside the CardView we have the design as we want. So you can create any design inside your Card.
- It is not mandatory that you use a CardView. A CardView gives you a nice elevated look only.
- So to create the above layout, just create a new layout resource file named layout_products.xml and use the following xml code.
|
1 2 3 4 5 6 7 8 9 10 11 12 13 14 15 16 17 18 19 20 21 22 23 24 25 26 27 28 29 30 31 32 33 34 35 36 37 38 39 40 41 42 43 44 45 46 47 48 49 50 51 52 53 54 55 56 57 58 59 60 61 62 63 64 65 66 67 68 69 70 71 72 73 74 75 76 77 |
<?xml version="1.0" encoding="utf-8"?> <LinearLayout xmlns:android="http://schemas.android.com/apk/res/android" android:layout_width="match_parent" android:layout_height="wrap_content" android:orientation="vertical"> <android.support.v7.widget.CardView android:layout_width="match_parent" android:layout_height="wrap_content" android:layout_margin="5dp"> <RelativeLayout android:layout_width="match_parent" android:layout_height="wrap_content" android:padding="8dp"> <ImageView android:id="@+id/imageView" android:layout_width="120dp" android:layout_height="90dp" android:padding="4dp" /> <TextView android:id="@+id/textViewTitle" android:layout_width="wrap_content" android:layout_height="wrap_content" android:layout_marginLeft="5dp" android:layout_toRightOf="@id/imageView" android:text="Apple MacBook Air Core i5 5th Gen - (8 GB/128 GB SSD/Mac OS Sierra)" android:textAppearance="@style/Base.TextAppearance.AppCompat.Small" android:textColor="#000000" /> <TextView android:id="@+id/textViewShortDesc" android:layout_width="wrap_content" android:layout_height="wrap_content" android:layout_below="@id/textViewTitle" android:layout_marginLeft="5dp" android:layout_marginTop="5dp" android:layout_toRightOf="@id/imageView" android:text="13.3 Inch, 256 GB" android:textAppearance="@style/Base.TextAppearance.AppCompat.Small" /> <TextView android:id="@+id/textViewRating" android:layout_width="wrap_content" android:layout_height="wrap_content" android:layout_below="@id/textViewShortDesc" android:layout_marginLeft="5dp" android:layout_marginTop="5dp" android:layout_toRightOf="@id/imageView" android:background="@color/colorPrimary" android:paddingLeft="15dp" android:paddingRight="15dp" android:text="4.7" android:textAppearance="@style/Base.TextAppearance.AppCompat.Small.Inverse" android:textStyle="bold" /> <TextView android:id="@+id/textViewPrice" android:layout_width="wrap_content" android:layout_height="wrap_content" android:layout_below="@id/textViewRating" android:layout_marginLeft="5dp" android:layout_marginTop="5dp" android:layout_toRightOf="@id/imageView" android:text="INR 56990" android:textAppearance="@style/Base.TextAppearance.AppCompat.Large" android:textStyle="bold" /> </RelativeLayout> </android.support.v7.widget.CardView> </LinearLayout> |
- So thats all for the layout files.
Model Class for Storing Product
- Here we don’t have a single item for our list, and that is why it can’t be stored in a String array. We need a class to store all the attributes that we have for item in our list. Here I have product as the List Item and each product has
- Id
- Title
- Image
- Short Description
- Rating
- Price
- So to store these attributes lets create a class named Product.java and write the following code.
|
1 2 3 4 5 6 7 8 9 10 11 12 13 14 15 16 17 18 19 20 21 22 23 24 25 26 27 28 29 30 31 32 33 34 35 36 37 38 39 40 41 42 43 44 45 46 47 48 49 50 |
package net.simplifiedlearning.recyclerviewexample; /** * Created by Belal on 10/18/2017. */ public class Product { private int id; private String title; private String shortdesc; private double rating; private double price; private int image; public Product(int id, String title, String shortdesc, double rating, double price, int image) { this.id = id; this.title = title; this.shortdesc = shortdesc; this.rating = rating; this.price = price; this.image = image; } public int getId() { return id; } public String getTitle() { return title; } public String getShortdesc() { return shortdesc; } public double getRating() { return rating; } public double getPrice() { return price; } public int getImage() { return image; } } |
- Now we will create a ProductAdapter.
Creating RecyclerView Adapter
- To manage and display the data of our RecyclerView we need a class that will extend RecyclerView.Adapter. Inside this class we need RecyclerView.ViewHolder. Now what are these two?
- RecyclerView.ViewHolder represents the views of our RecyclerView and the RecyclerView.Adapter represents the data that is to be shown with the ViewHoder.
- We have 3 methods inside RecyclerView.Adapter that we need to override.
- RecyclerView.ViewHolder onCreateViewHolder(ViewGroup parent, int viewType)
- This method returns a new instance of our ViewHolder.
- void onBindViewHolder(ProductViewHolder holder, int position)
- This method binds the data to the view holder.
- int getItemCount()
- This returns the size of the List.
- RecyclerView.ViewHolder onCreateViewHolder(ViewGroup parent, int viewType)
- So lets create our Adapter. For this create a new class named ProductAdapter.java and write the following code.
|
1 2 3 4 5 6 7 8 9 10 11 12 13 14 15 16 17 18 19 20 21 22 23 24 25 26 27 28 29 30 31 32 33 34 35 36 37 38 39 40 41 42 43 44 45 46 47 48 49 50 51 52 53 54 55 56 57 58 59 60 61 62 63 64 65 66 67 68 69 70 71 72 73 74 75 76 77 78 79 80 81 |
package net.simplifiedlearning.recyclerviewexample; import android.content.Context; import android.support.v7.widget.RecyclerView; import android.view.LayoutInflater; import android.view.View; import android.view.ViewGroup; import android.widget.ImageView; import android.widget.TextView; import java.util.List; /** * Created by Belal on 10/18/2017. */ public class ProductAdapter extends RecyclerView.Adapter<ProductAdapter.ProductViewHolder> { //this context we will use to inflate the layout private Context mCtx; //we are storing all the products in a list private List<Product> productList; //getting the context and product list with constructor public ProductAdapter(Context mCtx, List<Product> productList) { this.mCtx = mCtx; this.productList = productList; } @Override public ProductViewHolder onCreateViewHolder(ViewGroup parent, int viewType) { //inflating and returning our view holder LayoutInflater inflater = LayoutInflater.from(mCtx); View view = inflater.inflate(R.layout.layout_products, null); return new ProductViewHolder(view); } @Override public void onBindViewHolder(ProductViewHolder holder, int position) { //getting the product of the specified position Product product = productList.get(position); //binding the data with the viewholder views holder.textViewTitle.setText(product.getTitle()); holder.textViewShortDesc.setText(product.getShortdesc()); holder.textViewRating.setText(String.valueOf(product.getRating())); holder.textViewPrice.setText(String.valueOf(product.getPrice())); holder.imageView.setImageDrawable(mCtx.getResources().getDrawable(product.getImage())); } @Override public int getItemCount() { return productList.size(); } class ProductViewHolder extends RecyclerView.ViewHolder { TextView textViewTitle, textViewShortDesc, textViewRating, textViewPrice; ImageView imageView; public ProductViewHolder(View itemView) { super(itemView); textViewTitle = itemView.findViewById(R.id.textViewTitle); textViewShortDesc = itemView.findViewById(R.id.textViewShortDesc); textViewRating = itemView.findViewById(R.id.textViewRating); textViewPrice = itemView.findViewById(R.id.textViewPrice); imageView = itemView.findViewById(R.id.imageView); } } } |
Setting Adapter to RecyclerView
- The last step to show RecyclerView. Come inside MainActivity and write the following code.
|
1 2 3 4 5 6 7 8 9 10 11 12 13 14 15 16 17 18 19 20 21 22 23 24 25 26 27 28 29 30 31 32 33 34 35 36 37 38 39 40 41 42 43 44 45 46 47 48 49 50 51 52 53 54 55 56 57 58 59 60 61 62 63 64 65 66 67 68 69 |
package net.simplifiedlearning.recyclerviewexample; import android.support.v7.app.AppCompatActivity; import android.os.Bundle; import android.support.v7.widget.LinearLayoutManager; import android.support.v7.widget.RecyclerView; import java.util.ArrayList; import java.util.List; public class MainActivity extends AppCompatActivity { //a list to store all the products List<Product> productList; //the recyclerview RecyclerView recyclerView; @Override protected void onCreate(Bundle savedInstanceState) { super.onCreate(savedInstanceState); setContentView(R.layout.activity_main); //getting the recyclerview from xml recyclerView = (RecyclerView) findViewById(R.id.recyclerView); recyclerView.setHasFixedSize(true); recyclerView.setLayoutManager(new LinearLayoutManager(this)); //initializing the productlist productList = new ArrayList<>(); //adding some items to our list productList.add( new Product( 1, "Apple MacBook Air Core i5 5th Gen - (8 GB/128 GB SSD/Mac OS Sierra)", "13.3 inch, Silver, 1.35 kg", 4.3, 60000, R.drawable.macbook)); productList.add( new Product( 1, "Dell Inspiron 7000 Core i5 7th Gen - (8 GB/1 TB HDD/Windows 10 Home)", "14 inch, Gray, 1.659 kg", 4.3, 60000, R.drawable.dellinspiron)); productList.add( new Product( 1, "Microsoft Surface Pro 4 Core m3 6th Gen - (4 GB/128 GB SSD/Windows 10)", "13.3 inch, Silver, 1.35 kg", 4.3, 60000, R.drawable.surface)); //creating recyclerview adapter ProductAdapter adapter = new ProductAdapter(this, productList); //setting adapter to recyclerview recyclerView.setAdapter(adapter); } } |
- For the images I am using some images, you can get it from below link. You need to post these images to drawable folder. You can also use other images if you want.
- Now you can try running your application.
- You see we have our RecyclerView. The items are looking nice in the Cards.
- Here I am using static items for RecyclerView. But if you want to load the data from Server using PHP and MySQL you can visit the following post.
RecyclerView using PHP and MySQL Tutorial
- You can get my source code from below link.
[sociallocker id=1372]Android RecyclerView Tutorial Source Code Download[/sociallocker]
So thats all for this Android RecyclerView Tutorial friends. If you are having any confusions or queries please do comment. Thank You 🙂


