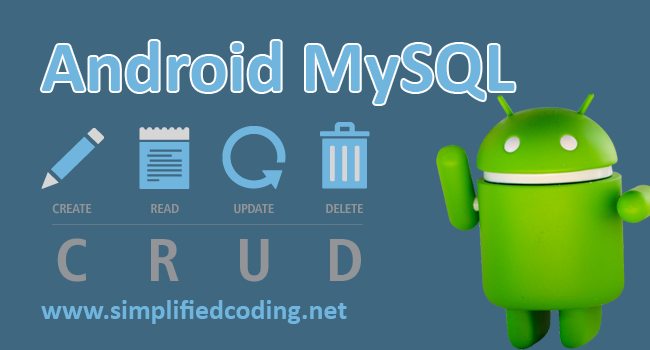
Hello friends, Here is another Android MySQL Tutorial, in this post we will learn the basic CRUD operation in MySQL database from Android Application. So without wasting time lets start our Android MySQL Tutorial.
Table of Contents
What is CRUD?
I guess many of you already know that what is CRUD. But if anyone don’t know, CRUD is an Acronym for the Basic Database Operations. In any database we do the following basic operations.
- Creating a Record -> In the database we insert a record.
- Reading Stored Records -> No point of saving data when we can’t read it back 😛 (LOL). So the second operation is reading the stored data back.
- Updating Stored Records -> We may also need to update the existing data. So the third operation is update.
- Deleting Records -> Lastly we may also need to delete the existing data from the database.
So basically in any database we perform the above mentioned operations. In this tutorial I am going to use MySQL and PHP.
Why PHP and MySQL and Why Not SQLite?
Android gives us a feature of SQLite to use as the RDBMS for our app. But we can’t use SQLite only if we are building an app. This is because we need a centralize server. SQLite is local for every device so if a user is using your application you will not be able manage your users if it is only in SQLite. That is why we need a centralize database where we can store our app data.
If you want to learn about the SQLite using the Latest Architecture Component ROOM. Then here is a complete FREE COURSE for Android Room Database.
Do we have only PHP and MySQL for this?
Obviously NO? You can use any server side scripting language or database application. I am using here PHP and MySQL because it is easily available and I already know it. 😛 (LOL) But if you are an expert in Python or JAVA or NodeJS or basically any other technology then you can go with it. It will change only the server side coding. Android part will always be the same.
Building Web APIs
The first step is building the required Web APIs. This is because from the android application, to communicate with our web server we need an interface called API.
So our android device will send a request to our API, then our API will perform the requested task and it will give us the response related to the task. You can see the below diagram for more clarification.

The response that the web server gives should be in a standard structure, so that in our android side we can easily parse and get the information from the structure. For this everyone now uses JSON. If you heard this term for the first time then you should consider watching this 7 minute quick JSON tutorial.
I guess you got a basic idea about the task that we are going to do in this tutorial.
Creating Database
It is obvious that we need a database first 😛 . So here I am using XAMPP (You can go with wamp or lamp as well). So first create the following database.
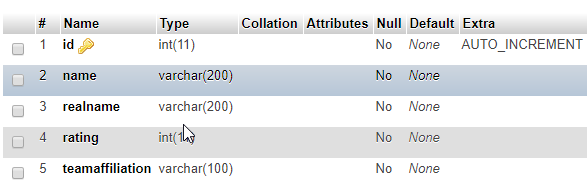
- So open localhost/phpmyadmin and run the following query to create the above table.
|
1 2 3 4 5 6 7 8 9 10 11 12 13 14 15 16 |
-- created by Belal Khan -- website: www.simplifiedcoding.net -- tables -- Table: heroes CREATE TABLE heroes ( id int NOT NULL AUTO_INCREMENT, name varchar(200) NOT NULL, realname varchar(200) NOT NULL, rating int NOT NULL, teamaffiliation varchar(100) NOT NULL, CONSTRAINT heroes_pk PRIMARY KEY (id) ); -- End of file. |
Creating PHP Project
Now to perform the Database Operations we will create a PHP Project.
- So inside htdocs (c:/xampp/htdocs) create a new folder (You can also use an IDE like PHP Storm to create project but remember create the project inside c:/xampp/htdocs only).
- I have given the name HeroApi to my project. You can give any name. But I would say give the same name or else you may lead up to some errors following the post if you are a newbie.
- Inside the project create two more folders named includes and Api. You can see the below screenshot for the directory structure that I am using. (I am using Sublime Text for coding server part).
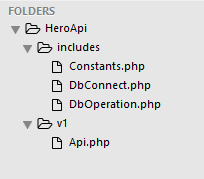
- You see we have four php files (3 inside includes and 1 inside v1). So you create these files as well.
Project Structure
- So we have the following things in our PHP project.
- includes
- Constants.php: In this file we will define all the required constants e.g., database name, username, password etc.
- DbConnect.php: This fill will contain a class where we will connect to our MySQL database.
- DbOperation.php: The actual CRUD operation is performed inside this file.
- v1
- Api.php: This is our API, we will send request to this file only from the android side. And this file will handle all the API calls.
- includes
Defining Constants
- First come inside the file Constants.php and write the following code.
|
1 2 3 4 5 6 7 8 9 10 11 12 13 |
<?php /* * Created by Belal Khan * website: www.simplifiedcoding.net */ define('DB_HOST', 'localhost'); define('DB_USER', 'root'); define('DB_PASS', ''); define('DB_NAME', 'android'); |
Connecting to Database
- Now inside DbConnect.php write the following code. I have explained the code using comments.
|
1 2 3 4 5 6 7 8 9 10 11 12 13 14 15 16 17 18 19 20 21 22 23 24 25 26 27 28 29 30 31 32 33 34 35 36 37 38 39 40 |
<?php /* * Created by Belal Khan * website: www.simplifiedcoding.net */ //Class DbConnect class DbConnect { //Variable to store database link private $con; //Class constructor function __construct() { } //This method will connect to the database function connect() { //Including the constants.php file to get the database constants include_once dirname(__FILE__) . '/Constants.php'; //connecting to mysql database $this->con = new mysqli(DB_HOST, DB_USER, DB_PASS, DB_NAME); //Checking if any error occured while connecting if (mysqli_connect_errno()) { echo "Failed to connect to MySQL: " . mysqli_connect_error(); } //finally returning the connection link return $this->con; } } |
Performing Database Operations
- Now we will do the CRUD operation inside the DbOperation.php file.
|
1 2 3 4 5 6 7 8 9 10 11 12 13 14 15 16 17 18 19 20 21 22 23 24 25 26 27 28 29 30 31 32 33 34 35 36 37 38 39 40 41 42 43 44 45 46 47 48 49 50 51 52 53 54 55 56 57 58 59 60 61 62 63 64 65 66 67 68 69 70 71 72 73 74 75 76 77 78 79 80 81 82 83 84 85 86 |
<?php class DbOperation { //Database connection link private $con; //Class constructor function __construct() { //Getting the DbConnect.php file require_once dirname(__FILE__) . '/DbConnect.php'; //Creating a DbConnect object to connect to the database $db = new DbConnect(); //Initializing our connection link of this class //by calling the method connect of DbConnect class $this->con = $db->connect(); } /* * The create operation * When this method is called a new record is created in the database */ function createHero($name, $realname, $rating, $teamaffiliation){ $stmt = $this->con->prepare("INSERT INTO heroes (name, realname, rating, teamaffiliation) VALUES (?, ?, ?, ?)"); $stmt->bind_param("ssis", $name, $realname, $rating, $teamaffiliation); if($stmt->execute()) return true; return false; } /* * The read operation * When this method is called it is returning all the existing record of the database */ function getHeroes(){ $stmt = $this->con->prepare("SELECT id, name, realname, rating, teamaffiliation FROM heroes"); $stmt->execute(); $stmt->bind_result($id, $name, $realname, $rating, $teamaffiliation); $heroes = array(); while($stmt->fetch()){ $hero = array(); $hero['id'] = $id; $hero['name'] = $name; $hero['realname'] = $realname; $hero['rating'] = $rating; $hero['teamaffiliation'] = $teamaffiliation; array_push($heroes, $hero); } return $heroes; } /* * The update operation * When this method is called the record with the given id is updated with the new given values */ function updateHero($id, $name, $realname, $rating, $teamaffiliation){ $stmt = $this->con->prepare("UPDATE heroes SET name = ?, realname = ?, rating = ?, teamaffiliation = ? WHERE id = ?"); $stmt->bind_param("ssisi", $name, $realname, $rating, $teamaffiliation, $id); if($stmt->execute()) return true; return false; } /* * The delete operation * When this method is called record is deleted for the given id */ function deleteHero($id){ $stmt = $this->con->prepare("DELETE FROM heroes WHERE id = ? "); $stmt->bind_param("i", $id); if($stmt->execute()) return true; return false; } } |
Handling API Calls
- Now here come the main part, which is handling the API calls. So come inside the Api.php which is inside the v1 folder.
|
1 2 3 4 5 6 7 8 9 10 11 12 13 14 15 16 17 18 19 20 21 22 23 24 25 26 27 28 29 30 31 32 33 34 35 36 37 38 39 40 41 42 43 44 45 46 47 48 49 50 51 52 53 54 55 56 57 58 59 60 61 62 63 64 65 66 67 68 69 70 71 72 73 74 75 76 77 78 79 80 81 82 83 84 85 86 87 88 89 90 91 92 93 94 95 96 97 98 99 100 101 102 103 104 105 106 107 108 109 110 111 112 113 114 115 116 117 118 119 120 121 122 123 124 125 126 127 128 129 130 131 132 133 134 135 136 137 138 139 140 141 142 143 144 145 146 147 |
<?php //getting the dboperation class require_once '../includes/DbOperation.php'; //function validating all the paramters are available //we will pass the required parameters to this function function isTheseParametersAvailable($params){ //assuming all parameters are available $available = true; $missingparams = ""; foreach($params as $param){ if(!isset($_POST[$param]) || strlen($_POST[$param])<=0){ $available = false; $missingparams = $missingparams . ", " . $param; } } //if parameters are missing if(!$available){ $response = array(); $response['error'] = true; $response['message'] = 'Parameters ' . substr($missingparams, 1, strlen($missingparams)) . ' missing'; //displaying error echo json_encode($response); //stopping further execution die(); } } //an array to display response $response = array(); //if it is an api call //that means a get parameter named api call is set in the URL //and with this parameter we are concluding that it is an api call if(isset($_GET['apicall'])){ switch($_GET['apicall']){ //the CREATE operation //if the api call value is 'createhero' //we will create a record in the database case 'createhero': //first check the parameters required for this request are available or not isTheseParametersAvailable(array('name','realname','rating','teamaffiliation')); //creating a new dboperation object $db = new DbOperation(); //creating a new record in the database $result = $db->createHero( $_POST['name'], $_POST['realname'], $_POST['rating'], $_POST['teamaffiliation'] ); //if the record is created adding success to response if($result){ //record is created means there is no error $response['error'] = false; //in message we have a success message $response['message'] = 'Hero addedd successfully'; //and we are getting all the heroes from the database in the response $response['heroes'] = $db->getHeroes(); }else{ //if record is not added that means there is an error $response['error'] = true; //and we have the error message $response['message'] = 'Some error occurred please try again'; } break; //the READ operation //if the call is getheroes case 'getheroes': $db = new DbOperation(); $response['error'] = false; $response['message'] = 'Request successfully completed'; $response['heroes'] = $db->getHeroes(); break; //the UPDATE operation case 'updatehero': isTheseParametersAvailable(array('id','name','realname','rating','teamaffiliation')); $db = new DbOperation(); $result = $db->updateHero( $_POST['id'], $_POST['name'], $_POST['realname'], $_POST['rating'], $_POST['teamaffiliation'] ); if($result){ $response['error'] = false; $response['message'] = 'Hero updated successfully'; $response['heroes'] = $db->getHeroes(); }else{ $response['error'] = true; $response['message'] = 'Some error occurred please try again'; } break; //the delete operation case 'deletehero': //for the delete operation we are getting a GET parameter from the url having the id of the record to be deleted if(isset($_GET['id'])){ $db = new DbOperation(); if($db->deleteHero($_GET['id'])){ $response['error'] = false; $response['message'] = 'Hero deleted successfully'; $response['heroes'] = $db->getHeroes(); }else{ $response['error'] = true; $response['message'] = 'Some error occurred please try again'; } }else{ $response['error'] = true; $response['message'] = 'Nothing to delete, provide an id please'; } break; } }else{ //if it is not api call //pushing appropriate values to response array $response['error'] = true; $response['message'] = 'Invalid API Call'; } //displaying the response in json structure echo json_encode($response); |
- Now lets test the APIs.
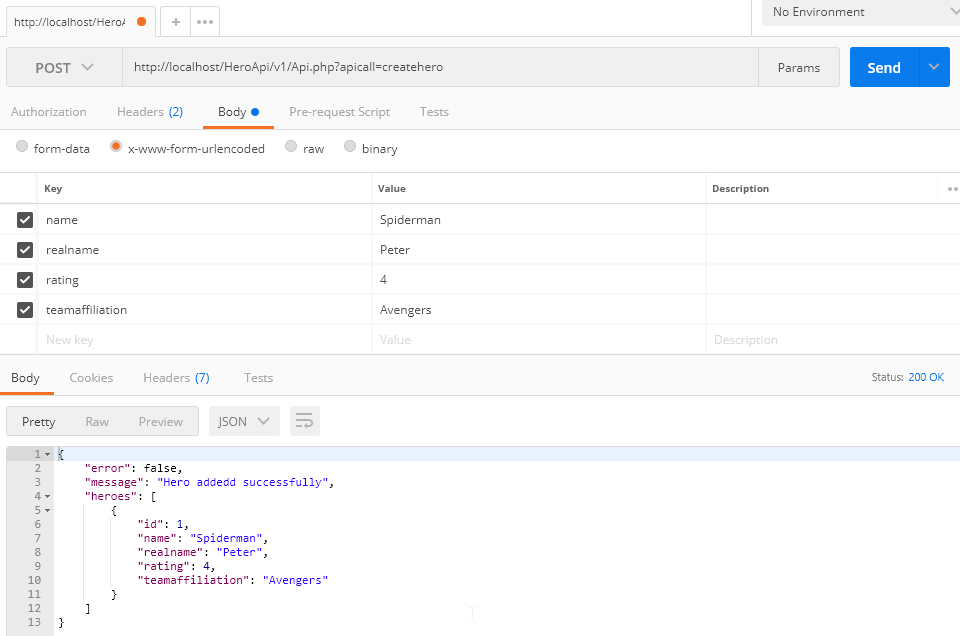
Testing the API Calls
- For testing the API Calls here I am using POSTMAN. It is a REST API Client for Google Chrome.
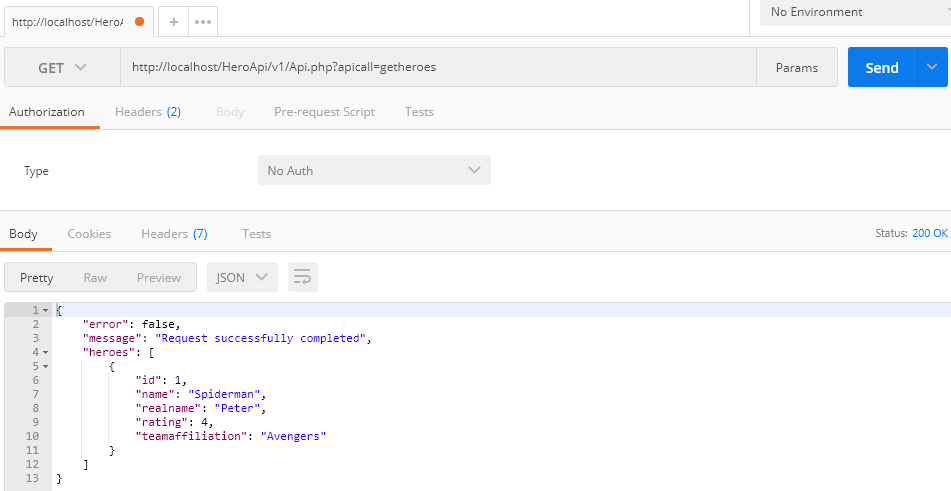
Create Operation
Read Operation
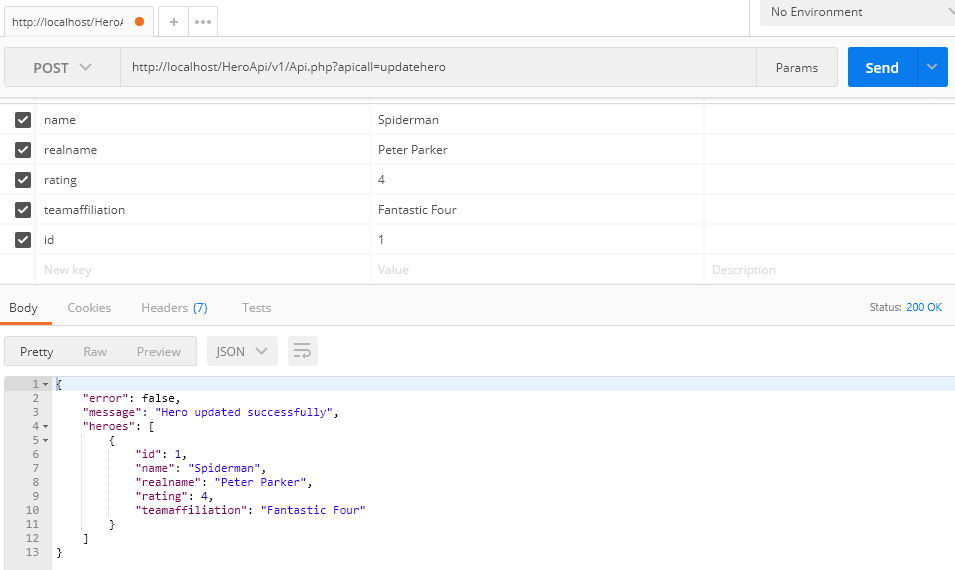
Update Operation
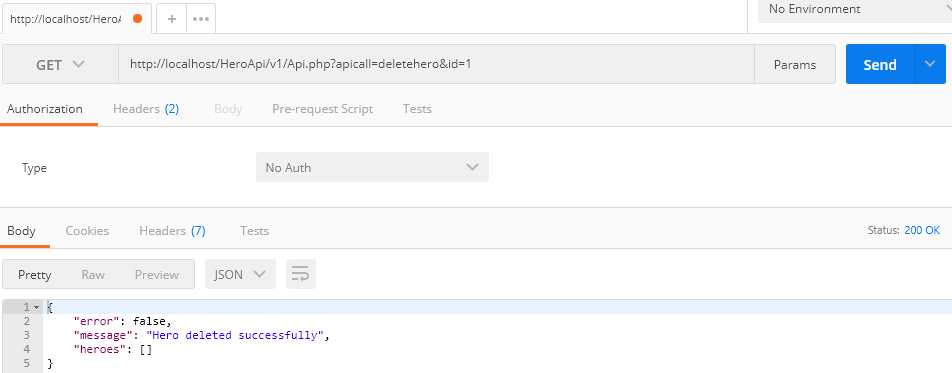
Delete Operation
You see all the operations are working absolutely fine. Now we can move ahead in creating our Android Project. But before moving to android side below you can see our API URLs.
Finalizing API Calls
- The below table displays our API URLs with the Parameter and Method. Remember using localhost in android side will not work. You need to find your IP. I have my IP in the below table, but in your case you need to find yours. So if you are using a windows you can use ipconfig command to find IP and for MAC or Linux use the ifconfig command. For more details you can visit this tutorial.
- POST: http://192.168.101.1/HeroApi/v1/Api.php?apicall=createhero
- GET: http://192.168.101.1/HeroApi/v1/Api.php?apicall=getheroes
- POST: http://192.168.101.1/HeroApi/v1/Api.php?apicall=updatehero
- GET: http://192.168.101.1/HeroApi/v1/Api.php?apicall=deletehero&id=idvalue
Want to Explore Building RESTful APIs?
Here we built a very basic API that demonstrates the CRUD operation. But in real world scenarios we use FRAMEWORKS to make the API creating easy and structured. If you want to dig a bit more about building RESTful APIs. Then you should check the following course. It is absolutely FREE.
Android MySQL Tutorial
We have our Web Services, and now we can build the android application. So lets start.
Creating a new Project
- Create a new Android Studio Project. Here I have created a project named MyHeroApp.
- Once your project is loaded inside the package we will create all the helper classes that is required for thie project.
Creating Helper Classes
Class To Store API URLs
- First create a class named Api.java and write the following code.
|
1 2 3 4 5 6 7 8 9 10 11 12 13 14 15 16 17 18 |
package net.simplifiedlearning.myheroapp; /** * Created by Belal on 9/9/2017. */ public class Api { private static final String ROOT_URL = "http://192.168.101.1/HeroApi/v1/Api.php?apicall="; public static final String URL_CREATE_HERO = ROOT_URL + "createhero"; public static final String URL_READ_HEROES = ROOT_URL + "getheroes"; public static final String URL_UPDATE_HERO = ROOT_URL + "updatehero"; public static final String URL_DELETE_HERO = ROOT_URL + "deletehero&id="; } |
Hero Model Class
- We also need a model class for our Hero. So create a class named Hero.java and write the following code. It will have only properties, constructor and getters.
|
1 2 3 4 5 6 7 8 9 10 11 12 13 14 15 16 17 18 19 20 21 22 23 24 25 26 27 28 29 30 31 32 33 34 35 36 37 38 39 40 41 42 43 44 |
package net.simplifiedlearning.myheroapp; import java.io.Serializable; /** * Created by Belal on 9/9/2017. */ class Hero { private int id; private String name, realname; private int rating; private String teamaffiliation; public Hero(int id, String name, String realname, int rating, String teamaffiliation) { this.id = id; this.name = name; this.realname = realname; this.rating = rating; this.teamaffiliation = teamaffiliation; } public int getId() { return id; } public String getName() { return name; } public String getRealname() { return realname; } public int getRating() { return rating; } public String getTeamaffiliation() { return teamaffiliation; } } |
Request Handler
- We need to send GET and POST request to our API URLs, and for this I am creating a new class that will perform these tasks. So create a new class named RequestHandler.java and write the following code.
|
1 2 3 4 5 6 7 8 9 10 11 12 13 14 15 16 17 18 19 20 21 22 23 24 25 26 27 28 29 30 31 32 33 34 35 36 37 38 39 40 41 42 43 44 45 46 47 48 49 50 51 52 53 54 55 56 57 58 59 60 61 62 63 64 65 66 67 68 69 70 71 72 73 74 75 76 77 78 79 80 81 82 83 84 85 86 87 88 89 90 91 92 93 94 95 96 97 98 99 100 101 102 103 104 105 106 107 108 109 110 111 112 113 |
package net.simplifiedlearning.myheroapp; import java.io.BufferedReader; import java.io.BufferedWriter; import java.io.InputStreamReader; import java.io.OutputStream; import java.io.OutputStreamWriter; import java.io.UnsupportedEncodingException; import java.net.HttpURLConnection; import java.net.URL; import java.net.URLEncoder; import java.util.HashMap; import java.util.Map; import javax.net.ssl.HttpsURLConnection; /** * Created by Belal on 9/9/2017. */ public class RequestHandler { //Method to send httpPostRequest //This method is taking two arguments //First argument is the URL of the script to which we will send the request //Other is an HashMap with name value pairs containing the data to be send with the request public String sendPostRequest(String requestURL, HashMap<String, String> postDataParams) { //Creating a URL URL url; //StringBuilder object to store the message retrieved from the server StringBuilder sb = new StringBuilder(); try { //Initializing Url url = new URL(requestURL); //Creating an httmlurl connection HttpURLConnection conn = (HttpURLConnection) url.openConnection(); //Configuring connection properties conn.setReadTimeout(15000); conn.setConnectTimeout(15000); conn.setRequestMethod("POST"); conn.setDoInput(true); conn.setDoOutput(true); //Creating an output stream OutputStream os = conn.getOutputStream(); //Writing parameters to the request //We are using a method getPostDataString which is defined below BufferedWriter writer = new BufferedWriter( new OutputStreamWriter(os, "UTF-8")); writer.write(getPostDataString(postDataParams)); writer.flush(); writer.close(); os.close(); int responseCode = conn.getResponseCode(); if (responseCode == HttpsURLConnection.HTTP_OK) { BufferedReader br = new BufferedReader(new InputStreamReader(conn.getInputStream())); sb = new StringBuilder(); String response; //Reading server response while ((response = br.readLine()) != null) { sb.append(response); } } } catch (Exception e) { e.printStackTrace(); } return sb.toString(); } public String sendGetRequest(String requestURL) { StringBuilder sb = new StringBuilder(); try { URL url = new URL(requestURL); HttpURLConnection con = (HttpURLConnection) url.openConnection(); BufferedReader bufferedReader = new BufferedReader(new InputStreamReader(con.getInputStream())); String s; while ((s = bufferedReader.readLine()) != null) { sb.append(s + "\n"); } } catch (Exception e) { } return sb.toString(); } private String getPostDataString(HashMap<String, String> params) throws UnsupportedEncodingException { StringBuilder result = new StringBuilder(); boolean first = true; for (Map.Entry<String, String> entry : params.entrySet()) { if (first) first = false; else result.append("&"); result.append(URLEncoder.encode(entry.getKey(), "UTF-8")); result.append("="); result.append(URLEncoder.encode(entry.getValue(), "UTF-8")); } return result.toString(); } } |
Defining Internet Permission in AndroidManifest
- As we need to perform network request from our Application, we need to define internet permission for this. And because we are working with localhost our APIs are not secured i.e. we have HTTP URLs and not HTTPS for our APIs.
- And by default your application are restricted to communicate with non HTTPS URLs (For security reasons). So you need to explicitly define that your app should be allowed to communicate with HTTP URLs. And to do this you need to add usesCleartextTraffic=”true” inside your opening application tag. (See the below code that is AndroidManifest.xml for my project.).
|
1 2 3 4 5 6 7 8 9 10 11 12 13 14 15 16 17 18 19 20 21 22 23 24 25 26 27 |
<?xml version="1.0" encoding="utf-8"?> <manifest xmlns:android="http://schemas.android.com/apk/res/android" package="net.simplifiedlearning.myheroapp"> <!-- this is the internet permission --> <uses-permission android:name="android.permission.INTERNET" /> <application android:usesCleartextTraffic="true" android:allowBackup="true" android:icon="@mipmap/ic_launcher" android:label="@string/app_name" android:roundIcon="@mipmap/ic_launcher_round" android:supportsRtl="true" android:theme="@style/AppTheme"> <activity android:name=".MainActivity"> <intent-filter> <action android:name="android.intent.action.MAIN" /> <category android:name="android.intent.category.LAUNCHER" /> </intent-filter> </activity> </application> </manifest> |
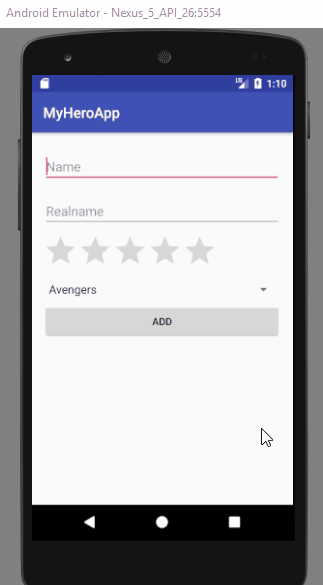
Designing User Interface
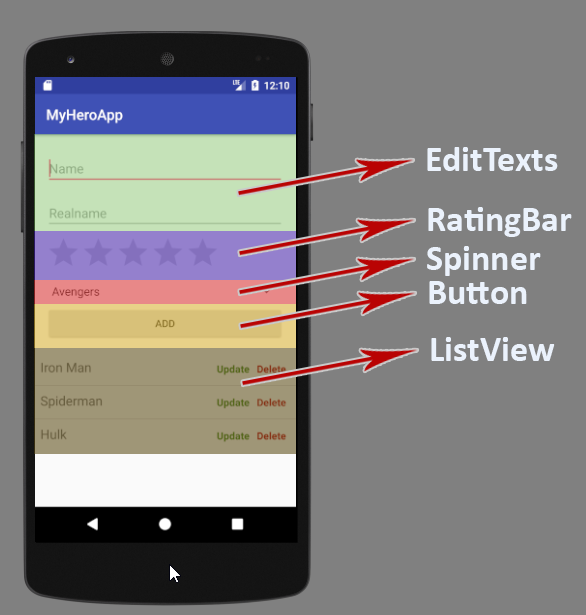
- The below image shows how our final application will look.
- So we need to design the above mentioned things. I have already designed the activity_main.xml so you can directly use the below code.
|
1 2 3 4 5 6 7 8 9 10 11 12 13 14 15 16 17 18 19 20 21 22 23 24 25 26 27 28 29 30 31 32 33 34 35 36 37 38 39 40 41 42 43 44 45 46 47 48 49 50 51 52 53 54 55 56 57 58 59 60 61 62 63 64 65 66 67 68 69 70 71 72 73 74 75 76 77 78 |
<?xml version="1.0" encoding="utf-8"?> <RelativeLayout xmlns:android="http://schemas.android.com/apk/res/android" xmlns:tools="http://schemas.android.com/tools" android:layout_width="match_parent" android:layout_height="match_parent" tools:context="net.simplifiedlearning.myheroapp.MainActivity"> <LinearLayout android:id="@+id/linearLayout" android:layout_width="match_parent" android:layout_height="wrap_content" android:layout_alignParentTop="true" android:orientation="vertical" android:padding="16dp"> <EditText android:id="@+id/editTextHeroId" android:layout_width="match_parent" android:layout_height="wrap_content" android:visibility="gone" /> <EditText android:id="@+id/editTextName" android:layout_width="match_parent" android:layout_height="wrap_content" android:layout_marginBottom="8dp" android:layout_marginTop="8dp" android:hint="Name" /> <EditText android:id="@+id/editTextRealname" android:layout_width="match_parent" android:layout_height="wrap_content" android:layout_marginBottom="8dp" android:layout_marginTop="8dp" android:hint="Realname" /> <RatingBar android:id="@+id/ratingBar" android:layout_width="wrap_content" android:layout_height="wrap_content" android:numStars="5" android:stepSize="1" /> <Spinner android:id="@+id/spinnerTeamAffiliation" android:layout_width="match_parent" android:layout_height="wrap_content" android:layout_marginBottom="8dp" android:layout_marginTop="8dp" android:entries="@array/teams" /> <Button android:id="@+id/buttonAddUpdate" android:layout_width="match_parent" android:layout_height="wrap_content" android:text="Add" /> </LinearLayout> <ListView android:id="@+id/listViewHeroes" android:layout_width="match_parent" android:layout_height="wrap_content" android:layout_below="@id/linearLayout" /> <ProgressBar android:id="@+id/progressBar" android:layout_width="wrap_content" android:layout_height="wrap_content" android:layout_centerHorizontal="true" android:layout_centerVertical="true" android:visibility="gone" /> </RelativeLayout> |
- For the spinner I have used static entries using xml array. So you also need to create this array. For this go inside values -> strings.xml
|
1 2 3 4 5 6 7 8 9 10 11 12 13 |
<resources> <string name="app_name">Android MySQL CRUD</string> <!-- defining the array for our spinner --> <array name="teams"> <item>Avengers</item> <item>Justice League</item> <item>X-Men</item> <item>Fantastic Four</item> </array> </resources> |
- Thats it for the User Interface part.
- Now lets perform the CRUD operations in our MySQL database.
Class to Perform Network Request
- The point is we cannot directly perform a network request in the application’s main thread. So for this we need an AsyncTask to perform the task in a separate thread. Hence we will create an inner class inside MainActivity.java.
|
1 2 3 4 5 6 7 8 9 10 11 12 13 14 15 16 17 18 19 20 21 22 23 24 25 26 27 28 29 30 31 32 33 34 35 36 37 38 39 40 41 42 43 44 45 46 47 48 49 50 51 52 53 54 55 56 57 58 59 60 61 62 63 64 |
//inner class to perform network request extending an AsyncTask private class PerformNetworkRequest extends AsyncTask<Void, Void, String> { //the url where we need to send the request String url; //the parameters HashMap<String, String> params; //the request code to define whether it is a GET or POST int requestCode; //constructor to initialize values PerformNetworkRequest(String url, HashMap<String, String> params, int requestCode) { this.url = url; this.params = params; this.requestCode = requestCode; } //when the task started displaying a progressbar @Override protected void onPreExecute() { super.onPreExecute(); progressBar.setVisibility(View.VISIBLE); } //this method will give the response from the request @Override protected void onPostExecute(String s) { super.onPostExecute(s); progressBar.setVisibility(GONE); try { JSONObject object = new JSONObject(s); if (!object.getBoolean("error")) { Toast.makeText(getApplicationContext(), object.getString("message"), Toast.LENGTH_SHORT).show(); //refreshing the herolist after every operation //so we get an updated list //we will create this method right now it is commented //because we haven't created it yet //refreshHeroList(object.getJSONArray("heroes")); } } catch (JSONException e) { e.printStackTrace(); } } //the network operation will be performed in background @Override protected String doInBackground(Void... voids) { RequestHandler requestHandler = new RequestHandler(); if (requestCode == CODE_POST_REQUEST) return requestHandler.sendPostRequest(url, params); if (requestCode == CODE_GET_REQUEST) return requestHandler.sendGetRequest(url); return null; } } |
Create Operation
- Now lets save a new hero to our database. First we will define all the views. And we will attach a clicklistener to the button and inside the click event we will call the method to create a new record in the database.
|
1 2 3 4 5 6 7 8 9 10 11 12 13 14 15 16 17 18 19 20 21 22 23 24 25 26 27 28 29 30 31 32 33 34 35 36 37 38 39 40 41 42 43 44 45 46 47 48 49 50 51 52 53 54 55 56 57 58 59 60 61 62 63 64 65 66 |
public class MainActivity extends AppCompatActivity { private static final int CODE_GET_REQUEST = 1024; private static final int CODE_POST_REQUEST = 1025; //defining views EditText editTextHeroId, editTextName, editTextRealname; RatingBar ratingBar; Spinner spinnerTeam; ProgressBar progressBar; ListView listView; Button buttonAddUpdate; //we will use this list to display hero in listview List<Hero> heroList; //as the same button is used for create and update //we need to track whether it is an update or create operation //for this we have this boolean boolean isUpdating = false; @Override protected void onCreate(Bundle savedInstanceState) { super.onCreate(savedInstanceState); setContentView(R.layout.activity_main); editTextHeroId = (EditText) findViewById(R.id.editTextHeroId); editTextName = (EditText) findViewById(R.id.editTextName); editTextRealname = (EditText) findViewById(R.id.editTextRealname); ratingBar = (RatingBar) findViewById(R.id.ratingBar); spinnerTeam = (Spinner) findViewById(R.id.spinnerTeamAffiliation); buttonAddUpdate = (Button) findViewById(R.id.buttonAddUpdate); progressBar = (ProgressBar) findViewById(R.id.progressBar); listView = (ListView) findViewById(R.id.listViewHeroes); heroList = new ArrayList<>(); buttonAddUpdate.setOnClickListener(new View.OnClickListener() { @Override public void onClick(View view) { //if it is updating if (isUpdating) { //calling the method update hero //method is commented becuase it is not yet created //updateHero(); } else { //if it is not updating //that means it is creating //so calling the method create hero createHero(); } } }); //calling the method read heroes to read existing heros from the database //method is commented because it is not yet created //readHeroes(); } |
- Now we need to create the method createHero().
|
1 2 3 4 5 6 7 8 9 10 11 12 13 14 15 16 17 18 19 20 21 22 23 24 25 26 27 28 29 30 31 32 33 34 35 36 37 |
private void createHero() { String name = editTextName.getText().toString().trim(); String realname = editTextRealname.getText().toString().trim(); int rating = (int) ratingBar.getRating(); String team = spinnerTeam.getSelectedItem().toString(); //validating the inputs if (TextUtils.isEmpty(name)) { editTextName.setError("Please enter name"); editTextName.requestFocus(); return; } if (TextUtils.isEmpty(realname)) { editTextRealname.setError("Please enter real name"); editTextRealname.requestFocus(); return; } //if validation passes HashMap<String, String> params = new HashMap<>(); params.put("name", name); params.put("realname", realname); params.put("rating", String.valueOf(rating)); params.put("teamaffiliation", team); //Calling the create hero API PerformNetworkRequest request = new PerformNetworkRequest(Api.URL_CREATE_HERO, params, CODE_POST_REQUEST); request.execute(); } |
- Now run the application and try adding a new hero.
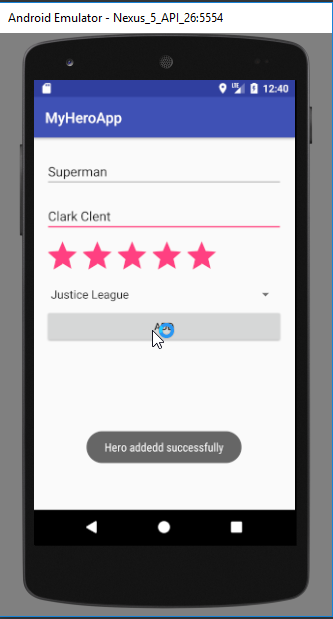
- Its working fine, you can check the database as well. Now lets move to the read operation.
Read Operation
- We will display all the heroes from the database in a ListView, the ListView also have the Update and Delete Button.
- So for this first we will create a custom Layout for our ListView.
List Layout
- Create a layout resource file named layout_hero_list.xml.
|
1 2 3 4 5 6 7 8 9 10 11 12 13 14 15 16 17 18 19 20 21 22 23 24 25 26 27 28 29 30 31 32 33 34 35 36 37 38 39 40 41 42 43 |
<?xml version="1.0" encoding="utf-8"?> <RelativeLayout xmlns:android="http://schemas.android.com/apk/res/android" android:layout_width="match_parent" android:layout_height="match_parent" android:orientation="horizontal" android:padding="8dp"> <TextView android:id="@+id/textViewName" android:layout_width="wrap_content" android:layout_height="wrap_content" android:layout_alignParentLeft="true" android:layout_weight="8" android:text="Captain America" android:textAppearance="@style/Base.TextAppearance.AppCompat.Medium" /> <TextView android:textStyle="bold" android:id="@+id/textViewUpdate" android:layout_width="wrap_content" android:layout_height="wrap_content" android:layout_alignBottom="@+id/textViewDelete" android:layout_toLeftOf="@+id/textViewDelete" android:layout_toStartOf="@+id/textViewDelete" android:padding="5dp" android:text="Update" android:textColor="#498C1A" /> <TextView android:textStyle="bold" android:id="@+id/textViewDelete" android:layout_width="wrap_content" android:layout_height="wrap_content" android:layout_alignParentRight="true" android:padding="5dp" android:text="Delete" android:textColor="#C20A10" /> </RelativeLayout> |
Custom Adapter Class
- Create one more inner class inside MainActivity class. We will name it HeroAdapter.
|
1 2 3 4 5 6 7 8 9 10 11 12 13 14 15 16 17 18 19 20 21 22 23 24 25 26 27 28 29 30 31 32 33 34 35 36 37 38 39 40 41 42 43 44 45 46 47 48 49 50 51 52 53 54 55 56 57 58 59 60 61 62 63 64 65 66 67 68 69 70 71 72 73 74 75 76 77 78 79 80 81 82 |
class HeroAdapter extends ArrayAdapter<Hero> { //our hero list List<Hero> heroList; //constructor to get the list public HeroAdapter(List<Hero> heroList) { super(MainActivity.this, R.layout.layout_hero_list, heroList); this.heroList = heroList; } //method returning list item @Override public View getView(int position, View convertView, ViewGroup parent) { LayoutInflater inflater = getLayoutInflater(); View listViewItem = inflater.inflate(R.layout.layout_hero_list, null, true); //getting the textview for displaying name TextView textViewName = listViewItem.findViewById(R.id.textViewName); //the update and delete textview TextView textViewUpdate = listViewItem.findViewById(R.id.textViewUpdate); TextView textViewDelete = listViewItem.findViewById(R.id.textViewDelete); final Hero hero = heroList.get(position); textViewName.setText(hero.getName()); //attaching click listener to update textViewUpdate.setOnClickListener(new View.OnClickListener() { @Override public void onClick(View view) { //so when it is updating we will //make the isUpdating as true isUpdating = true; //we will set the selected hero to the UI elements editTextHeroId.setText(String.valueOf(hero.getId())); editTextName.setText(hero.getName()); editTextRealname.setText(hero.getRealname()); ratingBar.setRating(hero.getRating()); spinnerTeam.setSelection(((ArrayAdapter<String>) spinnerTeam.getAdapter()).getPosition(hero.getTeamaffiliation())); //we will also make the button text to Update buttonAddUpdate.setText("Update"); } }); //when the user selected delete textViewDelete.setOnClickListener(new View.OnClickListener() { @Override public void onClick(View view) { // we will display a confirmation dialog before deleting AlertDialog.Builder builder = new AlertDialog.Builder(MainActivity.this); builder.setTitle("Delete " + hero.getName()) .setMessage("Are you sure you want to delete it?") .setPositiveButton(android.R.string.yes, new DialogInterface.OnClickListener() { public void onClick(DialogInterface dialog, int which) { //if the choice is yes we will delete the hero //method is commented because it is not yet created //deleteHero(hero.getId()); } }) .setNegativeButton(android.R.string.no, new DialogInterface.OnClickListener() { public void onClick(DialogInterface dialog, int which) { } }) .setIcon(android.R.drawable.ic_dialog_alert) .show(); } }); return listViewItem; } } |
Retrieving Heroes from the Database
- Create a method named readHeroes().
|
1 2 3 4 5 6 |
private void readHeroes() { PerformNetworkRequest request = new PerformNetworkRequest(Api.URL_READ_HEROES, null, CODE_GET_REQUEST); request.execute(); } |
- Now one more method we need to refresh the Hero List. So create a method named refreshHeroList().
|
1 2 3 4 5 6 7 8 9 10 11 12 13 14 15 16 17 18 19 20 21 22 23 24 25 26 |
private void refreshHeroList(JSONArray heroes) throws JSONException { //clearing previous heroes heroList.clear(); //traversing through all the items in the json array //the json we got from the response for (int i = 0; i < heroes.length(); i++) { //getting each hero object JSONObject obj = heroes.getJSONObject(i); //adding the hero to the list heroList.add(new Hero( obj.getInt("id"), obj.getString("name"), obj.getString("realname"), obj.getInt("rating"), obj.getString("teamaffiliation") )); } //creating the adapter and setting it to the listview HeroAdapter adapter = new HeroAdapter(heroList); listView.setAdapter(adapter); } |
- Now also uncomment the commented method inside PeformNetworkRequest class and onCreate() method. You need to uncomment readHeroes() inside onCreate() and refreshHeroList() inside PerformNetworkRequest class.
- Now you can try running the application.
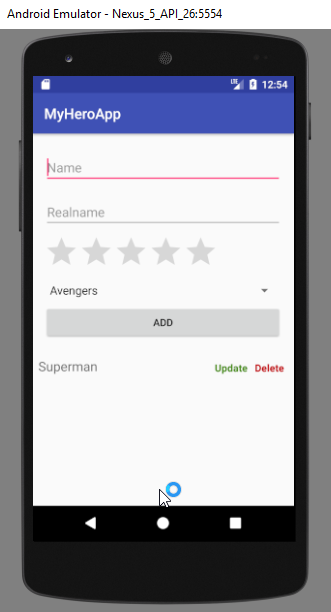
- You can see it is also working fine. Now lets do the UPDATE operation.
Update Operation
- For updating we will create a new method named updateHero().
|
1 2 3 4 5 6 7 8 9 10 11 12 13 14 15 16 17 18 19 20 21 22 23 24 25 26 27 28 29 30 31 32 33 34 35 36 37 38 39 40 41 42 43 44 |
private void updateHero() { String id = editTextHeroId.getText().toString(); String name = editTextName.getText().toString().trim(); String realname = editTextRealname.getText().toString().trim(); int rating = (int) ratingBar.getRating(); String team = spinnerTeam.getSelectedItem().toString(); if (TextUtils.isEmpty(name)) { editTextName.setError("Please enter name"); editTextName.requestFocus(); return; } if (TextUtils.isEmpty(realname)) { editTextRealname.setError("Please enter real name"); editTextRealname.requestFocus(); return; } HashMap<String, String> params = new HashMap<>(); params.put("id", id); params.put("name", name); params.put("realname", realname); params.put("rating", String.valueOf(rating)); params.put("teamaffiliation", team); PerformNetworkRequest request = new PerformNetworkRequest(Api.URL_UPDATE_HERO, params, CODE_POST_REQUEST); request.execute(); buttonAddUpdate.setText("Add"); editTextName.setText(""); editTextRealname.setText(""); ratingBar.setRating(0); spinnerTeam.setSelection(0); isUpdating = false; } |
- Now just uncomment the method updateHero() inside the click listener of buttonAddUpdate.
- And now we can try updating a record.
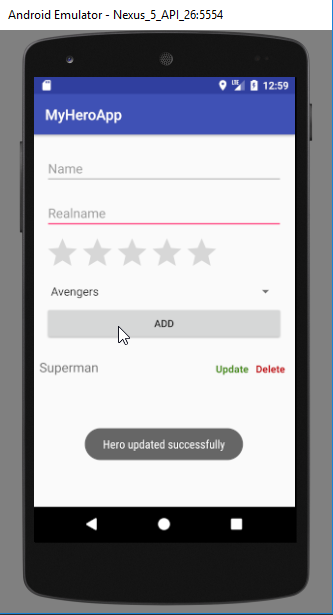
- So the update is also working absolutely fine. Now lets move to the last operation which is delete.
Delete Operation
- For delete also we need a new method. So create a method named deleteHero().
|
1 2 3 4 5 6 |
private void deleteHero(int id) { PerformNetworkRequest request = new PerformNetworkRequest(Api.URL_DELETE_HERO + id, null, CODE_GET_REQUEST); request.execute(); } |
- Now uncomment the method deleteHero() inside the HeroAdapter class.
- And lets test the delete operation as well.
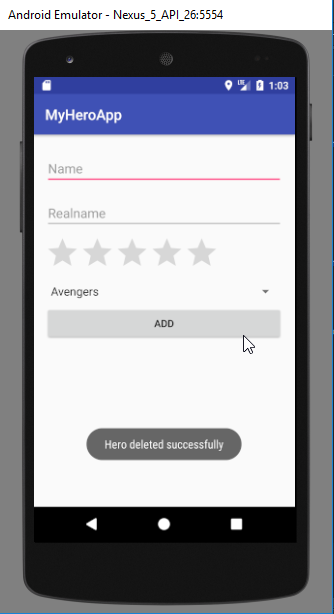
- So it is working fine as well. And we have done with all the basic CRUD operations.
The complete code for MainActivity
- If you had some confusions following the above steps here is the complete code for MainActivity.java.
|
1 2 3 4 5 6 7 8 9 10 11 12 13 14 15 16 17 18 19 20 21 22 23 24 25 26 27 28 29 30 31 32 33 34 35 36 37 38 39 40 41 42 43 44 45 46 47 48 49 50 51 52 53 54 55 56 57 58 59 60 61 62 63 64 65 66 67 68 69 70 71 72 73 74 75 76 77 78 79 80 81 82 83 84 85 86 87 88 89 90 91 92 93 94 95 96 97 98 99 100 101 102 103 104 105 106 107 108 109 110 111 112 113 114 115 116 117 118 119 120 121 122 123 124 125 126 127 128 129 130 131 132 133 134 135 136 137 138 139 140 141 142 143 144 145 146 147 148 149 150 151 152 153 154 155 156 157 158 159 160 161 162 163 164 165 166 167 168 169 170 171 172 173 174 175 176 177 178 179 180 181 182 183 184 185 186 187 188 189 190 191 192 193 194 195 196 197 198 199 200 201 202 203 204 205 206 207 208 209 210 211 212 213 214 215 216 217 218 219 220 221 222 223 224 225 226 227 228 229 230 231 232 233 234 235 236 237 238 239 240 241 242 243 244 245 246 247 248 249 250 251 252 253 254 255 256 257 258 259 260 261 262 263 264 265 266 267 268 269 270 271 272 273 274 275 276 277 278 279 280 281 282 283 284 285 286 287 288 289 290 291 292 293 294 295 |
package net.simplifiedlearning.myheroapp; import android.content.DialogInterface; import android.os.AsyncTask; import android.os.Bundle; import android.support.v7.app.AlertDialog; import android.support.v7.app.AppCompatActivity; import android.text.TextUtils; import android.view.LayoutInflater; import android.view.View; import android.view.ViewGroup; import android.widget.ArrayAdapter; import android.widget.Button; import android.widget.EditText; import android.widget.ListView; import android.widget.ProgressBar; import android.widget.RatingBar; import android.widget.Spinner; import android.widget.TextView; import android.widget.Toast; import org.json.JSONArray; import org.json.JSONException; import org.json.JSONObject; import java.util.ArrayList; import java.util.HashMap; import java.util.List; import static android.view.View.GONE; public class MainActivity extends AppCompatActivity { private static final int CODE_GET_REQUEST = 1024; private static final int CODE_POST_REQUEST = 1025; EditText editTextHeroId, editTextName, editTextRealname; RatingBar ratingBar; Spinner spinnerTeam; ProgressBar progressBar; ListView listView; Button buttonAddUpdate; List<Hero> heroList; boolean isUpdating = false; @Override protected void onCreate(Bundle savedInstanceState) { super.onCreate(savedInstanceState); setContentView(R.layout.activity_main); editTextHeroId = (EditText) findViewById(R.id.editTextHeroId); editTextName = (EditText) findViewById(R.id.editTextName); editTextRealname = (EditText) findViewById(R.id.editTextRealname); ratingBar = (RatingBar) findViewById(R.id.ratingBar); spinnerTeam = (Spinner) findViewById(R.id.spinnerTeamAffiliation); buttonAddUpdate = (Button) findViewById(R.id.buttonAddUpdate); progressBar = (ProgressBar) findViewById(R.id.progressBar); listView = (ListView) findViewById(R.id.listViewHeroes); heroList = new ArrayList<>(); buttonAddUpdate.setOnClickListener(new View.OnClickListener() { @Override public void onClick(View view) { if (isUpdating) { updateHero(); } else { createHero(); } } }); readHeroes(); } private void createHero() { String name = editTextName.getText().toString().trim(); String realname = editTextRealname.getText().toString().trim(); int rating = (int) ratingBar.getRating(); String team = spinnerTeam.getSelectedItem().toString(); if (TextUtils.isEmpty(name)) { editTextName.setError("Please enter name"); editTextName.requestFocus(); return; } if (TextUtils.isEmpty(realname)) { editTextRealname.setError("Please enter real name"); editTextRealname.requestFocus(); return; } HashMap<String, String> params = new HashMap<>(); params.put("name", name); params.put("realname", realname); params.put("rating", String.valueOf(rating)); params.put("teamaffiliation", team); PerformNetworkRequest request = new PerformNetworkRequest(Api.URL_CREATE_HERO, params, CODE_POST_REQUEST); request.execute(); } private void readHeroes() { PerformNetworkRequest request = new PerformNetworkRequest(Api.URL_READ_HEROES, null, CODE_GET_REQUEST); request.execute(); } private void updateHero() { String id = editTextHeroId.getText().toString(); String name = editTextName.getText().toString().trim(); String realname = editTextRealname.getText().toString().trim(); int rating = (int) ratingBar.getRating(); String team = spinnerTeam.getSelectedItem().toString(); if (TextUtils.isEmpty(name)) { editTextName.setError("Please enter name"); editTextName.requestFocus(); return; } if (TextUtils.isEmpty(realname)) { editTextRealname.setError("Please enter real name"); editTextRealname.requestFocus(); return; } HashMap<String, String> params = new HashMap<>(); params.put("id", id); params.put("name", name); params.put("realname", realname); params.put("rating", String.valueOf(rating)); params.put("teamaffiliation", team); PerformNetworkRequest request = new PerformNetworkRequest(Api.URL_UPDATE_HERO, params, CODE_POST_REQUEST); request.execute(); buttonAddUpdate.setText("Add"); editTextName.setText(""); editTextRealname.setText(""); ratingBar.setRating(0); spinnerTeam.setSelection(0); isUpdating = false; } private void deleteHero(int id) { PerformNetworkRequest request = new PerformNetworkRequest(Api.URL_DELETE_HERO + id, null, CODE_GET_REQUEST); request.execute(); } private void refreshHeroList(JSONArray heroes) throws JSONException { heroList.clear(); for (int i = 0; i < heroes.length(); i++) { JSONObject obj = heroes.getJSONObject(i); heroList.add(new Hero( obj.getInt("id"), obj.getString("name"), obj.getString("realname"), obj.getInt("rating"), obj.getString("teamaffiliation") )); } HeroAdapter adapter = new HeroAdapter(heroList); listView.setAdapter(adapter); } private class PerformNetworkRequest extends AsyncTask<Void, Void, String> { String url; HashMap<String, String> params; int requestCode; PerformNetworkRequest(String url, HashMap<String, String> params, int requestCode) { this.url = url; this.params = params; this.requestCode = requestCode; } @Override protected void onPreExecute() { super.onPreExecute(); progressBar.setVisibility(View.VISIBLE); } @Override protected void onPostExecute(String s) { super.onPostExecute(s); progressBar.setVisibility(GONE); try { JSONObject object = new JSONObject(s); if (!object.getBoolean("error")) { Toast.makeText(getApplicationContext(), object.getString("message"), Toast.LENGTH_SHORT).show(); refreshHeroList(object.getJSONArray("heroes")); } } catch (JSONException e) { e.printStackTrace(); } } @Override protected String doInBackground(Void... voids) { RequestHandler requestHandler = new RequestHandler(); if (requestCode == CODE_POST_REQUEST) return requestHandler.sendPostRequest(url, params); if (requestCode == CODE_GET_REQUEST) return requestHandler.sendGetRequest(url); return null; } } class HeroAdapter extends ArrayAdapter<Hero> { List<Hero> heroList; public HeroAdapter(List<Hero> heroList) { super(MainActivity.this, R.layout.layout_hero_list, heroList); this.heroList = heroList; } @Override public View getView(int position, View convertView, ViewGroup parent) { LayoutInflater inflater = getLayoutInflater(); View listViewItem = inflater.inflate(R.layout.layout_hero_list, null, true); TextView textViewName = listViewItem.findViewById(R.id.textViewName); TextView textViewUpdate = listViewItem.findViewById(R.id.textViewUpdate); TextView textViewDelete = listViewItem.findViewById(R.id.textViewDelete); final Hero hero = heroList.get(position); textViewName.setText(hero.getName()); textViewUpdate.setOnClickListener(new View.OnClickListener() { @Override public void onClick(View view) { isUpdating = true; editTextHeroId.setText(String.valueOf(hero.getId())); editTextName.setText(hero.getName()); editTextRealname.setText(hero.getRealname()); ratingBar.setRating(hero.getRating()); spinnerTeam.setSelection(((ArrayAdapter<String>) spinnerTeam.getAdapter()).getPosition(hero.getTeamaffiliation())); buttonAddUpdate.setText("Update"); } }); textViewDelete.setOnClickListener(new View.OnClickListener() { @Override public void onClick(View view) { AlertDialog.Builder builder = new AlertDialog.Builder(MainActivity.this); builder.setTitle("Delete " + hero.getName()) .setMessage("Are you sure you want to delete it?") .setPositiveButton(android.R.string.yes, new DialogInterface.OnClickListener() { public void onClick(DialogInterface dialog, int which) { deleteHero(hero.getId()); } }) .setNegativeButton(android.R.string.no, new DialogInterface.OnClickListener() { public void onClick(DialogInterface dialog, int which) { } }) .setIcon(android.R.drawable.ic_dialog_alert) .show(); } }); return listViewItem; } } } |
- So after following every step correctly your application will behave as shown below.
Android MySQL Tutorial – Source Code Download
- If you are still facing troubles you can get my source code from below. It has everything, the server side scripts, database file and android project.
Android MySQL Tutorial Source Code
So thats all for this Android MySQL Tutorial friends. CRUD Operation is needed in almost every application so it is a very important thing. If you are having any confusions or queries regarding this Android MySQL tutorial don’t hesitate in asking on comments. And if you liked the post then PLEASE SHARE IT. Thank You 🙂


