
In this post we will create an Android Email App.
We will not use the default Android Email Client to send emails instead we will use Javamail API to create our own email sender. And you can also use this App for Email.
So if you are searching Best Email App for Android then try the app created by yourself 😉
Before going through the tutorial you can check the following video to see exactly what you will be creating in this tutorial.
Android Email App – Video
Download Javamail API for Android
- For this Android Email App we will use Javamail API, so before starting our android project download Javamail API from link given below
[download id=”1481″]
- You will get a zip file from the above link. Extract the zip and you will get three .jar files. We will use these .jar files in our android email app project.
Creating Android Email App in Android Studio
- Open Android Studio and create a new android project.
- First we will add the downloaded .jar’s to our project.
- From the left panel click on Android -> Project (see the image below)

- Now you will get the libs folder inside projectfolder -> app -> libs . Paste all the three .jar files which you have downloaded above inside the libs folder. (See the image below)

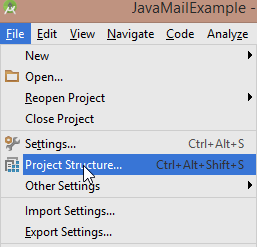
- Now go to file -> project structure.
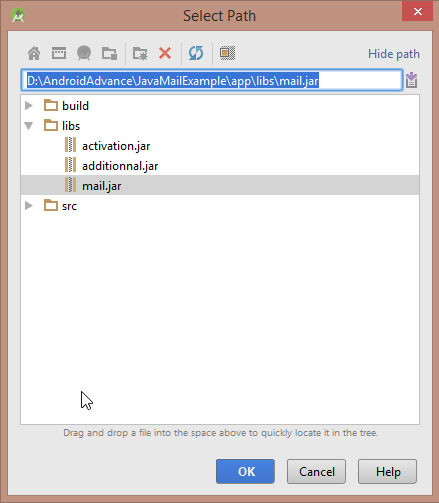
- Now go to dependencies and from the right click on the green + sign and then click on file dependencies.

- Now go to libs folder and add all the three .jar files (you can see in the image)
- Now click on ok, ok and you have added the apis to your project.
- Now come to activity_main.xml and create the following layout.

- Use the following code for creating the above layout.
|
1 2 3 4 5 6 7 8 9 10 11 12 13 14 15 16 17 18 19 20 21 22 23 24 25 26 27 28 29 30 31 32 33 34 35 36 37 38 39 40 41 42 |
<?xml version="1.0" encoding="utf-8"?> <LinearLayout xmlns:android="http://schemas.android.com/apk/res/android" android:orientation="vertical" xmlns:tools="http://schemas.android.com/tools" android:layout_width="match_parent" android:layout_height="match_parent" android:paddingLeft="@dimen/activity_horizontal_margin" android:paddingRight="@dimen/activity_horizontal_margin" android:paddingTop="@dimen/activity_vertical_margin" android:paddingBottom="@dimen/activity_vertical_margin" tools:context=".MainActivity"> <TextView android:text="Recipient Email" android:layout_width="wrap_content" android:layout_height="wrap_content" /> <EditText android:layout_width="match_parent" android:layout_height="wrap_content" android:id="@+id/editTextEmail" /> <TextView android:text="Subject" android:layout_width="wrap_content" android:layout_height="wrap_content" /> <EditText android:layout_width="match_parent" android:layout_height="wrap_content" android:id="@+id/editTextSubject" /> <TextView android:text="Message" android:layout_width="wrap_content" android:layout_height="wrap_content" /> <EditText android:lines="4" android:layout_width="match_parent" android:layout_height="wrap_content" android:id="@+id/editTextMessage" /> <Button android:layout_width="match_parent" android:layout_height="wrap_content" android:id="@+id/buttonSend" android:text="Send"/> </LinearLayout> |
- For this android email app we will use gmail to send emails. So create a new java class named Config.java and write the following code.
|
1 2 3 4 5 6 7 8 9 10 11 |
package net.simplifiedcoding.javamailexample; /** * Created by Belal on 10/30/2015. */ public class Config { public static final String EMAIL ="your-gmail-username"; public static final String PASSWORD ="your-gmail-password"; } |
- You have to write your gmail username and password.
- Now create a new class SendMail.java. It will send our email. Write the following code in this class.
|
1 2 3 4 5 6 7 8 9 10 11 12 13 14 15 16 17 18 19 20 21 22 23 24 25 26 27 28 29 30 31 32 33 34 35 36 37 38 39 40 41 42 43 44 45 46 47 48 49 50 51 52 53 54 55 56 57 58 59 60 61 62 63 64 65 66 67 68 69 70 71 72 73 74 75 76 77 78 79 80 81 82 83 84 85 86 87 88 89 90 91 92 93 94 95 96 97 98 99 100 101 102 103 104 105 106 107 |
package net.simplifiedcoding.javamailexample; import android.app.ProgressDialog; import android.content.Context; import android.os.AsyncTask; import android.widget.Toast; import java.util.Properties; import javax.mail.Message; import javax.mail.MessagingException; import javax.mail.PasswordAuthentication; import javax.mail.Session; import javax.mail.Transport; import javax.mail.internet.InternetAddress; import javax.mail.internet.MimeMessage; /** * Created by Belal on 10/30/2015. */ //Class is extending AsyncTask because this class is going to perform a networking operation public class SendMail extends AsyncTask<Void,Void,Void> { //Declaring Variables private Context context; private Session session; //Information to send email private String email; private String subject; private String message; //Progressdialog to show while sending email private ProgressDialog progressDialog; //Class Constructor public SendMail(Context context, String email, String subject, String message){ //Initializing variables this.context = context; this.email = email; this.subject = subject; this.message = message; } @Override protected void onPreExecute() { super.onPreExecute(); //Showing progress dialog while sending email progressDialog = ProgressDialog.show(context,"Sending message","Please wait...",false,false); } @Override protected void onPostExecute(Void aVoid) { super.onPostExecute(aVoid); //Dismissing the progress dialog progressDialog.dismiss(); //Showing a success message Toast.makeText(context,"Message Sent",Toast.LENGTH_LONG).show(); } @Override protected Void doInBackground(Void... params) { //Creating properties Properties props = new Properties(); //Configuring properties for gmail //If you are not using gmail you may need to change the values props.put("mail.smtp.host", "smtp.gmail.com"); props.put("mail.smtp.socketFactory.port", "465"); props.put("mail.smtp.socketFactory.class", "javax.net.ssl.SSLSocketFactory"); props.put("mail.smtp.auth", "true"); props.put("mail.smtp.port", "465"); //Creating a new session session = Session.getDefaultInstance(props, new javax.mail.Authenticator() { //Authenticating the password protected PasswordAuthentication getPasswordAuthentication() { return new PasswordAuthentication(Config.EMAIL, Config.PASSWORD); } }); try { //Creating MimeMessage object MimeMessage mm = new MimeMessage(session); //Setting sender address mm.setFrom(new InternetAddress(Config.EMAIL)); //Adding receiver mm.addRecipient(Message.RecipientType.TO, new InternetAddress(email)); //Adding subject mm.setSubject(subject); //Adding message mm.setText(message); //Sending email Transport.send(mm); } catch (MessagingException e) { e.printStackTrace(); } return null; } } |
- Now come to MainActivity.java and write the following code.
|
1 2 3 4 5 6 7 8 9 10 11 12 13 14 15 16 17 18 19 20 21 22 23 24 25 26 27 28 29 30 31 32 33 34 35 36 37 38 39 40 41 42 43 44 45 46 47 48 49 50 51 52 53 54 55 56 57 58 59 60 |
package net.simplifiedcoding.javamailexample; import android.support.v7.app.AppCompatActivity; import android.os.Bundle; import android.view.View; import android.widget.Button; import android.widget.EditText; import java.util.Properties; import javax.mail.PasswordAuthentication; import javax.mail.Session; public class MainActivity extends AppCompatActivity implements View.OnClickListener { //Declaring EditText private EditText editTextEmail; private EditText editTextSubject; private EditText editTextMessage; //Send button private Button buttonSend; @Override protected void onCreate(Bundle savedInstanceState) { super.onCreate(savedInstanceState); setContentView(R.layout.activity_main); //Initializing the views editTextEmail = (EditText) findViewById(R.id.editTextEmail); editTextSubject = (EditText) findViewById(R.id.editTextSubject); editTextMessage = (EditText) findViewById(R.id.editTextMessage); buttonSend = (Button) findViewById(R.id.buttonSend); //Adding click listener buttonSend.setOnClickListener(this); } private void sendEmail() { //Getting content for email String email = editTextEmail.getText().toString().trim(); String subject = editTextSubject.getText().toString().trim(); String message = editTextMessage.getText().toString().trim(); //Creating SendMail object SendMail sm = new SendMail(this, email, subject, message); //Executing sendmail to send email sm.execute(); } @Override public void onClick(View v) { sendEmail(); } } |
- Finally add internet permission to manifest.
|
1 2 3 |
<uses-permission android:name="android.permission.INTERNET"/> |
- Thats it now run your application.

- Bingo! It is working absolutely fine. You can also download the source code of my project from below.
Get source code of Android Email App
[sociallocker id=1372] [download id=”1500″] [/sociallocker]
So thats all for this Android Email App tutorial. Leave your comments if you are having any queries or trouble for this Android Email App. Thank You 🙂


