Hello guys, today we will learn about creating options menu for RecyclerView Item in Android. You may have seen this in many apps. Sometimes you need to open an Options Menu for every item in the List. For creating the list we will use RecyclerView. I already posted some RecyclerView Tutorials. This time we will add an option menu to the items. So lets start.
Table of Contents
Creating an Android Studio Project
- As we always do create a new Android Studio Project.
- Select Empty Activity and move ahead.
- As usual after project is loaded in Android Studio we will get MainActivity.java and activity_main.xml files (If you haven’t changed the names while creating projects).
Learn Everything About RecyclerView in this Video
- If you are not familiar with RecyclerView then you can learn it from Scratch in this playlist. The playlist covers everything from beginning to advanced level.
- If you don’t want to learn with video then leave it and lets move ahead on this tutorial.
Adding RecyclerView and CardView
- For this List we will use RecyclerView and for the ListItems we will use CardView. Both the components are not available by default. So first we need to add these.
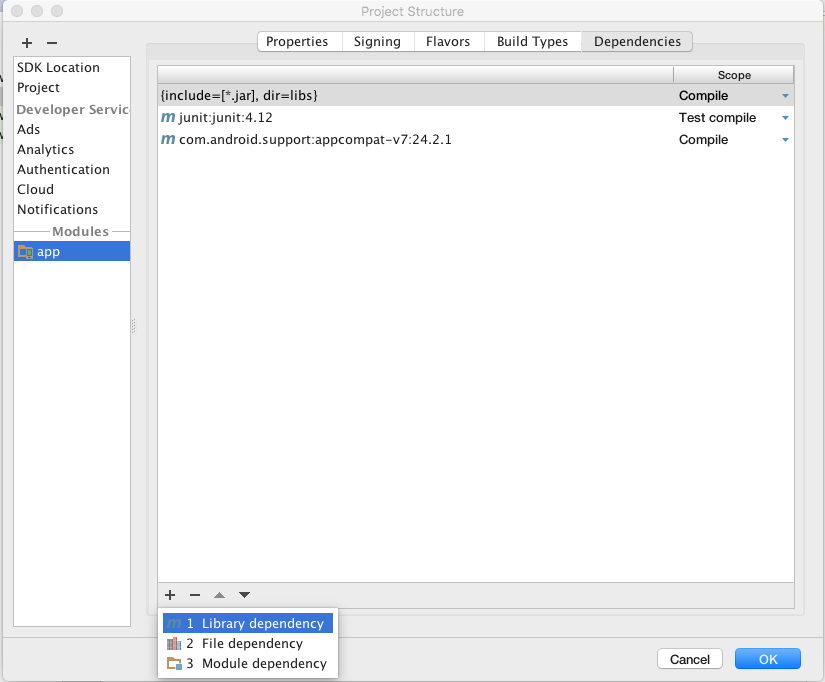
- Go to File -> Project Structure -> app -> Dependencies, then click on the + icon from below and select Library Dependency.
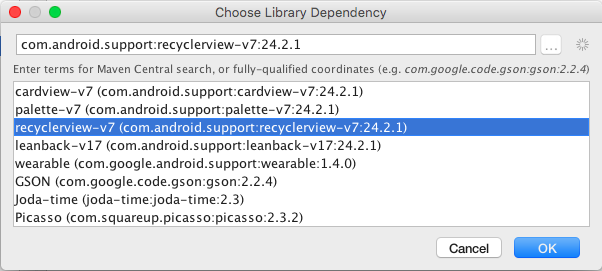
- Now find ReyclerView and CardView from the list and add them both.
Creating RecyclerView
- Now we will create a RecyclerView, so come inside activity_main.xml and create a RecyclerView with the below given code.
|
1 2 3 4 5 6 7 8 9 10 11 12 13 14 15 16 17 18 19 20 21 22 23 |
<?xml version="1.0" encoding="utf-8"?> <RelativeLayout xmlns:android="http://schemas.android.com/apk/res/android" xmlns:tools="http://schemas.android.com/tools" android:layout_width="match_parent" android:layout_height="match_parent" android:paddingBottom="@dimen/activity_vertical_margin" android:paddingLeft="@dimen/activity_horizontal_margin" android:paddingRight="@dimen/activity_horizontal_margin" android:paddingTop="@dimen/activity_vertical_margin" tools:context="net.simplifiedcoding.recyclerviewoptionsmenu.MainActivity"> <android.support.v7.widget.RecyclerView android:id="@+id/recyclerView" android:layout_width="match_parent" android:layout_height="match_parent"> </android.support.v7.widget.RecyclerView> </RelativeLayout> |
Designing List Items
- Now its time to design our List Items. So create a new layout resource file inside layout folder. I have created list_items.xml. Copy the following code inside this file, we are using CardView here to design the list item.
|
1 2 3 4 5 6 7 8 9 10 11 12 13 14 15 16 17 18 19 20 21 22 23 24 25 26 27 28 29 30 31 32 33 34 35 36 37 38 39 40 41 42 43 44 45 46 47 48 49 50 |
<?xml version="1.0" encoding="utf-8"?> <LinearLayout xmlns:android="http://schemas.android.com/apk/res/android" android:layout_width="match_parent" android:layout_height="wrap_content" android:orientation="vertical"> <android.support.v7.widget.CardView android:layout_width="match_parent" android:layout_height="wrap_content" android:layout_margin="4dp" android:elevation="4dp"> <RelativeLayout android:layout_width="match_parent" android:layout_height="wrap_content" android:padding="@dimen/activity_horizontal_margin"> <TextView android:id="@+id/textViewHead" android:layout_width="match_parent" android:layout_height="wrap_content" android:text="Your Heading" android:textAppearance="?android:textAppearanceLarge" /> <TextView android:id="@+id/textViewDesc" android:layout_width="match_parent" android:layout_height="wrap_content" android:layout_below="@id/textViewHead" android:text="Lorem ipsum dolor sit amet, consectetur adipiscing elit. Morbi molestie nisi dui. " android:textAppearance="?android:textAppearanceMedium" /> <TextView android:id="@+id/textViewOptions" android:layout_width="wrap_content" android:layout_height="wrap_content" android:layout_alignParentRight="true" android:layout_alignParentTop="true" android:paddingLeft="@dimen/activity_horizontal_margin" android:text="⋮" android:textAppearance="?android:textAppearanceLarge" /> </RelativeLayout> </android.support.v7.widget.CardView> </LinearLayout> |
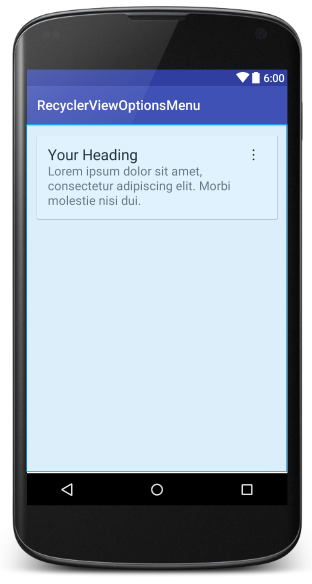
- The above code will generate the following ListItem.
- Now we need the menu item so first create a new directory inside res and name it menu.
- Inside this menu directory create a menu resource file named options_menu.xml. And create the menus you want inside this file. See the following code.
|
1 2 3 4 5 6 7 8 9 10 11 12 13 14 15 16 17 18 19 |
<?xml version="1.0" encoding="utf-8"?> <menu xmlns:android="http://schemas.android.com/apk/res/android"> <item android:id="@+id/menu1" android:title="Menu 1" /> <item android:id="@+id/menu2" android:title="Menu 2" /> <item android:id="@+id/menu3" android:title="Menu 3" /> </menu> |
Creating List Model and Adapter
- Now lets come to the coding part. First we will create a Model for our RecyclerView. So create a java file named MyList.java.
|
1 2 3 4 5 6 7 8 9 10 11 12 13 14 15 16 17 18 19 20 21 22 23 24 25 26 |
package net.simplifiedcoding.recyclerviewoptionsmenu; /** * Created by Belal on 05/10/16. */ public class MyList { private String head; private String desc; //constructor initializing values public MyList(String head, String desc) { this.head = head; this.desc = desc; } //getters public String getHead() { return head; } public String getDesc() { return desc; } } |
- Now its time to create our RecyclerView Adapter. So create a java file named CustomAdapter and write the following code.
|
1 2 3 4 5 6 7 8 9 10 11 12 13 14 15 16 17 18 19 20 21 22 23 24 25 26 27 28 29 30 31 32 33 34 35 36 37 38 39 40 41 42 43 44 45 46 47 48 49 50 51 52 53 54 55 56 57 58 59 60 61 62 63 64 65 66 67 68 69 70 71 72 |
package net.simplifiedcoding.recyclerviewoptionsmenu; import android.content.Context; import android.support.v7.widget.RecyclerView; import android.view.LayoutInflater; import android.view.View; import android.view.ViewGroup; import android.widget.TextView; import java.util.List; /** * Created by Belal on 29/09/16. */ public class CustomAdapter extends RecyclerView.Adapter<CustomAdapter.ViewHolder> { private List<MyList> list; private Context mCtx; public CustomAdapter(List<MyList> list, Context mCtx) { this.list = list; this.mCtx = mCtx; } @Override public ViewHolder onCreateViewHolder(ViewGroup parent, int viewType) { View v = LayoutInflater.from(parent.getContext()) .inflate(R.layout.list_items, parent, false); return new ViewHolder(v); } @Override public void onBindViewHolder(CustomAdapter.ViewHolder holder, int position) { MyList myList = list.get(position); holder.textViewHead.setText(myList.getHead()); holder.textViewDesc.setText(myList.getDesc()); holder.buttonViewOption.setOnClickListener(new View.OnClickListener() { @Override public void onClick(View view) { //will show popup menu here } }); } @Override public int getItemCount() { return list.size(); } public class ViewHolder extends RecyclerView.ViewHolder { public TextView textViewHead; public TextView textViewDesc; public TextView buttonViewOption; public ViewHolder(View itemView) { super(itemView); textViewHead = (TextView) itemView.findViewById(R.id.textViewHead); textViewDesc = (TextView) itemView.findViewById(R.id.textViewDesc); buttonViewOption = (TextView) itemView.findViewById(R.id.textViewOptions); } } } |
Adding Items to RecyclerView
- Now lets add some items to our RecyclerView. So come inside MainActivity.java and write the following code.
|
1 2 3 4 5 6 7 8 9 10 11 12 13 14 15 16 17 18 19 20 21 22 23 24 25 26 27 28 29 30 31 32 33 34 35 36 37 38 39 40 41 42 43 44 45 46 47 48 49 50 51 52 53 54 |
package net.simplifiedcoding.recyclerviewoptionsmenu; import android.support.v7.app.AppCompatActivity; import android.os.Bundle; import android.support.v7.widget.LinearLayoutManager; import android.support.v7.widget.RecyclerView; import android.widget.TextView; import java.util.ArrayList; import java.util.List; public class MainActivity extends AppCompatActivity { //recyclerview objects private RecyclerView recyclerView; private RecyclerView.LayoutManager layoutManager; private RecyclerView.Adapter adapter; //model object for our list data private List<MyList> list; @Override protected void onCreate(Bundle savedInstanceState) { super.onCreate(savedInstanceState); setContentView(R.layout.activity_main); //initializing views recyclerView = (RecyclerView) findViewById(R.id.recyclerView); recyclerView.setHasFixedSize(true); recyclerView.setLayoutManager(new LinearLayoutManager(this)); list = new ArrayList<>(); //loading list view item with this function loadRecyclerViewItem(); } private void loadRecyclerViewItem() { //you can fetch the data from server or some apis //for this tutorial I am adding some dummy data directly for (int i = 1; i <= 5; i++) { MyList myList = new MyList( "Dummy Heading " + i, "Lorem ipsum dolor sit amet, consectetur adipiscing elit. Morbi molestie nisi dui." ); list.add(myList); } adapter = new CustomAdapter(list, this); recyclerView.setAdapter(adapter); } } |
- Now run the application and you should see the following output.
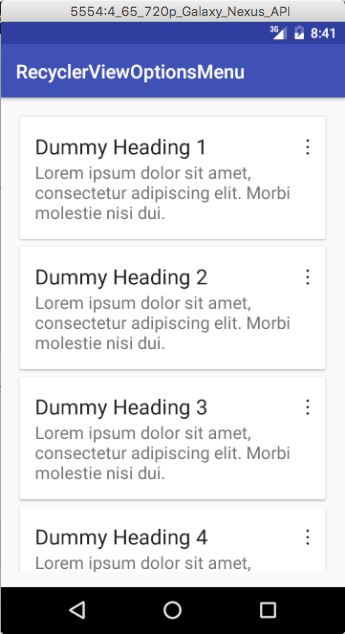
- So by now we have our nice looking RecyclerView. Now we need to create Options Menu for RecyclerView Items. You can see the three vertical dots in every item. We will option the option on the click over this three vertical dot.
- Now the last phase of this tutorial is creating Options Menu for RecyclerView Item. So again come inside CustomAdapter.java. And inside onClick() method where we written a comment that will show popup menu here, write the following code.
|
1 2 3 4 5 6 7 8 9 10 11 12 13 14 15 16 17 18 19 20 21 22 23 24 25 26 |
//creating a popup menu PopupMenu popup = new PopupMenu(mCtx, holder.buttonViewOption); //inflating menu from xml resource popup.inflate(R.menu.options_menu); //adding click listener popup.setOnMenuItemClickListener(new PopupMenu.OnMenuItemClickListener() { @Override public boolean onMenuItemClick(MenuItem item) { switch (item.getItemId()) { case R.id.menu1: //handle menu1 click break; case R.id.menu2: //handle menu2 click break; case R.id.menu3: //handle menu3 click break; } return false; } }); //displaying the popup popup.show(); |
- So the final code of the CustomAdapter.java after adding the Options Menu for RecyclerView Item will be.
|
1 2 3 4 5 6 7 8 9 10 11 12 13 14 15 16 17 18 19 20 21 22 23 24 25 26 27 28 29 30 31 32 33 34 35 36 37 38 39 40 41 42 43 44 45 46 47 48 49 50 51 52 53 54 55 56 57 58 59 60 61 62 63 64 65 66 67 68 69 70 71 72 73 74 75 76 77 78 79 80 81 82 83 84 85 86 87 88 89 90 91 92 93 94 95 96 97 98 99 |
package net.simplifiedcoding.recyclerviewoptionsmenu; import android.content.Context; import android.content.DialogInterface; import android.support.v7.app.AlertDialog; import android.support.v7.widget.PopupMenu; import android.support.v7.widget.RecyclerView; import android.view.LayoutInflater; import android.view.MenuItem; import android.view.View; import android.view.ViewGroup; import android.widget.TextView; import java.util.List; /** * Created by Belal on 29/09/16. */ public class CustomAdapter extends RecyclerView.Adapter<CustomAdapter.ViewHolder> { private List<MyList> list; private Context mCtx; public CustomAdapter(List<MyList> list, Context mCtx) { this.list = list; this.mCtx = mCtx; } @Override public ViewHolder onCreateViewHolder(ViewGroup parent, int viewType) { View v = LayoutInflater.from(parent.getContext()) .inflate(R.layout.list_items, parent, false); return new ViewHolder(v); } @Override public void onBindViewHolder(final CustomAdapter.ViewHolder holder, int position) { MyList myList = list.get(position); holder.textViewHead.setText(myList.getHead()); holder.textViewDesc.setText(myList.getDesc()); holder.buttonViewOption.setOnClickListener(new View.OnClickListener() { @Override public void onClick(View view) { //creating a popup menu PopupMenu popup = new PopupMenu(mCtx, holder.buttonViewOption); //inflating menu from xml resource popup.inflate(R.menu.options_menu); //adding click listener popup.setOnMenuItemClickListener(new PopupMenu.OnMenuItemClickListener() { @Override public boolean onMenuItemClick(MenuItem item) { switch (item.getItemId()) { case R.id.menu1: //handle menu1 click break; case R.id.menu2: //handle menu2 click break; case R.id.menu3: //handle menu3 click break; } return false; } }); //displaying the popup popup.show(); } }); } @Override public int getItemCount() { return list.size(); } public class ViewHolder extends RecyclerView.ViewHolder { public TextView textViewHead; public TextView textViewDesc; public TextView buttonViewOption; public ViewHolder(View itemView) { super(itemView); textViewHead = (TextView) itemView.findViewById(R.id.textViewHead); textViewDesc = (TextView) itemView.findViewById(R.id.textViewDesc); buttonViewOption = (TextView) itemView.findViewById(R.id.textViewOptions); } } } |
- Now run the application.
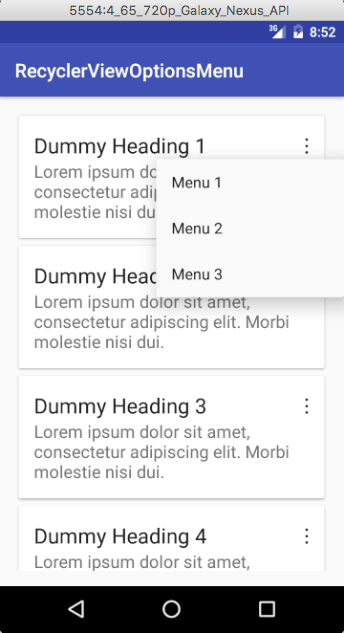
- Bingo! Its working absolutely fine.
- Still facing problems? Don’t worry you can get my source code from github repository, just go to the link given below.
[sociallocker id=1372] Options Menu for RecyclerView Source Code [/sociallocker]
So thats all for this Options Menu For RecyclerView Tutorial friends. If you are still facing troubles or have any query please don’t hesitate to leave your comments. Thank You 🙂


