
Hi everyone, “Uploading File or Image to Backend Server” this is something that we often need to do in many applications. We already learned this concept in many previous posts. But things keep changing in this tech world and old methods are obsolete now. That is why here I am with this Android Upload File to Server with Progress Tutorial.
The method we will learn in this post is fully updated and will work in all devices, including Android 10.
Table of Contents
Prerequisites
- XAMPP Server: We will use it for the backend, and ofcourse we will be using PHP and MySQL here for the backend part. But if you are comfortable with some other tech for handling the backend you can do it. We basically just need the API that will accept a file.
- Retrofit: We will be using this networking library in our Android Project.
If you want to learn building RESTFul API, that you can use in your production application then please subscribe to my YouTube channel and comment to any video that you want a production level RESTFul API Development Tutorial.

You can also learn the basics of RESTFul API Development using SLIM3 PHP Framework from the below given link.
Android Networking Tutorial using PHP, MySQL & Retrofit
Now let’s move into our post. We will start by designing our database.
What we will do is we will store the uploaded image to an uploads directory in the backend server and we will store the path to that image in our MySQL database. And you should remember this thing, we don’t store files in our MySQL database, we just store path to the file in the database.
Android Upload File to Server with Progress – Video
In case you are more comfortable watching video tutorial, then you can watch the above playlist that explains complete step by step guide about Uploading File to Server with Progress.
But in case you are ok reading a written tutorial, keep reading, we will do the same thing here.
Designing Database
- We will be using a very simple table. So just open PhpMyAdmin (I hope your XAMPP Server is running) and create a database. In my case I have created a table named ImageUploader.
- Now we need to create a table where we will store the uploaded files info. Run the following SQL query to create a table named uploads.
|
1 2 3 4 5 6 7 |
CREATE TABLE `uploads` ( `id` int(11) AUTO_INCREMENT PRIMARY KEY, `path` varchar(252) NOT NULL, `description` varchar(252) NOT NULL ); |
- As you can see we have 3 columns in our table (id, path and description).
Building Image Upload API
- We have the database, now let’s build the Image Upload API. For this I have a directory named ImageUploader inside my root folder that is htdocs for xampp.
- Inside this directory we will create a file named DbConnect.php.
|
1 2 3 4 5 6 7 8 9 10 11 12 13 14 15 16 17 18 19 20 21 22 |
<?php //these are the server details //the username is root by default in case of xampp //password is nothing by default //and lastly we have the database named android. if your database name is different you have to change it $servername = "localhost"; $username = "root"; $password = ""; $database = "imageuploader"; //creating a new connection object using mysqli $conn = new mysqli($servername, $username, $password, $database); //if there is some error connecting to the database //with die we will stop the further execution by displaying a message causing the error if ($conn->connect_error) { die("Connection failed: " . $conn->connect_error); } |
- The above file will make our database connection. Now let’s create the script that will handle the file upload.
- Create a file named Api.php and write the following code.
|
1 2 3 4 5 6 7 8 9 10 11 12 13 14 15 16 17 18 19 20 21 22 23 24 25 26 27 28 29 30 31 32 33 34 35 36 37 38 39 40 41 42 43 44 45 46 47 48 49 50 51 52 53 54 55 56 57 58 59 60 61 62 63 64 65 66 67 68 69 70 71 72 73 74 75 76 77 78 79 80 81 82 83 84 85 86 87 88 89 90 91 92 93 94 95 96 97 98 99 100 101 102 103 104 105 106 107 |
<?php //getting database connection require_once 'DbConnect.php'; //array to show the response $response = array(); //uploads directory, we will upload all the files inside this folder $target_dir = "uploads/"; //checking if we are having an api call, using the get parameters 'apicall' if(isset($_GET['apicall'])){ switch($_GET['apicall']){ //if the api call is for uploading the image case 'upload': //error message and error flag $message = 'Params '; $is_error = false; //validating the request to check if all the required parameters are available or not if(!isset($_POST['desc'])){ $message .= "desc, "; $is_error = true; } if(!isset($_FILES['image']['name'])){ $message .= "image "; $is_error = true; } //in case we have an error in validation, displaying the error message if($is_error){ $response['error'] = true; $response['message'] = $message . " required."; }else{ //if validation succeeds //creating a target file with a unique name, so that for every upload we create a unique file in our server $target_file = $target_dir . uniqid() . '.'.pathinfo($_FILES['image']['name'], PATHINFO_EXTENSION); //saving the uploaded file to the uploads directory in our target file if (move_uploaded_file($_FILES["image"]["tmp_name"], $target_file)) { //saving the file information to our database $stmt = $conn->prepare("INSERT INTO uploads (`path`, `description`) VALUES (?, ?)"); $stmt->bind_param("ss", $target_file, $_POST['desc']); //if it is saved in database successfully if($stmt->execute()){ //displaying success response $response['error'] = false; $response['message'] = 'Image Uploaded Successfully'; $response['image'] = getBaseURL() . $target_file; }else{ //if not saved in database //showing response accordingly $response['error'] = true; $response['message'] = 'Could not upload image, try again...'; } $stmt->close(); } else { $response['error'] = true; $response['message'] = 'Try again later...'; } } break; //we will use this case to get all the uploaded images from the database case 'images': $stmt = $conn->prepare("SELECT `id`, `path`, `description` FROM uploads"); $stmt->execute(); $stmt->bind_result($id, $path, $desc); while($stmt->fetch()){ $image = array(); $image['id'] = $id; $image['path'] = getBaseURL() . $path; $image['desc'] = $desc; array_push($response, $image); } break; default: $response['error'] = true; $response['message'] = 'Invalid Operation Called'; } }else{ $response['error'] = true; $response['message'] = 'Invalid API Call'; } function getBaseURL(){ $url = isset($_SERVER['HTTPS']) ? 'https://' : 'http://'; $url .= $_SERVER['SERVER_NAME']; $url .= $_SERVER['REQUEST_URI']; return dirname($url) . '/'; } header('Content-Type: application/json'); echo json_encode($response); |
- The above code handle two cases. The first one is to upload the file and the next is to fetch the uploaded files.
|
1 2 3 4 5 |
POST - http://localhost/ImageUploader/Api.php?apicall=upload - image, desc GET - http://localhost/ImageUploader/Api.php?apicall=images |
If you need the source code of the PHP Scripts, then you can get it from the below given link.
So we have the APIs ready, now let’s create our Android Project.
Android Upload File to Server with Progress
Creating an Android Project
- I have created a new project named ImageUploader using an EmptyActivity. Once the project is loaded, we will add required dependencies and internet permission.
- First add internet permission in your AndroidManifest.xml, you also need to add the usesCleartextTraffic=”true”.
|
1 2 3 4 5 6 7 8 9 10 11 12 13 14 15 16 17 18 19 20 21 22 23 24 25 26 27 28 |
<?xml version="1.0" encoding="utf-8"?> <manifest xmlns:android="http://schemas.android.com/apk/res/android" xmlns:tools="http://schemas.android.com/tools" package="net.simplifiedcoding.imageuploader"> <uses-permission android:name="android.permission.INTERNET" /> <application android:allowBackup="true" android:icon="@mipmap/ic_launcher" android:label="@string/app_name" android:roundIcon="@mipmap/ic_launcher_round" android:supportsRtl="true" android:theme="@style/AppTheme" android:usesCleartextTraffic="true" tools:targetApi="m"> <activity android:name=".MainActivity"> <intent-filter> <action android:name="android.intent.action.MAIN" /> <category android:name="android.intent.category.LAUNCHER" /> </intent-filter> </activity> </application> </manifest> |
- Now we will add the required dependencies.
Adding Dependencies
- Open app level build.gradle file and add the following dependencies inside dependencies block.
|
1 2 3 4 5 |
implementation 'com.squareup.retrofit2:retrofit:2.6.1' implementation 'com.squareup.retrofit2:converter-gson:2.6.1' implementation 'com.google.android.material:material:1.1.0' |
- After adding these lines, sync the project.
Designing User Interface
- Now let’s design the UI. Open activity_main.xml and write the following xml code.
|
1 2 3 4 5 6 7 8 9 10 11 12 13 14 15 16 17 18 19 20 21 22 23 24 25 26 27 28 29 30 31 32 33 34 35 36 37 38 39 40 41 42 43 44 45 46 47 48 49 50 51 52 53 54 55 56 57 58 59 |
<?xml version="1.0" encoding="utf-8"?> <androidx.constraintlayout.widget.ConstraintLayout xmlns:android="http://schemas.android.com/apk/res/android" xmlns:app="http://schemas.android.com/apk/res-auto" xmlns:tools="http://schemas.android.com/tools" android:id="@+id/layout_root" android:layout_width="match_parent" android:layout_height="match_parent" tools:context=".MainActivity"> <LinearLayout android:id="@+id/linearLayout" android:layout_width="0dp" android:layout_height="wrap_content" android:orientation="vertical" android:padding="12dp" app:layout_constraintBottom_toBottomOf="parent" app:layout_constraintEnd_toEndOf="parent" app:layout_constraintStart_toStartOf="parent" app:layout_constraintTop_toTopOf="parent"> <ImageView android:id="@+id/image_view" android:layout_width="match_parent" android:layout_height="350dp" android:layout_margin="24dp" app:srcCompat="@drawable/ic_picture" /> <TextView android:id="@+id/textView" android:layout_width="wrap_content" android:layout_height="wrap_content" android:layout_gravity="center_horizontal" android:fontFamily="sans-serif-light" android:text="Tap to Select Image" android:textSize="24sp" /> <ProgressBar android:id="@+id/progress_bar" style="@style/Widget.AppCompat.ProgressBar.Horizontal" android:layout_width="match_parent" android:layout_height="wrap_content" android:max="100" tools:progress="40" /> </LinearLayout> <Button android:id="@+id/button_upload" android:layout_width="wrap_content" android:layout_height="wrap_content" android:text="Upload" app:layout_constraintBottom_toBottomOf="parent" app:layout_constraintEnd_toEndOf="parent" app:layout_constraintStart_toStartOf="parent" /> </androidx.constraintlayout.widget.ConstraintLayout> |
- The above XML Code will generate the following output.
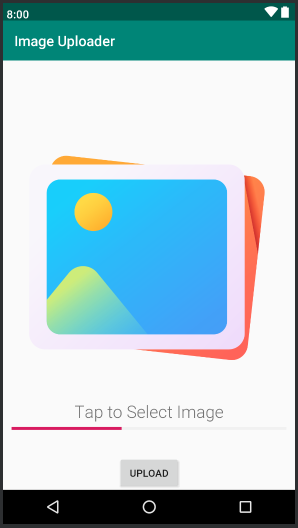
- As you can see we have a very simple User Interface for our upload operation.
- Now we need an Image to Upload it. And we will let the user choose the image from device. So our first task here is to let the user choose the image to upload.
Choosing an Image from Androids Gallery
- First define a var inside your MainActivity.kt. This var will keep the uri of the selected image file.
|
1 2 3 |
private var selectedImageUri: Uri? = null |
- Now we will create two different function inside our MainActivity.kt. One is to choose the image that we will use now and other to upload the image.
- We will also attach the click listeners to our ImageView and Button to call the functions as you can see in the below code.
|
1 2 3 4 5 6 7 8 9 |
image_view.setOnClickListener { openImageChooser() } button_upload.setOnClickListener { uploadImage() } |
- The above code snippet you need to put inside your onCreate() function.
- Inside MainActivity.kt we will define a constant that we will use for getting the selected image.
|
1 2 3 4 5 |
companion object { const val REQUEST_CODE_PICK_IMAGE = 101 } |
- Now we will define the function openImageChooser() that will open the image picker, and we will also override the function onActivityResult() to get the selected image.
|
1 2 3 4 5 6 7 8 9 10 11 12 13 14 15 16 17 18 19 20 21 22 |
private fun openImageChooser() { Intent(Intent.ACTION_PICK).also { it.type = "image/*" val mimeTypes = arrayOf("image/jpeg", "image/png") it.putExtra(Intent.EXTRA_MIME_TYPES, mimeTypes) startActivityForResult(it, REQUEST_CODE_PICK_IMAGE) } } override fun onActivityResult(requestCode: Int, resultCode: Int, data: Intent?) { super.onActivityResult(requestCode, resultCode, data) if (resultCode == Activity.RESULT_OK) { when (requestCode) { REQUEST_CODE_PICK_IMAGE -> { selectedImageUri = data?.data image_view.setImageURI(selectedImageUri) } } } } |
- As you can see inside the function onActivityResult() we are storing the uri of the image to the var that we defined at the beginning. We are also displaying the image selected in our ImageView.
Here we have the tricky part, we have the Uri of the image, but to upload the image we need the real path of it. If you have seen my last tutorial about Uploading Image with Retrofit, then here we have used a function that provides the real path from Uri. But this doesn’t work anymore in Android 10.
Nowadays, android recommends us to use the app directory for file storage. Every app has its own app-specific storage directory for file storage that is not accessible to other apps, and all files stored here are removed when we uninstall the application. And the good thing is too access this area you don’t need any permission.
So what we need to do is, we need to select the file from the gallery and make a copy of it inside the app-specific storage directory.
But before doing the above mentioned thing we will setup the Retrofit.
Setting Up Retrofit for File Upload
If you have used Retrofit earlier, you know what we need to do. First we will create an interface to define the API Calls.
- Create a file named MyAPI.kt and write the following code in it.
|
1 2 3 4 5 6 7 8 9 10 11 12 13 14 15 16 17 18 19 20 21 |
interface MyAPI { @Multipart @POST("Api.php?apicall=upload") fun uploadImage( @Part image: MultipartBody.Part, @Part("desc") desc: RequestBody ): Call<UploadResponse> companion object { operator fun invoke(): MyAPI { return Retrofit.Builder() .baseUrl("http://10.10.10.118/ImageUploader/") .addConverterFactory(GsonConverterFactory.create()) .build() .create(MyAPI::class.java) } } } |
- In the above code you can see we didn’t use localhost in the Base URL but we used IP Address, now what is the IP Address in your system you need to find it out. Check this post to know the details about it.
- Now you also need to create the following data class for parsing the API Response.
|
1 2 3 4 5 6 7 |
data class UploadResponse( val error: Boolean, val message: String, val image: String ) |
Creating Some Extension Functions
Extension function is a great feature that you get with Kotlin. We need to create two extension functions in this project, one is for getting file name from Uri and another one is for displaying snackbar (Toast looks very boring now a days).
- Create a file named Utils.kt and write the following code.
|
1 2 3 4 5 6 7 8 9 10 11 12 13 14 15 16 17 18 19 20 21 22 23 24 25 |
fun View.snackbar(message: String) { Snackbar.make( this, message, Snackbar.LENGTH_LONG ).also { snackbar -> snackbar.setAction("Ok") { snackbar.dismiss() } }.show() } fun ContentResolver.getFileName(fileUri: Uri): String { var name = "" val returnCursor = this.query(fileUri, null, null, null, null) if (returnCursor != null) { val nameIndex = returnCursor.getColumnIndex(OpenableColumns.DISPLAY_NAME) returnCursor.moveToFirst() name = returnCursor.getString(nameIndex) returnCursor.close() } return name } |
- Now let’s make the very important part of this project, that is a custom RequestBody.
If we want to get the upload progress, we need to create a custom RequestBody that will contain the file and the other information that we need to send with the API.
Creating Custom RequestBody
- Create a class named UploadRequestBody and write the following code in it.
|
1 2 3 4 5 6 7 8 9 10 11 12 13 14 15 16 17 18 19 20 21 22 23 24 25 26 27 28 29 30 31 32 33 34 35 36 37 38 39 40 41 42 43 44 45 |
class UploadRequestBody( private val file: File, private val contentType: String, private val callback: UploadCallback ) : RequestBody() { override fun contentType() = MediaType.parse("$contentType/*") override fun contentLength() = file.length() override fun writeTo(sink: BufferedSink) { val length = file.length() val buffer = ByteArray(DEFAULT_BUFFER_SIZE) val fileInputStream = FileInputStream(file) var uploaded = 0L fileInputStream.use { inputStream -> var read: Int val handler = Handler(Looper.getMainLooper()) while (inputStream.read(buffer).also { read = it } != -1) { handler.post(ProgressUpdater(uploaded, length)) uploaded += read sink.write(buffer, 0, read) } } } interface UploadCallback { fun onProgressUpdate(percentage: Int) } inner class ProgressUpdater( private val uploaded: Long, private val total: Long ) : Runnable { override fun run() { callback.onProgressUpdate((100 * uploaded / total).toInt()) } } companion object { private const val DEFAULT_BUFFER_SIZE = 2048 } } |
- Now we just need to complete the function uploadImage() inside our MainActivity.kt and we are done.
|
1 2 3 4 5 6 7 8 9 10 11 12 13 14 15 16 17 18 19 20 21 22 23 24 25 26 27 28 29 30 31 32 33 34 35 36 37 38 39 40 41 42 43 |
private fun uploadImage() { if (selectedImageUri == null) { layout_root.snackbar("Select an Image First") return } val parcelFileDescriptor = contentResolver.openFileDescriptor(selectedImageUri!!, "r", null) ?: return val inputStream = FileInputStream(parcelFileDescriptor.fileDescriptor) val file = File(cacheDir, contentResolver.getFileName(selectedImageUri!!)) val outputStream = FileOutputStream(file) inputStream.copyTo(outputStream) progress_bar.progress = 0 val body = UploadRequestBody(file, "image", this) MyAPI().uploadImage( MultipartBody.Part.createFormData( "image", file.name, body ), RequestBody.create(MediaType.parse("multipart/form-data"), "json") ).enqueue(object : Callback<UploadResponse> { override fun onFailure(call: Call<UploadResponse>, t: Throwable) { layout_root.snackbar(t.message!!) progress_bar.progress = 0 } override fun onResponse( call: Call<UploadResponse>, response: Response<UploadResponse> ) { response.body()?.let { layout_root.snackbar(it.message) progress_bar.progress = 100 } } }) } |
- After finishing the above function, you can try running your application to see the image is getting uploaded or not.
Android Upload File to Server with Progress Source Code
In case you want to get my source code, you can get it by being Simplified Coding’s Subscriber on YouTube.


