
Hi Everyone, welcome to another post. Today we will learn integration Firebase Authentication using MVVM Architecture. Today we are going to build a complete authentication app using Firebase. Now without wasting anytime let’s get started.
Table of Contents
Prerequisites
- Understanding of MVVM Architecture in Android
- Dependency Injection with Hilt
- Building UIs with Jetpack Compose
- Navigation with Jetpack Compose
Firebase Authentication Project
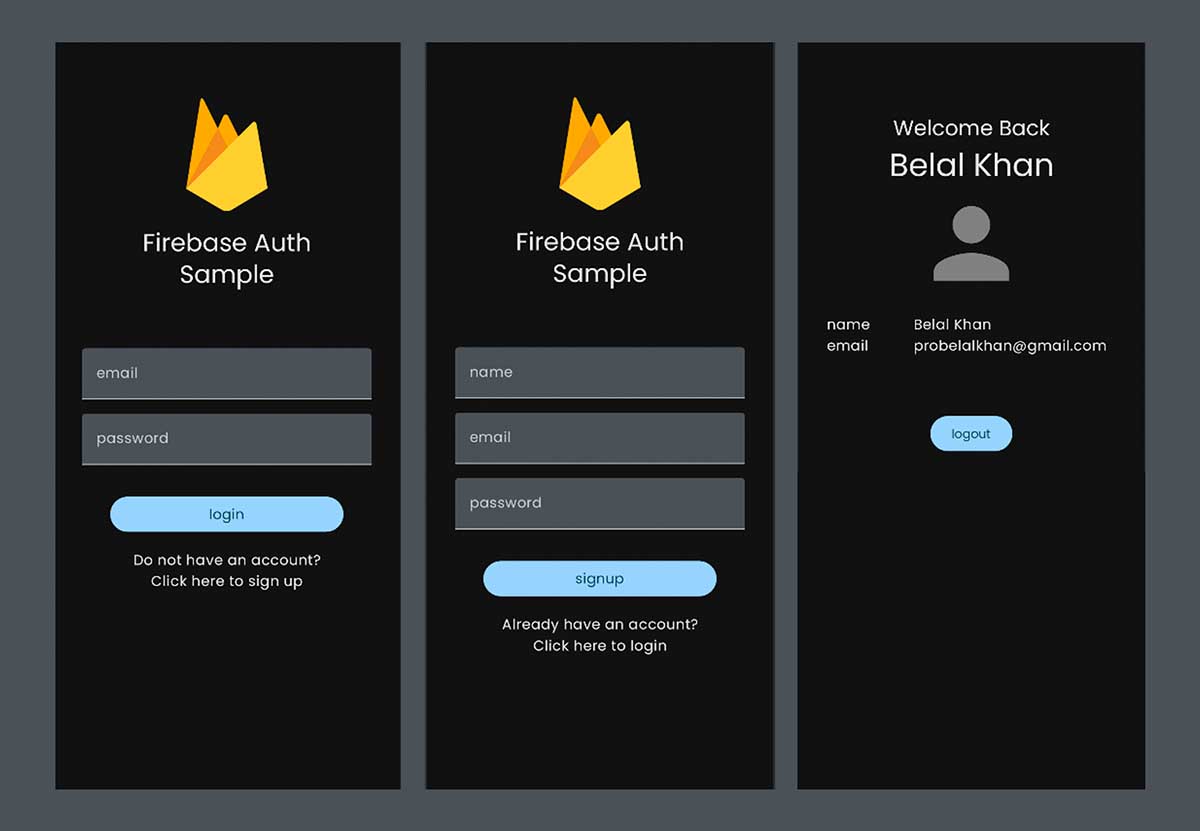
In the below image you can see what we are going to build in this project.
This project is completely built with Jetpack Compose. If you are not familiar with Jetpack Compose then I highly recommend that you should check my Jetpack Compose Crash Course.
In this tutorial, I am not going to cover the UI Design part.
And that is why to get started you need to clone this repository and it has everything setup. Once you clone the repository make sure you are at 1_ui_design branch, as this is the starting point for this tutorial.
Before moving ahead you should go through the project once, as it has the following things already setup.
- Login, Signup and Home Screen UI
- Compose Navigation
- Dependency Injection using Hilt
- Firebase Dependencies
Connecting to a Firebase Project
I hope you went through the code and you do not have any confusion. If you want to ask anything, then don’t hesitate in commenting your question below.
Firebase dependencies are already added we just need to connect the project to a firebase project, then we can build it.
- Go to Firebase Console.
- Create a new project there and follow the steps (It’s very simple). You can also select an existing project if you already have a project in your firebase console.
- Once the firebase project is created, you need to add your android app to it.
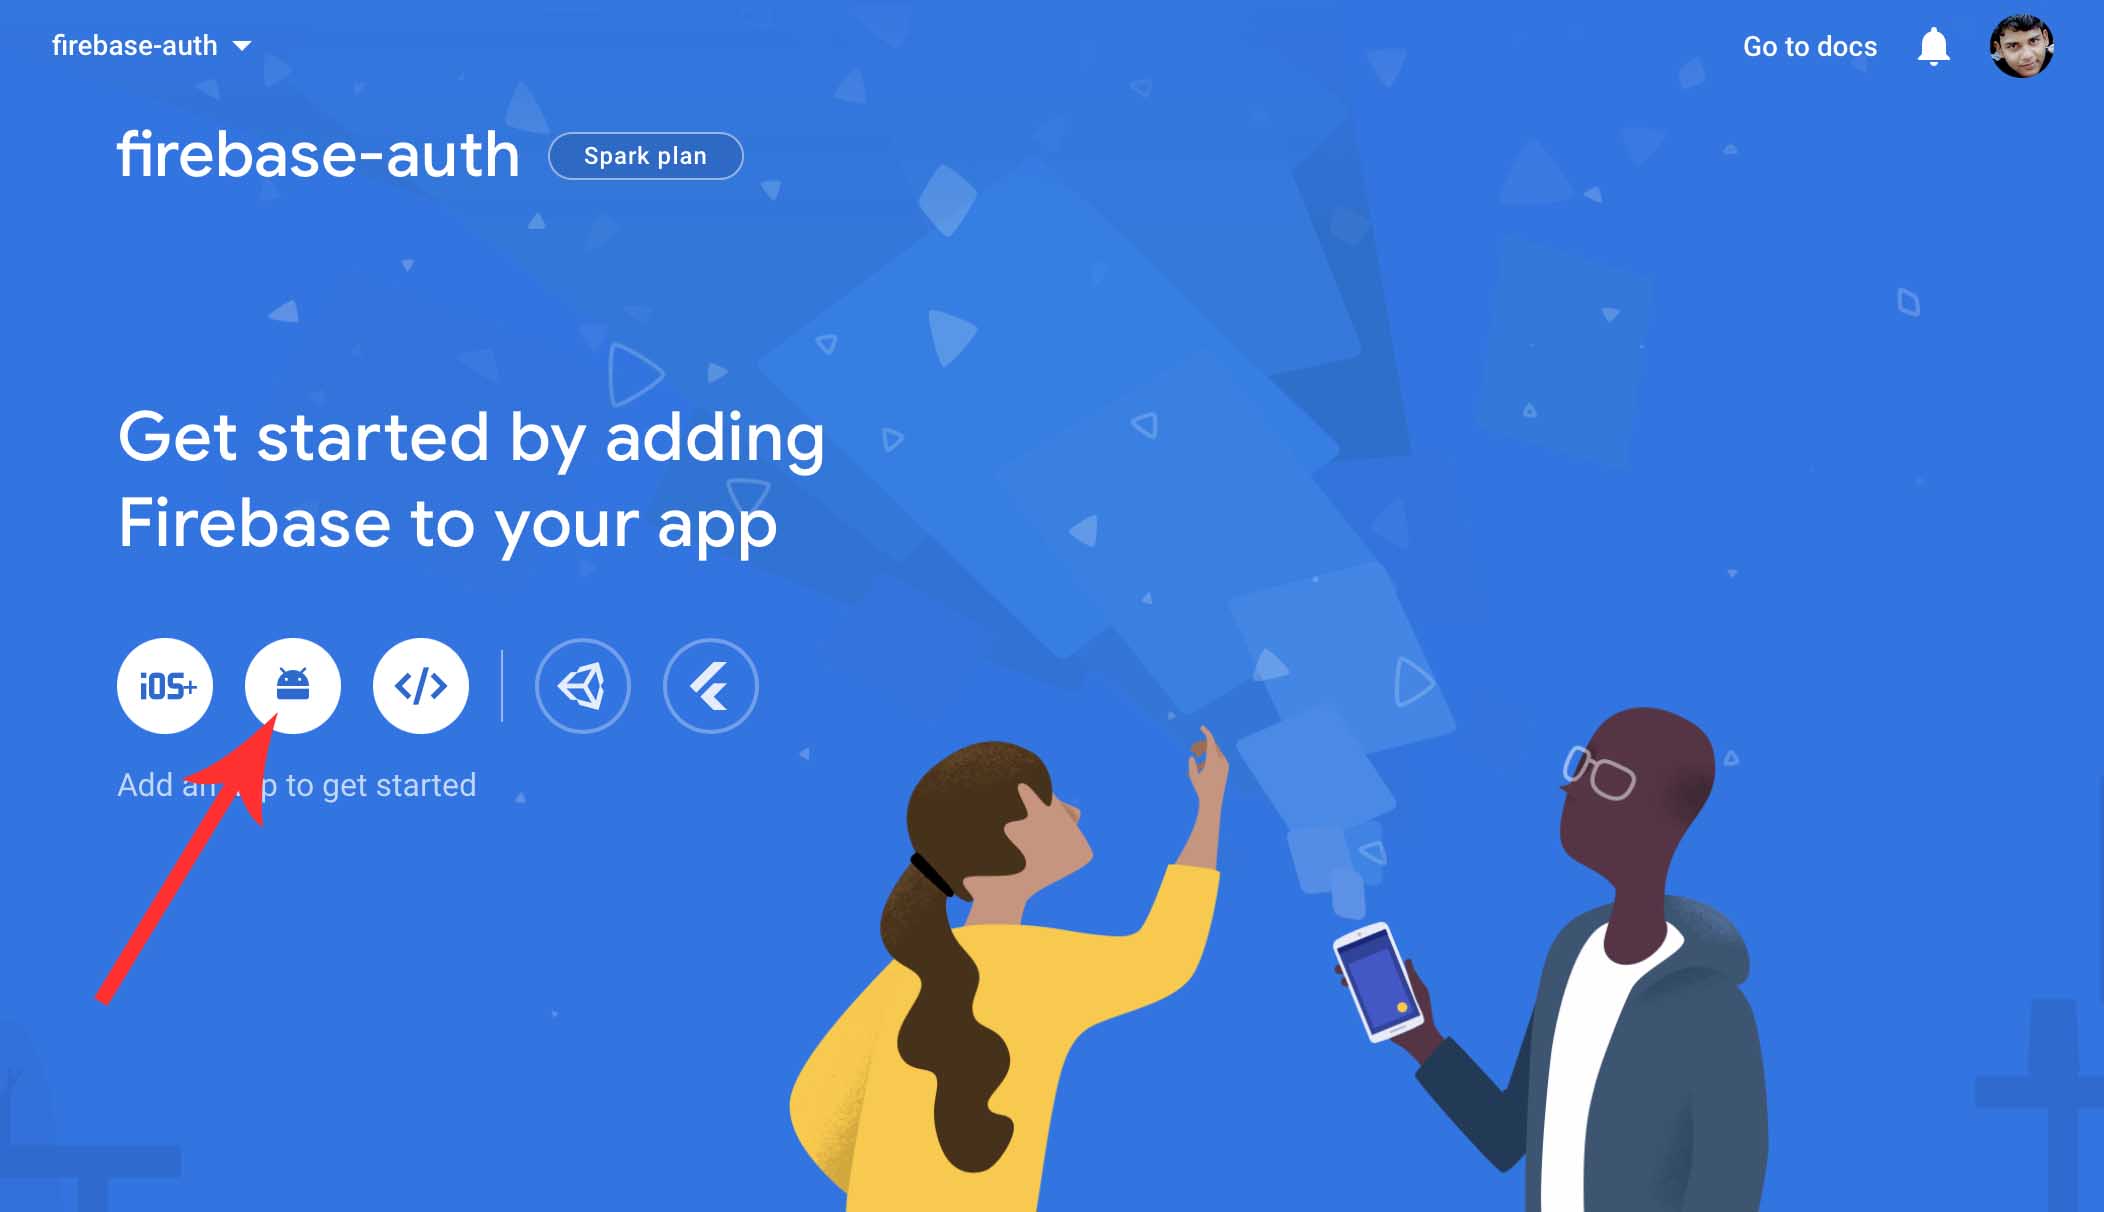
- Click on add an Android App option, then you will get a form.
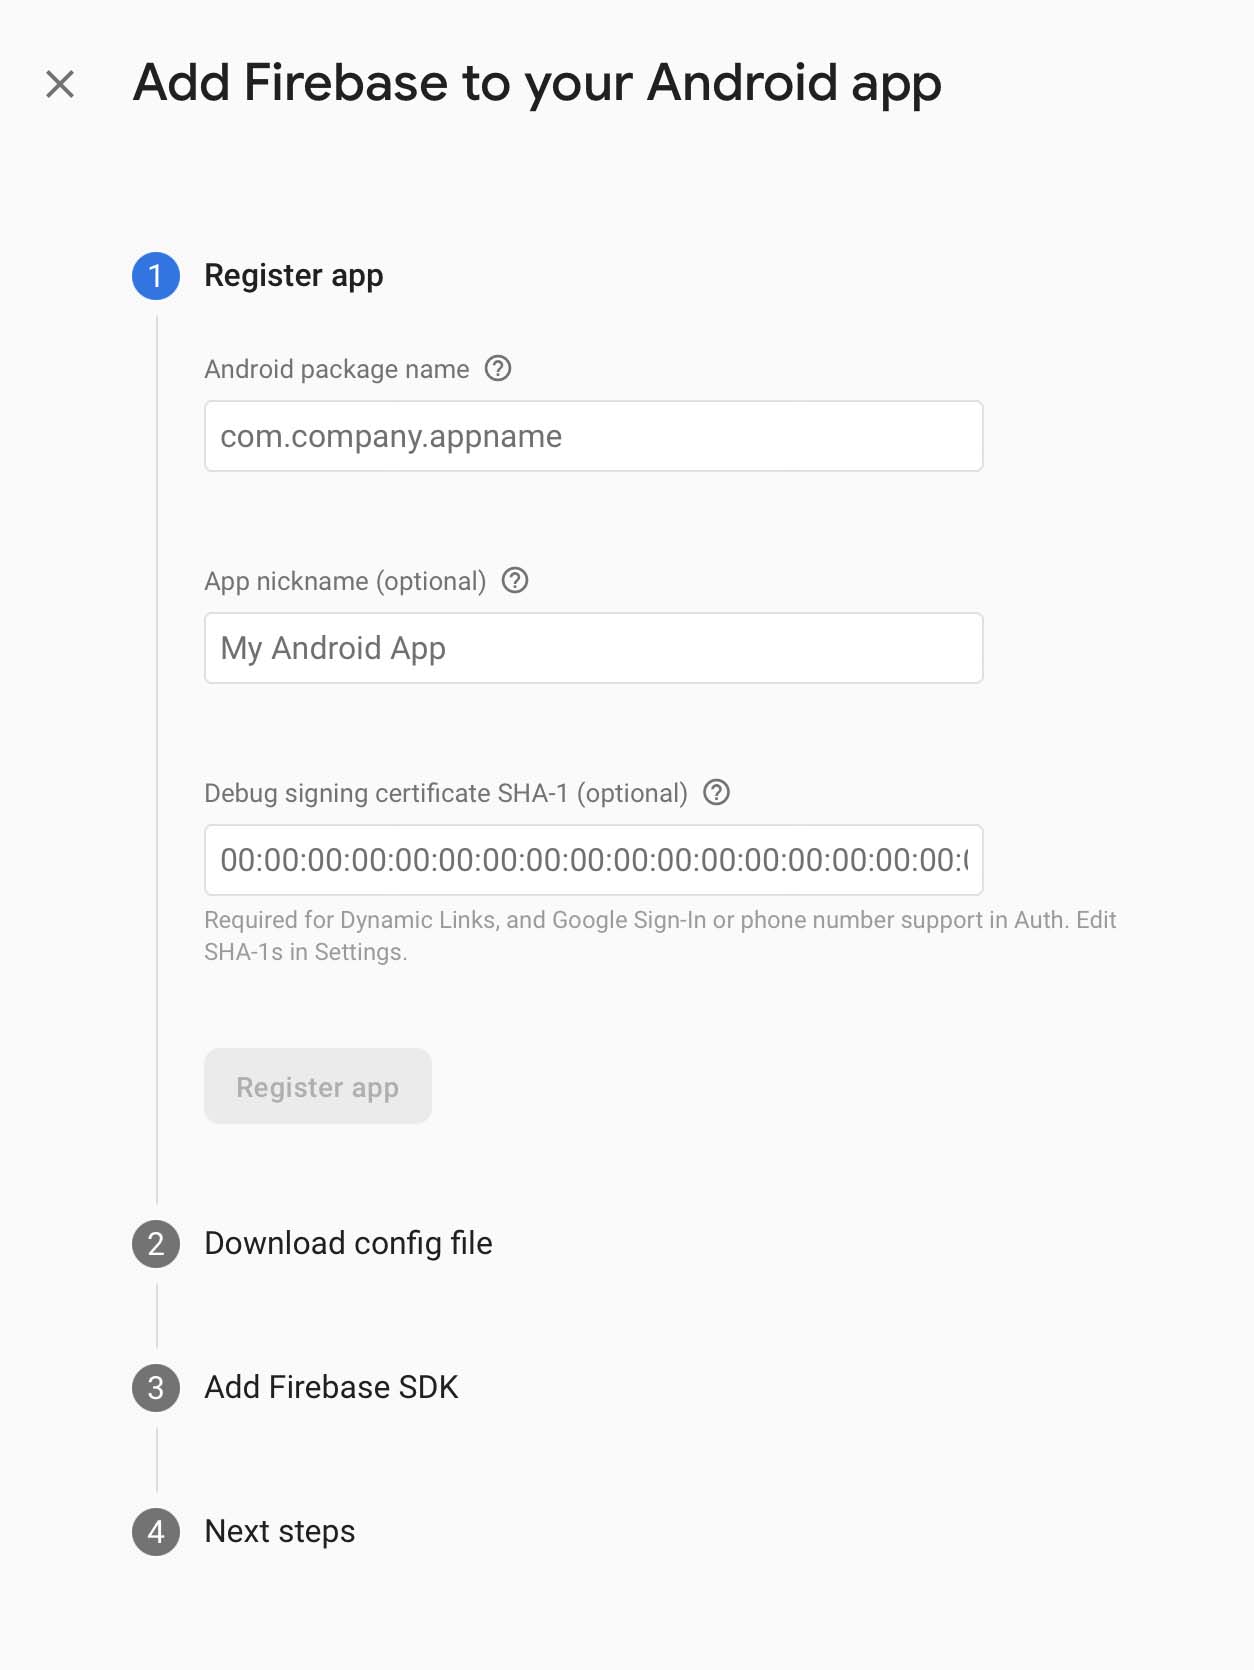
- After following the steps shown in the above image, you will get the config file that is nothing but google-services.json file; and this is what we need to connect our project to firebase.
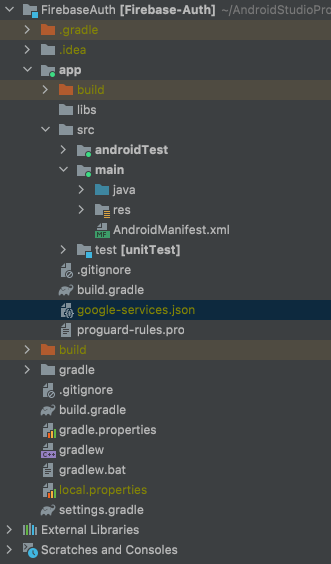
- You need to paste this file to the app folder.
 Now you can build your project and it should work. If it is working; Bingo! you can move ahead.
Make sure that you have enabled sign in with email and password option in firebase console.
Creating a Repository
We need to perform Login, Signup and Logout in this project. Let’s discuss about login (the same will apply for signup as well). Think how it will happen?
We will get the email and password from the UI and we will call the firebase function for login. If the given email and password is correct, we will receive the user if it does not matches we will get an exception.
Now let’s consider the user as a Resource, because when we call the user login function, either we will receive a user or an exception and to handle all these cases we will wrap the result as a Resource.
For the Resource we will create a sealed class.
|
1 2 3 4 5 6 7 |
sealed class Resource<out R> { data class Success<out R>(val result: R) : Resource<R>() data class Failure(val exception: Exception) : Resource<Nothing>() object Loading : Resource<Nothing>() } |
As you can see one more case Loading is added, and we will use it to show a progressbar when the user is logging in.
Now we will define an interface for our Repository; I will name it AuthRepository .
|
1 2 3 4 5 6 7 8 |
interface AuthRepository { val currentUser: FirebaseUser? suspend fun login(email: String, password: String): Resource<FirebaseUser> suspend fun signup(name: String, email: String, password: String): Resource<FirebaseUser> fun logout() } |
As you can see we have three functions login() , signup() and logout(). We also have a val currentUser: FirebaseUser? that we will use to get the currently logged in user.
Firebase Authentication with Kotlin Coroutines
To login a user with firebase, we use the following function.
|
1 2 3 |
firebaseAuth.signInWithEmailAndPassword(email, password) |
Function signInWithEmailAndPassword() returns a Task that contains the result and to get the result we add an OnCompleteListener to the Task . Basically we use the callbacks to get the result. But I want to avoid using callbacks everywhere, and we can do it using Coroutines.
So first I will define a utility function that will directly convert the Task to the actual result.
Create a file named FirebaseUtils.kt and write the following code in it.
|
1 2 3 4 5 6 7 8 9 10 11 12 13 14 |
@OptIn(ExperimentalCoroutinesApi::class) suspend fun <T> Task<T>.await(): T { return suspendCancellableCoroutine { cont -> addOnCompleteListener { if (it.exception != null) { cont.resumeWithException(it.exception!!) } else { cont.resume(it.result, null) } } } } |
Now instead of attaching callbacks everytime we can simply call await() function to get the result.
Let’s define the implementation of our AuthRepository .
|
1 2 3 4 5 6 7 8 9 10 11 12 13 14 15 16 17 18 19 20 21 22 23 24 25 26 27 28 29 30 31 32 33 34 35 |
class AuthRepositoryImpl @Inject constructor( private val firebaseAuth: FirebaseAuth ) : AuthRepository { override val currentUser: FirebaseUser? get() = firebaseAuth.currentUser override suspend fun login(email: String, password: String): Resource<FirebaseUser> { return try { val result = firebaseAuth.signInWithEmailAndPassword(email, password).await() Resource.Success(result.user!!) } catch (e: Exception) { e.printStackTrace() Resource.Failure(e) } } override suspend fun signup(name: String, email: String, password: String): Resource<FirebaseUser> { return try { val result = firebaseAuth.createUserWithEmailAndPassword(email, password).await() result.user?.updateProfile(UserProfileChangeRequest.Builder().setDisplayName(name).build())?.await() return Resource.Success(result.user!!) } catch (e: Exception) { e.printStackTrace() Resource.Failure(e) } } override fun logout() { firebaseAuth.signOut() } } |
You can see in the above code, I am using Resource sealed class and the await() function, and there are no callbacks.
As you can see here we are passing firebaseAuth as the dependency, so we need to tell hilt how to get this dependency.
Creating a Hilt Module
Create an object named AppModule and write the following code.
|
1 2 3 4 5 6 7 8 9 10 11 12 13 |
@InstallIn(SingletonComponent::class) @Module object AppModule { @Provides fun provideFirebaseAuth(): FirebaseAuth = FirebaseAuth.getInstance() @Provides fun providesAuthRepository(impl: AuthRepositoryImpl): AuthRepository = impl } |
As you can see I am also providing the implementation of our AuthRepository that we will need in our ViewModel.
Creating ViewModel
Now let’s create our ViewModel. I am going to create a class named AuthViewModel.
|
1 2 3 4 5 6 7 8 9 10 11 12 13 14 15 16 17 18 19 20 21 22 23 24 25 26 27 28 29 30 31 32 33 34 35 36 37 38 39 40 |
@HiltViewModel class AuthViewModel @Inject constructor( private val repository: AuthRepository ) : ViewModel() { private val _loginFlow = MutableStateFlow<Resource<FirebaseUser>?>(null) val loginFlow: StateFlow<Resource<FirebaseUser>?> = _loginFlow private val _signupFlow = MutableStateFlow<Resource<FirebaseUser>?>(null) val signupFlow: StateFlow<Resource<FirebaseUser>?> = _signupFlow val currentUser: FirebaseUser? get() = repository.currentUser init { if (repository.currentUser != null) { _loginFlow.value = Resource.Success(repository.currentUser!!) } } fun loginUser(email: String, password: String) = viewModelScope.launch { _loginFlow.value = Resource.Loading val result = repository.login(email, password) _loginFlow.value = result } fun signupUser(name: String, email: String, password: String) = viewModelScope.launch { _signupFlow.value = Resource.Loading val result = repository.signup(name, email, password) _signupFlow.value = result } fun logout() { repository.logout() _loginFlow.value = null _signupFlow.value = null } } |
As you can see I am consuming the repository in this ViewModel, and everything is very clean and simple. Now we can just use this ViewModel in our UI.
User Login
First we need to pass ViewModel to our composables.
We will crate the ViewModel inside MainActivity.
|
1 2 3 4 5 6 7 8 9 10 11 12 13 14 15 16 17 18 19 20 21 22 23 24 |
@AndroidEntryPoint class MainActivity : AppCompatActivity() { private val authViewModel by viewModels<AuthViewModel>() @OptIn(ExperimentalMaterial3Api::class) @SuppressLint("UnusedMaterial3ScaffoldPaddingParameter") override fun onCreate(savedInstanceState: Bundle?) { super.onCreate(savedInstanceState) setContent { val snackbarHostState = remember { SnackbarHostState() } Scaffold( snackbarHost = { SnackbarHost(snackbarHostState) }, content = { AppTheme { AppNavHost(authViewModel) } } ) } } } |
We will receive the ViewModel in our NavHost and from there we will pass it to the composables.
|
1 2 3 4 5 6 7 8 9 10 11 12 13 14 15 16 17 18 19 20 21 22 23 24 25 |
@Composable fun AppNavHost( viewModel: AuthViewModel, modifier: Modifier = Modifier, navController: NavHostController = rememberNavController(), startDestination: String = ROUTE_LOGIN ) { NavHost( modifier = modifier, navController = navController, startDestination = startDestination ) { composable(ROUTE_LOGIN) { LoginScreen(viewModel, navController) } composable(ROUTE_SIGNUP) { SignupScreen(viewModel, navController) } composable(ROUTE_HOME) { HomeScreen(viewModel, navController) } } } |
Now let’s perform the user login, it is very very easy.
|
1 2 3 4 5 6 7 8 9 10 11 12 13 14 15 16 17 18 19 20 21 22 23 24 25 26 27 28 29 30 31 32 33 34 35 36 37 38 39 40 41 42 43 44 45 46 47 48 49 50 51 52 53 54 55 56 57 58 59 60 61 62 63 64 65 66 67 68 69 70 71 72 73 74 75 76 77 78 79 80 81 82 83 84 85 86 87 88 89 90 91 92 93 94 95 96 97 98 99 100 101 102 103 104 105 106 107 108 109 110 111 112 113 114 115 116 117 118 119 120 121 122 123 124 125 126 127 128 129 130 131 132 133 134 135 136 137 138 139 140 141 142 143 144 145 146 147 148 149 |
@OptIn(ExperimentalMaterial3Api::class) @Composable fun LoginScreen(viewModel: AuthViewModel?, navController: NavController) { var email by remember { mutableStateOf("") } var password by remember { mutableStateOf("") } val authResource = viewModel?.loginFlow?.collectAsState() ConstraintLayout( modifier = Modifier.fillMaxSize() ) { val (refHeader, refEmail, refPassword, refButtonLogin, refTextSignup, refLoading) = createRefs() val spacing = MaterialTheme.spacing Box( modifier = Modifier .constrainAs(refHeader) { top.linkTo(parent.top, spacing.extraLarge) start.linkTo(parent.start) end.linkTo(parent.end) width = Dimension.fillToConstraints } .wrapContentSize() ) { AuthHeader() } TextField( value = email, onValueChange = { email = it }, label = { Text(text = stringResource(id = R.string.email)) }, modifier = Modifier.constrainAs(refEmail) { top.linkTo(refHeader.bottom, spacing.extraLarge) start.linkTo(parent.start, spacing.large) end.linkTo(parent.end, spacing.large) width = Dimension.fillToConstraints }, keyboardOptions = KeyboardOptions( capitalization = KeyboardCapitalization.None, autoCorrect = false, keyboardType = KeyboardType.Email, imeAction = ImeAction.Next ) ) TextField( value = password, onValueChange = { password = it }, label = { Text(text = stringResource(id = R.string.password)) }, modifier = Modifier.constrainAs(refPassword) { top.linkTo(refEmail.bottom, spacing.medium) start.linkTo(parent.start, spacing.large) end.linkTo(parent.end, spacing.large) width = Dimension.fillToConstraints }, visualTransformation = PasswordVisualTransformation(), keyboardOptions = KeyboardOptions( capitalization = KeyboardCapitalization.None, autoCorrect = false, keyboardType = KeyboardType.Password, imeAction = ImeAction.Done ) ) Button( onClick = { viewModel?.loginUser(email, password) }, modifier = Modifier.constrainAs(refButtonLogin) { top.linkTo(refPassword.bottom, spacing.large) start.linkTo(parent.start, spacing.extraLarge) end.linkTo(parent.end, spacing.extraLarge) width = Dimension.fillToConstraints } ) { Text(text = stringResource(id = R.string.login), style = MaterialTheme.typography.titleMedium) } Text( modifier = Modifier .constrainAs(refTextSignup) { top.linkTo(refButtonLogin.bottom, spacing.medium) start.linkTo(parent.start, spacing.extraLarge) end.linkTo(parent.end, spacing.extraLarge) } .clickable { navController.navigate(ROUTE_SIGNUP) { popUpTo(ROUTE_LOGIN) { inclusive = true } } }, text = stringResource(id = R.string.dont_have_account), style = MaterialTheme.typography.bodyLarge, textAlign = TextAlign.Center, color = MaterialTheme.colorScheme.onSurface ) authResource?.value?.let { when (it) { is Resource.Failure -> { ShowToast(message = it.exception.message.toString()) } is Resource.Loading -> { CircularProgressIndicator(modifier = Modifier.constrainAs(refLoading) { top.linkTo(parent.top) bottom.linkTo(parent.bottom) start.linkTo(parent.start) end.linkTo(parent.end) }) } is Resource.Success -> { LaunchedEffect(Unit) { navController.navigate(ROUTE_HOME) { popUpTo(ROUTE_LOGIN) { inclusive = true } } } } } } } } @Preview(showBackground = true, uiMode = UI_MODE_NIGHT_NO) @Composable fun LoginScreenPreviewLight() { AppTheme { LoginScreen(null, rememberNavController()) } } @Preview(showBackground = true, uiMode = UI_MODE_NIGHT_YES) @Composable fun LoginScreenPreviewDark() { AppTheme { LoginScreen(null, rememberNavController()) } } |
User Signup
This is very much similar to the user login.
|
1 2 3 4 5 6 7 8 9 10 11 12 13 14 15 16 17 18 19 20 21 22 23 24 25 26 27 28 29 30 31 32 33 34 35 36 37 38 39 40 41 42 43 44 45 46 47 48 49 50 51 52 53 54 55 56 57 58 59 60 61 62 63 64 65 66 67 68 69 70 71 72 73 74 75 76 77 78 79 80 81 82 83 84 85 86 87 88 89 90 91 92 93 94 95 96 97 98 99 100 101 102 103 104 105 106 107 108 109 110 111 112 113 114 115 116 117 118 119 120 121 122 123 124 125 126 127 128 129 130 131 132 133 134 135 136 137 138 139 140 141 142 143 144 145 146 147 148 149 150 151 152 153 154 155 156 157 158 159 160 161 162 163 164 165 166 167 168 169 170 |
@OptIn(ExperimentalMaterial3Api::class) @Composable fun SignupScreen(viewModel: AuthViewModel?, navController: NavHostController) { var name by remember { mutableStateOf("") } var email by remember { mutableStateOf("") } var password by remember { mutableStateOf("") } val authResource = viewModel?.signupFlow?.collectAsState() ConstraintLayout( modifier = Modifier.fillMaxSize() ) { val (refHeader, refName, refEmail, refPassword, refButtonSignup, refTextSignup, refLoading) = createRefs() val spacing = MaterialTheme.spacing Box( modifier = Modifier .constrainAs(refHeader) { top.linkTo(parent.top, spacing.extraLarge) start.linkTo(parent.start) end.linkTo(parent.end) width = Dimension.fillToConstraints } .wrapContentSize() ) { AuthHeader() } TextField( value = name, onValueChange = { name = it }, label = { Text(text = stringResource(id = R.string.name)) }, modifier = Modifier.constrainAs(refName) { top.linkTo(refHeader.bottom, spacing.extraLarge) start.linkTo(parent.start, spacing.large) end.linkTo(parent.end, spacing.large) width = Dimension.fillToConstraints }, keyboardOptions = KeyboardOptions( capitalization = KeyboardCapitalization.None, autoCorrect = false, keyboardType = KeyboardType.Email, imeAction = ImeAction.Next ) ) TextField( value = email, onValueChange = { email = it }, label = { Text(text = stringResource(id = R.string.email)) }, modifier = Modifier.constrainAs(refEmail) { top.linkTo(refName.bottom, spacing.medium) start.linkTo(parent.start, spacing.large) end.linkTo(parent.end, spacing.large) width = Dimension.fillToConstraints }, keyboardOptions = KeyboardOptions( capitalization = KeyboardCapitalization.None, autoCorrect = false, keyboardType = KeyboardType.Email, imeAction = ImeAction.Next ) ) TextField( value = password, onValueChange = { password = it }, label = { Text(text = stringResource(id = R.string.password)) }, modifier = Modifier.constrainAs(refPassword) { top.linkTo(refEmail.bottom, spacing.medium) start.linkTo(parent.start, spacing.large) end.linkTo(parent.end, spacing.large) width = Dimension.fillToConstraints }, visualTransformation = PasswordVisualTransformation(), keyboardOptions = KeyboardOptions( capitalization = KeyboardCapitalization.None, autoCorrect = false, keyboardType = KeyboardType.Password, imeAction = ImeAction.Done ) ) Button( onClick = { viewModel?.signupUser(name, email, password) }, modifier = Modifier.constrainAs(refButtonSignup) { top.linkTo(refPassword.bottom, spacing.large) start.linkTo(parent.start, spacing.extraLarge) end.linkTo(parent.end, spacing.extraLarge) width = Dimension.fillToConstraints } ) { Text(text = stringResource(id = R.string.signup), style = MaterialTheme.typography.titleMedium) } Text( modifier = Modifier .constrainAs(refTextSignup) { top.linkTo(refButtonSignup.bottom, spacing.medium) start.linkTo(parent.start, spacing.extraLarge) end.linkTo(parent.end, spacing.extraLarge) } .clickable { navController.navigate(ROUTE_LOGIN) { popUpTo(ROUTE_SIGNUP) { inclusive = true } } }, text = stringResource(id = R.string.already_have_account), style = MaterialTheme.typography.bodyLarge, textAlign = TextAlign.Center, color = MaterialTheme.colorScheme.onSurface ) authResource?.value?.let { when (it) { is Resource.Failure -> { ShowToast(message = it.exception.message.toString()) } is Resource.Loading -> { CircularProgressIndicator(modifier = Modifier.constrainAs(refLoading) { top.linkTo(parent.top) bottom.linkTo(parent.bottom) start.linkTo(parent.start) end.linkTo(parent.end) }) } is Resource.Success -> { LaunchedEffect(Unit) { navController.navigate(ROUTE_HOME) { popUpTo(ROUTE_SIGNUP) { inclusive = true } } } } } } } } @Preview(showBackground = true, uiMode = UI_MODE_NIGHT_NO) @Composable fun SignupScreenPreviewLight() { AppTheme { SignupScreen(null, rememberNavController()) } } @Preview(showBackground = true, uiMode = UI_MODE_NIGHT_YES) @Composable fun SignupScreenPreviewDark() { AppTheme { SignupScreen(null, rememberNavController()) } } |
Home Screen
After login or signup, user will land to the HomeScreen where we will display the user information and a logout button. We have already created everything in our Repository and we just need to consume it.
|
1 2 3 4 5 6 7 8 9 10 11 12 13 14 15 16 17 18 19 20 21 22 23 24 25 26 27 28 29 30 31 32 33 34 35 36 37 38 39 40 41 42 43 44 45 46 47 48 49 50 51 52 53 54 55 56 57 58 59 60 61 62 63 64 65 66 67 68 69 70 71 72 73 74 75 76 77 78 79 80 81 82 83 84 85 86 87 88 89 90 91 92 93 94 95 96 97 98 99 100 101 102 103 104 105 106 107 108 109 110 111 112 113 114 115 116 117 |
@Composable fun HomeScreen(viewModel: AuthViewModel?, navController: NavHostController) { viewModel?.currentUser?.let { UserInfo(viewModel = viewModel, navController = navController, name = it.displayName.toString(), email = it.email.toString()) } } @Composable fun UserInfo(viewModel: AuthViewModel?, navController: NavController, name: String, email: String) { val spacing = MaterialTheme.spacing Column( modifier = Modifier .fillMaxWidth() .wrapContentHeight() .padding(spacing.medium) .padding(top = spacing.extraLarge), horizontalAlignment = Alignment.CenterHorizontally ) { Text( text = stringResource(id = R.string.welcome_back), style = MaterialTheme.typography.headlineSmall, color = MaterialTheme.colorScheme.onSurface ) Text( text = name, style = MaterialTheme.typography.displaySmall, color = MaterialTheme.colorScheme.onSurface ) Image( painter = painterResource(id = R.drawable.ic_person), contentDescription = stringResource(id = R.string.empty), modifier = Modifier.size(128.dp) ) Column( modifier = Modifier .fillMaxWidth() .wrapContentHeight() .padding(spacing.medium) ) { Row( modifier = Modifier .fillMaxWidth() .wrapContentHeight() ) { Text( text = stringResource(id = R.string.name), style = MaterialTheme.typography.bodyLarge, modifier = Modifier.weight(0.3f), color = MaterialTheme.colorScheme.onSurface ) Text( text = name, style = MaterialTheme.typography.bodyLarge, modifier = Modifier.weight(0.7f), color = MaterialTheme.colorScheme.onSurface ) } Row( modifier = Modifier .fillMaxWidth() .wrapContentHeight() ) { Text( text = stringResource(id = R.string.email), style = MaterialTheme.typography.bodyLarge, modifier = Modifier.weight(0.3f), color = MaterialTheme.colorScheme.onSurface ) Text( text = email, style = MaterialTheme.typography.bodyLarge, modifier = Modifier.weight(0.7f), color = MaterialTheme.colorScheme.onSurface ) } Button( onClick = { viewModel?.logout() navController.navigate(ROUTE_LOGIN) { popUpTo(ROUTE_HOME) { inclusive = true } } }, modifier = Modifier .align(Alignment.CenterHorizontally) .padding(top = spacing.extraLarge) ) { Text(text = stringResource(id = R.string.logout)) } } } } @Preview(showBackground = true, uiMode = Configuration.UI_MODE_NIGHT_NO) @Composable fun HomeScreenPreviewLight() { AppTheme { UserInfo(null, rememberNavController(), "Belal Khan", "probelalkhan@gmail.com") } } @Preview(showBackground = true, uiMode = Configuration.UI_MODE_NIGHT_YES) @Composable fun HomeScreenPreviewDark() { AppTheme { UserInfo(null, rememberNavController(), "Belal Khan", "probelalkhan@gmail.com") } } |
And that is it, we have our project ready. Test it and let me know if you made it work.
If you are having any problem then you can switch to 2_login_signup branch in the same repository and you will get all the codes.
So that is all for this Firebase Authentication using MVVM tutorial friends. I hope you learned something new. In case you have any question regarding the tutorial; please leave your comments below. Thank You 🙂


