Hi there, In this tutorial, I am gonna teach you how you can create an introductory slide show for your android application. The point to ponder about this task is that the slide show must run just for once after the installation. From the second time, the app must open with some home screen. So lets begin our Intro Screen Slider Android Tutorial.
Intro Screen Slider Android Tutorial
Creating a New Android Studio Project
- First create a new project. You can do the same in your existing application.
- I just created a project named AppIntro.
Adding AppIntro dependency
- In this Screen Slider Android Tutorial we will be using AppIntro library.
- So the first thing we need to add this library into our project. For this just go to your app level build.gradle file and add the following line inside dependencies block and then just sync your project.
|
1 2 3 |
compile 'com.github.paolorotolo:appintro:4.0.0' |
Creating a Fragment to Show Different Slides
- Next, we need to create a class named SampleSlide.java through which the view of different slides is inflated.
|
1 2 3 4 5 6 7 8 9 10 11 12 13 14 15 16 17 18 19 20 21 22 23 24 25 26 27 28 29 30 31 32 33 34 35 36 37 38 39 40 41 42 43 44 |
package com.example.manish.simplifiedcodingappintro; import android.os.Bundle; import android.support.annotation.Nullable; import android.support.v4.app.Fragment; import android.view.LayoutInflater; import android.view.View; import android.view.ViewGroup; public class SampleSlide extends Fragment { private static final String ARG_LAYOUT_RES_ID = "layoutResId"; public static SampleSlide newInstance(int layoutResId) { SampleSlide sampleSlide = new SampleSlide(); Bundle args = new Bundle(); args.putInt(ARG_LAYOUT_RES_ID, layoutResId); sampleSlide.setArguments(args); return sampleSlide; } private int layoutResId; public SampleSlide() {} @Override public void onCreate(@Nullable Bundle savedInstanceState) { super.onCreate(savedInstanceState); if(getArguments() != null && getArguments().containsKey(ARG_LAYOUT_RES_ID)) layoutResId = getArguments().getInt(ARG_LAYOUT_RES_ID); } @Nullable @Override public View onCreateView(LayoutInflater inflater, @Nullable ViewGroup container, @Nullable Bundle savedInstanceState) { return inflater.inflate(layoutResId, container, false); } } |
Creating Intro Screen Sliders
- Next, we need to create a class named DefaultIntro.java.
|
1 2 3 4 5 6 7 8 9 10 11 12 13 14 15 16 17 18 19 20 21 22 23 24 25 26 27 28 29 30 31 32 33 34 35 36 37 38 39 40 41 42 43 44 45 46 47 48 49 50 51 52 53 54 55 56 57 58 |
package com.example.manish.simplifiedcodingappintro; import android.Manifest; import android.content.Intent; import android.graphics.Color; import android.os.Bundle; import android.support.v4.app.Fragment; import android.view.View; import android.widget.Toast; import com.github.paolorotolo.appintro.AppIntro; public final class DefaultIntro extends AppIntro { @Override protected void onCreate(Bundle savedInstanceState) { super.onCreate(savedInstanceState); //Down here, we add the xml layouts into sample slide inflater. addSlide(SampleSlide.newInstance(R.layout.intro)); addSlide(SampleSlide.newInstance(R.layout.intro2)); addSlide(SampleSlide.newInstance(R.layout.intro3)); addSlide(SampleSlide.newInstance(R.layout.intro4)); showStatusBar(true); setDepthAnimation(); } @Override public void onDonePressed(Fragment currentFragment) { super.onDonePressed(currentFragment); loadMainActivity(); } private void loadMainActivity(){ Intent intent = new Intent(this, MainActivity.class); startActivity(intent); } @Override public void onSkipPressed(Fragment currentFragment) { super.onSkipPressed(currentFragment); loadMainActivity(); Toast.makeText(getApplicationContext(), getString(R.string.skip), Toast.LENGTH_SHORT).show(); } public void getStarted(View v){ loadMainActivity(); } } |
- Next, we need to create a class named Config.java to store constants.
|
1 2 3 4 5 6 |
public class Config { public static String FLAG="It the start"; } |
- Next, we need to configure our MainActivity.java. In order to make sure that the appintro runs just for once, we make use of Thread and SharedPreferences as it can be seen down into the code of MainActivity.
|
1 2 3 4 5 6 7 8 9 10 11 12 13 14 15 16 17 18 19 20 21 22 23 24 25 26 27 28 29 30 31 32 33 34 35 36 37 38 39 40 41 |
package com.example.manish.simplifiedcodingappintro; import android.content.Context; import android.content.Intent; import android.content.SharedPreferences; import android.preference.Preference; import android.preference.PreferenceManager; import android.support.v7.app.AppCompatActivity; import android.os.Bundle; import android.widget.Toast; public class MainActivity extends AppCompatActivity { @Override protected void onCreate(Bundle savedInstanceState) { super.onCreate(savedInstanceState); setContentView(R.layout.main); Thread t=new Thread(new Runnable() { @Override public void run() { SharedPreferences sharedPreferences = getSharedPreferences(Config.FLAG, Context.MODE_PRIVATE); if(sharedPreferences.getBoolean(Config.FLAG,true)){ startActivity(new Intent(MainActivity.this,DefaultIntro.class)); SharedPreferences.Editor e=sharedPreferences.edit(); e.putBoolean(Config.FLAG,false); e.apply(); } } }); t.start(); } } |
Here, the Java part gets over. Now, we need to configure our design resources i.e. xml layouts.
Creating Layouts for Slider
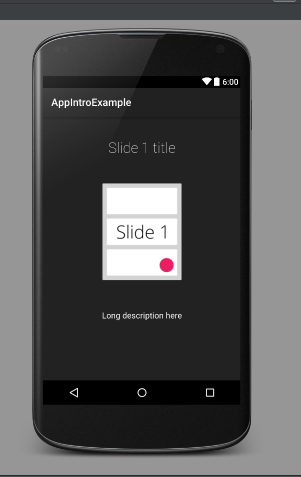
- Create a Layout resource file named intro.xml. This would be our first slide in the introduction.
|
1 2 3 4 5 6 7 8 9 10 11 12 13 14 15 16 17 18 19 20 21 22 23 24 25 26 27 28 29 30 31 32 33 34 35 36 37 38 39 40 41 42 43 44 45 46 47 48 49 50 51 52 53 |
<?xml version="1.0" encoding="utf-8"?> <LinearLayout xmlns:android="http://schemas.android.com/apk/res/android" android:orientation="vertical" android:layout_width="match_parent" android:layout_height="match_parent" android:background="#222222" android:layout_weight="10" android:id="@+id/main"> <TextView android:layout_width="wrap_content" android:layout_height="0dp" android:layout_gravity="center" android:gravity="center" android:paddingLeft="32dp" android:layout_weight="3" android:fontFamily="sans-serif-thin" android:textColor="#ffffff" android:paddingRight="32dp" android:textSize="28sp" android:text="Slide 1 title"/> <LinearLayout android:layout_width="fill_parent" android:layout_height="0dp" android:orientation="vertical" android:gravity="center" android:layout_weight="5"> <ImageView android:layout_width="wrap_content" android:layout_height="wrap_content" android:layout_gravity="center" android:paddingLeft="16dp" android:paddingRight="16dp" android:src="@drawable/ic_slide1"/> </LinearLayout> <TextView android:layout_width="wrap_content" android:layout_height="0dp" android:layout_weight="3" android:layout_gravity="center" android:gravity="center" android:textColor="#ffffff" android:paddingLeft="64dp" android:paddingRight="64dp" android:textSize="16sp" android:text="Long description here"/> <TextView android:layout_width="fill_parent" android:layout_height="64dp" /> </LinearLayout> |
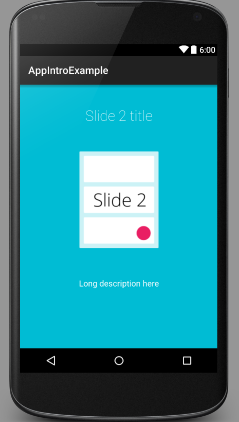
- Create a layout resource file named intro2.xml which would be our second slide.
|
1 2 3 4 5 6 7 8 9 10 11 12 13 14 15 16 17 18 19 20 21 22 23 24 25 26 27 28 29 30 31 32 33 34 35 36 37 38 39 40 41 42 43 44 45 46 47 48 49 50 51 52 53 |
<?xml version="1.0" encoding="utf-8"?> <LinearLayout xmlns:android="http://schemas.android.com/apk/res/android" android:orientation="vertical" android:layout_width="match_parent" android:layout_height="match_parent" android:background="#00BCD4" android:layout_weight="10" android:id="@+id/main"> <TextView android:layout_width="wrap_content" android:layout_height="0dp" android:layout_gravity="center" android:gravity="center" android:paddingLeft="32dp" android:layout_weight="3" android:fontFamily="sans-serif-thin" android:textColor="#ffffff" android:paddingRight="32dp" android:textSize="28sp" android:text="Slide 2 title"/> <LinearLayout android:layout_width="fill_parent" android:layout_height="0dp" android:orientation="vertical" android:gravity="center" android:layout_weight="5"> <ImageView android:layout_width="wrap_content" android:layout_height="wrap_content" android:layout_gravity="center" android:paddingLeft="16dp" android:paddingRight="16dp" android:src="@drawable/ic_slide2"/> </LinearLayout> <TextView android:layout_width="wrap_content" android:layout_height="0dp" android:layout_weight="3" android:layout_gravity="center" android:gravity="center" android:textColor="#ffffff" android:paddingLeft="64dp" android:paddingRight="64dp" android:textSize="16sp" android:text="Long description here"/> <TextView android:layout_width="fill_parent" android:layout_height="64dp" /> </LinearLayout> |
- By now, you might come across errors saying the resources such as drawbles not found. Leave it for now. I’ll deal with the same at the end.
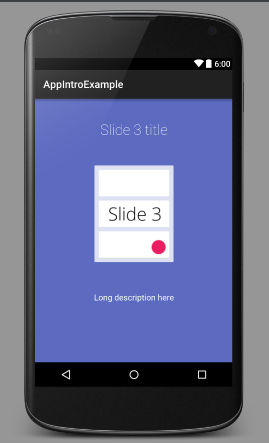
- Create a layout resource file named intro3.xml. This would be our third slide.
|
1 2 3 4 5 6 7 8 9 10 11 12 13 14 15 16 17 18 19 20 21 22 23 24 25 26 27 28 29 30 31 32 33 34 35 36 37 38 39 40 41 42 43 44 45 46 47 48 49 50 51 52 53 |
<?xml version="1.0" encoding="utf-8"?> <LinearLayout xmlns:android="http://schemas.android.com/apk/res/android" android:orientation="vertical" android:layout_width="match_parent" android:layout_height="match_parent" android:background="#5C6BC0" android:layout_weight="10" android:id="@+id/main"> <TextView android:layout_width="wrap_content" android:layout_height="0dp" android:layout_gravity="center" android:gravity="center" android:paddingLeft="32dp" android:layout_weight="3" android:fontFamily="sans-serif-thin" android:textColor="#ffffff" android:paddingRight="32dp" android:textSize="28sp" android:text="Slide 3 title"/> <LinearLayout android:layout_width="fill_parent" android:layout_height="0dp" android:orientation="vertical" android:gravity="center" android:layout_weight="5"> <ImageView android:layout_width="wrap_content" android:layout_height="wrap_content" android:layout_gravity="center" android:paddingLeft="16dp" android:paddingRight="16dp" android:src="@drawable/ic_slide3"/> </LinearLayout> <TextView android:layout_width="wrap_content" android:layout_height="0dp" android:layout_weight="3" android:layout_gravity="center" android:gravity="center" android:textColor="#ffffff" android:paddingLeft="64dp" android:paddingRight="64dp" android:textSize="16sp" android:text="Long description here"/> <TextView android:layout_width="fill_parent" android:layout_height="64dp" /> </LinearLayout> |
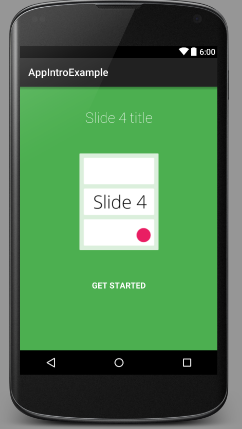
- Create a layout resoure file named intro4.xml which would be our fourth and final slide.
|
1 2 3 4 5 6 7 8 9 10 11 12 13 14 15 16 17 18 19 20 21 22 23 24 25 26 27 28 29 30 31 32 33 34 35 36 37 38 39 40 41 42 43 44 45 46 47 48 49 50 51 52 53 54 55 |
<?xml version="1.0" encoding="utf-8"?> <LinearLayout xmlns:android="http://schemas.android.com/apk/res/android" android:orientation="vertical" android:layout_width="match_parent" android:layout_height="match_parent" android:background="#4CAF50" android:layout_weight="10" android:id="@+id/main"> <TextView android:layout_width="wrap_content" android:layout_height="0dp" android:layout_gravity="center" android:gravity="center" android:paddingLeft="32dp" android:layout_weight="3" android:fontFamily="sans-serif-thin" android:textColor="#ffffff" android:paddingRight="32dp" android:textSize="28sp" android:text="Slide 4 title"/> <LinearLayout android:layout_width="fill_parent" android:layout_height="0dp" android:orientation="vertical" android:gravity="center" android:layout_weight="5"> <ImageView android:layout_width="wrap_content" android:layout_height="wrap_content" android:layout_gravity="center" android:paddingLeft="16dp" android:paddingRight="16dp" android:src="@drawable/ic_slide4"/> </LinearLayout> <TextView android:layout_width="wrap_content" android:layout_height="0dp" android:layout_weight="3" android:layout_gravity="center" android:gravity="center" android:textColor="#ffffff" android:paddingLeft="64dp" android:paddingRight="64dp" android:textSize="16sp" android:textStyle="bold" android:onClick="getStarted" android:text="GET STARTED"/> <TextView android:layout_width="fill_parent" android:layout_height="64dp" /> </LinearLayout> |
- We are almost done. Just add this theme into your style resource file as follows
|
1 2 3 4 5 6 |
<style name="FullscreenTheme" parent="Theme.AppCompat.Light.NoActionBar"> <!-- Customize your theme here. --> <item name="android:windowTranslucentStatus">true</item> </style> |
- Now, we need some icons and drawables resource files to be added to the drawables . Download the zip below and then add all its content to the drawables.
[download id=”3228″ template=”icons”]
- Finally, mention DefaultIntro.java as an activity in your manifest as follows:-
|
1 2 3 4 5 6 7 8 9 10 11 12 13 14 15 16 17 18 19 20 21 22 23 24 25 26 27 28 |
<?xml version="1.0" encoding="utf-8"?> <manifest xmlns:android="http://schemas.android.com/apk/res/android" package="com.example.manish.apptopintro22"> <application android:allowBackup="true" android:icon="@mipmap/ic_launcher" android:label="@string/app_name" android:supportsRtl="true" android:theme="@style/AppTheme"> <activity android:name=".MainActivity"> <intent-filter> <action android:name="android.intent.action.MAIN" /> <category android:name="android.intent.category.LAUNCHER" /> </intent-filter> </activity> <activity android:name=".DefaultIntro" android:label="Intro Label" android:theme="@style/FullscreenTheme"> </activity> </application> </manifest> |
- Yeah, you have done it. Run the app and Enjoy:)
- If you still find some problem, download the source code below and help yourself or let me know in the comments section.
[sociallocker id=1372] Intro Screen Slider Android Tutorial [/sociallocker]