In this android toolbar example, I will be explaining to you how to use Toolbar in your application. So, if you are confused about using the toolbar in your android application, then this is the right place for you.
Table of Contents
What is Toolbar in Android?
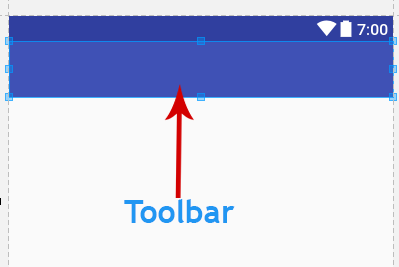
The toolbar was introduced from Android Lollipop when Material Design came into existence. Before Toolbar we were using ActionBar, the position of ActionBar was fix at the top of the screen. But in case of Toolbar, it is more flexible; you can place Toolbar anywhere in the Activity. The toolbar is useful for displaying App Icon, Title, Navigation Menu, etc.
You can see an example of the toolbar in below image.

Android Toolbar Example
To learn to implement Toolbar, we need an Android Project. And for this example, let’s create a new one.
Assuming you also have a new Android Project, here I have a project created using Android Studio 2.3. And you don’t need to add additional libraries if you are using version ahead 2.3.
Changing Theme
When you create a new project in Android Studio, it has the old Actionbar. And to use Toolbar first, we need to remove the Actionbar, to do this we have to change our theme.
- To change the theme go inside res->values->styles.xml. Here you will see the following.
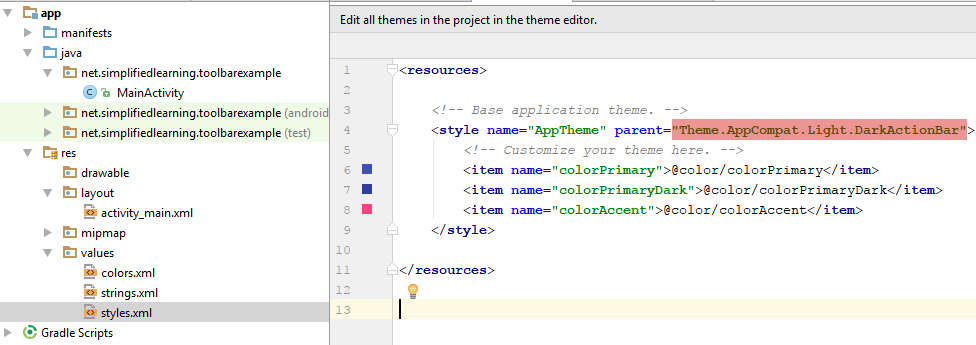
- So we need to modify the above XML thing as below.
|
1 2 3 4 5 6 7 8 9 10 11 12 13 |
<resources> <!-- Base application theme. --> <style name="AppTheme" parent="Theme.AppCompat.Light.NoActionBar"> <!-- Customize your theme here. --> <item name="colorPrimary">@color/colorPrimary</item> <item name="colorPrimaryDark">@color/colorPrimaryDark</item> <item name="colorAccent">@color/colorAccent</item> </style> </resources> |
- So we have changed the theme to NoActionBar. Now we can create a toolbar.
Creating Toolbar Layout
- Now come inside activity_main.xml and create toolbar as shown below.
|
1 2 3 4 5 6 7 8 9 10 11 12 13 14 15 16 17 18 19 20 21 22 23 24 25 26 27 28 29 30 31 32 33 34 |
<?xml version="1.0" encoding="utf-8"?> <RelativeLayout xmlns:android="http://schemas.android.com/apk/res/android" xmlns:app="http://schemas.android.com/apk/res-auto" xmlns:tools="http://schemas.android.com/tools" android:layout_width="match_parent" android:layout_height="match_parent" tools:context="net.simplifiedlearning.toolbarexample.MainActivity"> <android.support.v7.widget.Toolbar android:id="@+id/toolbar" android:layout_width="match_parent" android:layout_height="wrap_content" android:layout_alignParentStart="true" android:background="@color/colorPrimary" /> <LinearLayout android:layout_width="match_parent" android:layout_height="wrap_content" android:layout_below="@id/toolbar"> <!-- put your activity content here You can change the layout to anything you want right now it is a linear layout --> </LinearLayout> </RelativeLayout> |
- The above XML will generate a toolbar in your activity.
Setting Title for the Toolbar
- To do this come inside MainActivity.java.
|
1 2 3 4 5 6 7 8 9 10 11 12 13 14 15 16 17 18 19 20 21 22 23 24 25 26 |
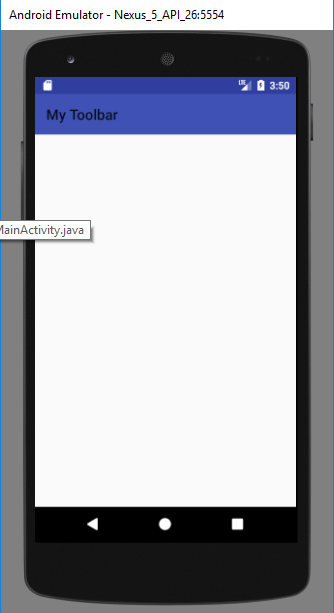
package net.simplifiedlearning.toolbarexample; import android.os.Build; import android.support.v7.app.AppCompatActivity; import android.os.Bundle; import android.support.v7.widget.Toolbar; public class MainActivity extends AppCompatActivity { @Override protected void onCreate(Bundle savedInstanceState) { super.onCreate(savedInstanceState); setContentView(R.layout.activity_main); //getting the toolbar Toolbar toolbar = (Toolbar) findViewById(R.id.toolbar); //setting the title toolbar.setTitle("My Toolbar"); //placing toolbar in place of actionbar setSupportActionBar(toolbar); } } |
- Now, execute your application and you will see the following output.
Creating a Menu
- Many times you see a menu on the right of the toolbar. Now let’s see how you can create this.
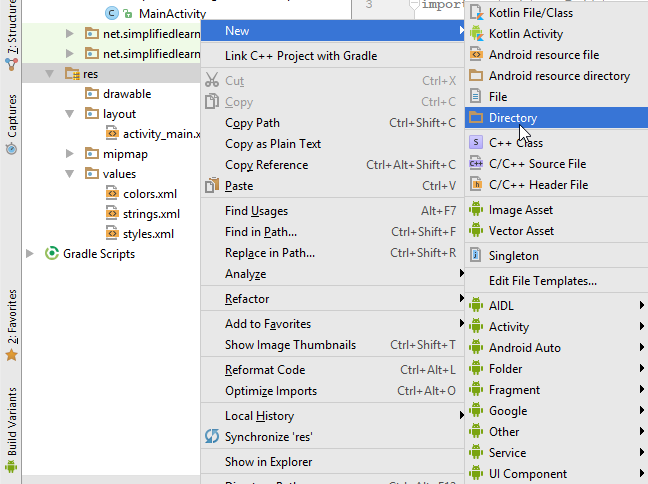
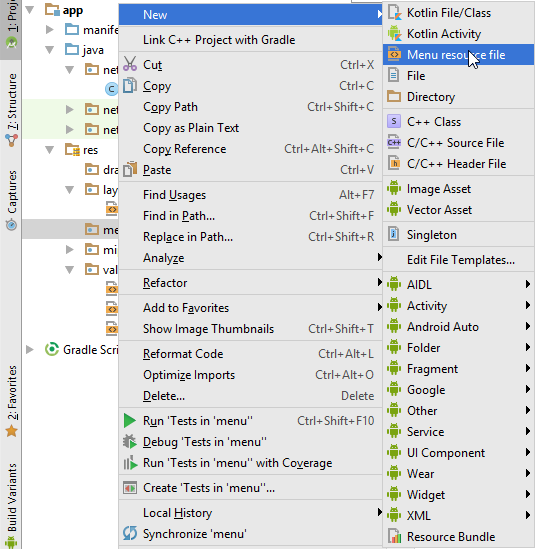
- First create a folder named menu inside res.
- Inside the menu directory, you need to create a new menu resource file. I have created a file named menu.xml.
- Inside the menu.xml file write the following code.
|
1 2 3 4 5 6 7 8 9 10 11 12 13 14 15 16 17 18 |
<?xml version="1.0" encoding="utf-8"?> <menu xmlns:android="http://schemas.android.com/apk/res/android"> <item android:id="@+id/menuAbout" android:title="About" /> <item android:id="@+id/menuSettings" android:title="Settings" /> <item android:id="@+id/menuLogout" android:title="Logout" /> </menu> |
- Here, we have only three menu items but if you need you can add as many menu items as you want.
Adding Menu to Toolbar
- We will do it inside MainActivity.java. Just add the following method inside MainActivity class.
|
1 2 3 4 5 6 7 8 |
@Override public boolean onCreateOptionsMenu(Menu menu) { MenuInflater menuInflater = getMenuInflater(); menuInflater.inflate(R.menu.menu, menu); return true; } |
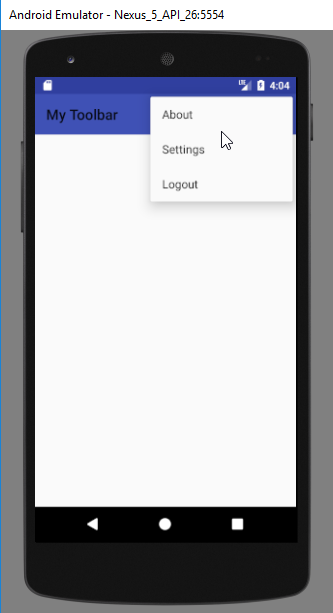
- Now you will see the menu in your application.
Handling Menu Clicks
- Now we also need to handle the clicks on Menu Items. To do this we just need to override onOptionsItemSelected() method.
|
1 2 3 4 5 6 7 8 9 10 11 12 13 14 15 16 17 18 19 20 21 |
@Override public boolean onOptionsItemSelected(MenuItem item) { switch(item.getItemId()){ case R.id.menuAbout: Toast.makeText(this, "You clicked about", Toast.LENGTH_SHORT).show(); break; case R.id.menuSettings: Toast.makeText(this, "You clicked settings", Toast.LENGTH_SHORT).show(); break; case R.id.menuLogout: Toast.makeText(this, "You clicked logout", Toast.LENGTH_SHORT).show(); break; } return true; } |
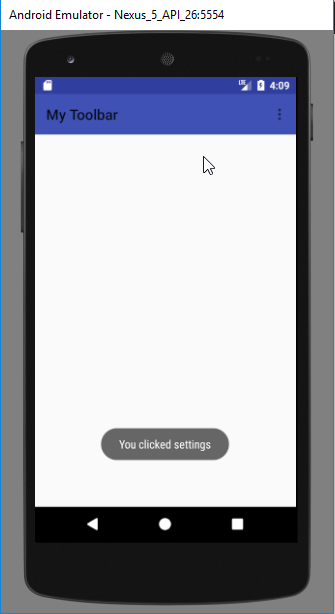
- After adding the above code, you will see the toast on clicking Menu Item.
Setting up a Search on the Toolbar
Many times you see a search icon that we can use for searching something in the app. The icon is nothing but the menu. So let’s look at how we can set up a Search option on the Toolbar.
Adding a Search Icon
- First, you need to add a search icon to your drawable folder. You can download any magnifier icon from google images or any other website for this. After downloading the image rename it to icon_search or any name you want, but you can only use small letters with underscores.
Adding Search Menu
- Now come inside the file menu.xml that we created above. Here you need to add one more item to the starting of your search. So modify the code as below. Remember I have added one more namespace here.
|
1 2 3 4 5 6 7 8 9 10 11 12 13 14 15 16 17 18 19 20 21 22 23 24 25 26 27 28 29 |
<?xml version="1.0" encoding="utf-8"?> <menu xmlns:android="http://schemas.android.com/apk/res/android" xmlns:app="http://schemas.android.com/apk/res-auto"> <!-- our search option --> <item android:id="@+id/menuSearch" android:icon="@drawable/icon_search" android:orderInCategory="100" android:title="Search" app:actionViewClass="android.support.v7.widget.SearchView" app:showAsAction="always" /> <item android:id="@+id/menuAbout" android:title="About" /> <item android:id="@+id/menuSettings" android:title="Settings" /> <item android:id="@+id/menuLogout" android:title="Logout" /> </menu> |
- Now the important things in the above code is the actionViewClass=”android.support.v7.widget.SearchView”. This means we are using the SearchView. The next thing is showAsAction=”always” and it will make the search icon visible always.
Modifying onCreateOptionsMenu()
- Now come inside your MainActivity.java and modify the method onCreateOptionsMenu() as shown below.
|
1 2 3 4 5 6 7 8 9 10 11 12 13 14 15 16 17 18 19 20 21 22 23 24 25 26 27 28 29 30 31 32 33 34 35 36 37 38 39 40 41 42 43 |
@Override public boolean onCreateOptionsMenu(Menu menu) { MenuInflater menuInflater = getMenuInflater(); menuInflater.inflate(R.menu.menu, menu); //getting the search view from the menu MenuItem searchViewItem = menu.findItem(R.id.menuSearch); //getting search manager from systemservice SearchManager searchManager = (SearchManager) getSystemService(Context.SEARCH_SERVICE); //getting the search view final SearchView searchView = (SearchView) searchViewItem.getActionView(); //you can put a hint for the search input field searchView.setQueryHint("Search Tutorials..."); searchView.setSearchableInfo(searchManager.getSearchableInfo(getComponentName())); //by setting it true we are making it iconified //so the search input will show up after taping the search iconified //if you want to make it visible all the time make it false searchView.setIconifiedByDefault(true); //here we will get the search query searchView.setOnQueryTextListener(new SearchView.OnQueryTextListener() { @Override public boolean onQueryTextSubmit(String query) { //do the search here return false; } @Override public boolean onQueryTextChange(String newText) { return false; } }); return true; } |
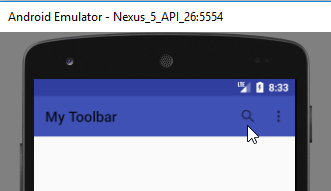
- After doing the above changes you can run your application and you will see a nice search option in your Toolbar.
So that’s all for this Android Toolbar Example friends. We learned some fundamental things, but you can do whatever you want with the Toolbar.
If you have any confusions regarding this Android Toolbar Example, just leave your comments below. And if you found it helpful then, please SHARE. Thank You 🙂