Simplified Coding

  • About
  • Contact Us
  • Advertise
  • Privacy Policy
You are here: Home / Android Application Development / Android Advance / Android SMS Verification App – Phone Verification with OTP

Android SMS Verification App – Phone Verification with OTP

November 21, 2015 by Belal Khan 112 Comments

Hello friends, I got a lots of emails and facebook requests to post a tutorial for phone number verification. Some people also asked me for SMS verification code for android. So in this tutorial we will create an Android SMS Verification App.

You already seen this example in some popular applications like WhatsApp, Hike etc. They verify the user’s phone number by sending an OTP (One Time Password) to the phone number registered.

To avoid spamming this is the best way to confirm your user with their phone number. And that is why verifying user’s with their phone number is one of the most common feature for your android app now days.

So in this tutorial we will create an Android SMS Verification App for registered users.

Android SMS Verification App – Video

You can check this video to know what we will be creating in this Android SMS Verification tutorial.

Creating our SMS API

  • To verify the user’s phone number we will send the verification code via SMS. For sending SMS we need an SMS API.
  • SMS’s are of two types
    • Promotional: It will not be sent to DND activated phone numbers. So for OTP  or Phone verification we cannot use promotional sms.
    • Transactional: It will be sent to all numbers, doesn’t matter a number has activated DND or not. In this tutorial I am using Transactional sms.
  • The bad news is for you guys is I haven’t found any provider who is providing SMS API for free. This tutorial is sponsored by Cheap SMS Bazaar. They gave me some free transactional sms credits to write this tutorial.
  • There are a lot of SMS API provider’s you can google for them. You can also buy it from Cheap SMS Bazaar. If you will signup to Cheap SMS Bazaar, they would give you 10 free promotional sms. You can test this tutorial with promotional sms as well. But with promotional sms your sms will not be sent to DND activated numbers.
  • I am assuming that you all are using Cheap SMS Bazaar. So go to your dashboard. And then go to API Documents. I am using the transactional one and my API link is.

http://login.cheapsmsbazaar.com/vendorsms/pushsms.aspx?user=abc&password=xyz&msisdn=919898xxxxxx&sid=SenderId&msg=test%20message&fl=0&gwid=2

user: Your login username.
password: Your login password.
msisdn: Single mobile number or multiple mobile numbers separated by comma(10 digits or +91).
sid: Approved sender id(Only 6 characters).
msg: Your message content(Minimum 459 characters/3 messages).
fl: if flash message then 1 or else 0
gwid: 2 (its for Transactions route.)
Note: Only 100 mobile numbers are allowed.

  • We will send the sms to only a single mobile number.
  • We will get the following JSON in response.

1
2
3
4
5
6
7
8
9
10
11
12
13
14
15
16
17
{
   "ErrorCode":"000",
   "ErrorMessage":"Success",
   "JobId":"381a8090-b230-42fa-ac04-157cc2142bfa",
   "MessageData":[
      {
         "MobileNumber":"919898xxxxxx ",
         "MessageParts":[
            {
               "MessageId":"919898xxxxxx -67e3765cdf034f438a432eacb88d0c14",
               "MessagePartId":1,
               "MessageText":"test message"
            }
         ]
      }
   ]
}

Creating Database and Scripts for Android SMS Verification Application

  • Go to phpMyAdmin and create the following table. (I am using Hostinger’s free hosting).
mysql database

MySql Database

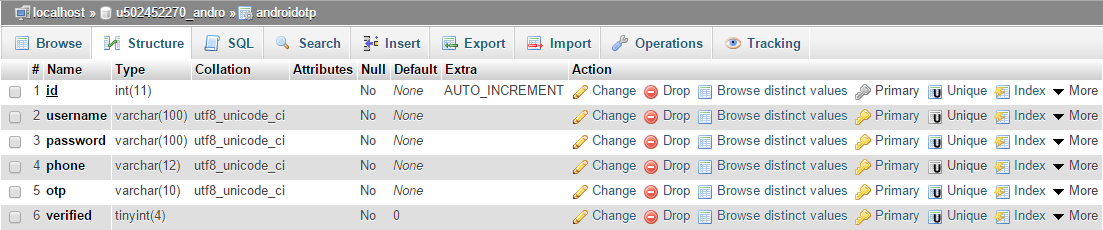
  • As you can see I have 6 columns. ID is PRIMARY KEY and AUTOINCREMENT Username and Phone is set to UNIQUE. verified is TINY INT and will store only two values 0 and 1. (o means not verified and 1 means verified). The default value for verified is set to 0 i.e. for every row the default value is unverified. And when user will enter the correct verification code we will change it to 1 i.e. verified.
  • Go to your server’s directory and create a folder for this project. (I created AndroidOTP)
  • We need to connect to the database first, so create a script dbConnect.php and write the following code.

dbConnect.php
PHP
1
2
3
4
5
6
7
8
<?php
define('HOST','mysql.hostinger.in');
define('USER','u502452270_andro');
define('PASS','belal_123');
define('DB','u502452270_andro');
//Connecting to database
$con = mysqli_connect(HOST,USER,PASS,DB) or die('Unable to Connect');

  • Now to handle the registration request create a file register.php. This file would store the user detail to database. It will also send the OTP or Verification Code via SMS.

register.php
PHP
1
2
3
4
5
6
7
8
9
10
11
12
13
14
15
16
17
18
19
20
21
22
23
24
25
26
27
28
29
30
31
32
33
34
35
36
37
38
39
40
41
42
43
44
45
46
47
48
49
50
51
52
53
54
55
<?php
//Constants for our API
//this is applicable only when you are using Cheap SMS Bazaar
define('SMSUSER','your user name');
define('PASSWORD','your password');
define('SENDERID','your sender id');
//This function will send the otp
function sendOtp($otp, $phone){
//This is the sms text that will be sent via sms
$sms_content = "Welcome to Simplified Coding: Your verification code is $otp";
//Encoding the text in url format
$sms_text = urlencode($sms_content);
 
//This is the Actual API URL concatnated with required values
$api_url = 'http://login.cheapsmsbazaar.com/vendorsms/pushsms.aspx?user='.SMSUSER.'&password='.PASSWORD.'&msisdn=91'.$phone.'&sid='.SENDERID.'&msg='.$sms_text.'&fl=0&gwid=2';
//Envoking the API url and getting the response
$response = file_get_contents( $api_url);
//Returning the response
return $response;
}
//If a post request comes to this script
if($_SERVER['REQUEST_METHOD']=='POST'){
//getting username password and phone number
$username = $_POST['username'];
$password = $_POST['password'];
$phone = $_POST['phone'];
//Generating a 6 Digits OTP or verification code
$otp = rand(100000, 999999);
//Importing the db connection script
require_once('dbConnect.php');
//Creating an SQL Query
$sql = "INSERT INTO androidotp (username, password, phone, otp) values ('$username','$password','$phone','$otp')";
//If the query executed on the db successfully
if(mysqli_query($con,$sql)){
//printing the response given by sendOtp function by passing the otp and phone number
            echo sendOtp($otp,$phone);
}else{
//printing the failure message in json
echo '{"ErrorMessage":"Failure"}';
}
//Closing the database connection
mysqli_close($con);
}

  • After sending the OTP to user’s mobile number we need to confirm the OTP from user. And for this we need one more php file. Create a new file confirm.php and write the following code.

confirm.php
PHP
1
2
3
4
5
6
7
8
9
10
11
12
13
14
15
16
17
18
19
20
21
22
23
24
25
26
27
28
29
30
31
32
33
34
35
36
37
38
39
40
41
42
<?php
//If a post request is detected
if($_SERVER['REQUEST_METHOD']=='POST'){
 
//Getting the username and otp
$username = $_POST['username'];
$otp = $_POST['otp'];
 
    //Importing the dbConnect script
require_once('dbConnect.php');
//Creating an SQL to fetch the otp from the table
$sql = "SELECT otp FROM androidotp WHERE username = '$username'";
//Getting the result array from database
$result = mysqli_fetch_array(mysqli_query($con,$sql));
//Getting the otp from the array
$realotp = $result['otp'];
//If the otp given is equal to otp fetched from database
if($otp == $realotp){
//Creating an sql query to update the column verified to 1 for the specified user
$sql = "UPDATE androidotp SET  verified =  '1' WHERE username ='$username'";
//If the table is updated
if(mysqli_query($con,$sql)){
//displaying success
echo 'success';
}else{
//displaying failure
echo 'failure';
}
}else{
//displaying failure if otp given is not equal to the otp fetched from database  
echo 'failure';
}
//Closing the database
mysqli_close($con);
}

  • Thats it for the server side part. Note the URL for the both the files register.php and confirm.php. And lets create an Android Project.

Android SMS Verification Project

  • Open Android Studio and create a new project and add the following dependencies that will be used.

1
2
3
4
5
6
7
dependencies {
    compile fileTree(dir: 'libs', include: ['*.jar'])
    testCompile 'junit:junit:4.12'
    compile 'com.android.support:appcompat-v7:23.1.0'
    compile 'com.android.support:design:23.0.0'
    compile 'com.mcxiaoke.volley:library-aar:1.0.0'
}

  • I have added volley because in this android sms verification tutorial I am using volley for the network operations. And for the layout design I have added design:23.0.0.
  • Now in your project create a java class to store the important constants that will be used in our app. I created Config.java

Config.java
Java
1
2
3
4
5
6
7
8
9
10
11
12
13
14
15
16
17
18
19
package net.simplifiedcoding.androidotp;
 
/**
* Created by Belal on 11/18/2015.
*/
public class Config {
    //URLs to register.php and confirm.php file
    public static final String REGISTER_URL = "http://simplifiedcoding.16mb.com/AndroidOTP/register.php";
    public static final String CONFIRM_URL = "http://simplifiedcoding.16mb.com/AndroidOTP/confirm.php";
 
    //Keys to send username, password, phone and otp
    public static final String KEY_USERNAME = "username";
    public static final String KEY_PASSWORD = "password";
    public static final String KEY_PHONE = "phone";
    public static final String KEY_OTP = "otp";
 
    //JSON Tag from response from server
    public static final String TAG_RESPONSE= "ErrorMessage";
}

  • Now we need to design a registration activity. I have created the following layout for this android sms verification.
android sms verification

Android SMS Verification

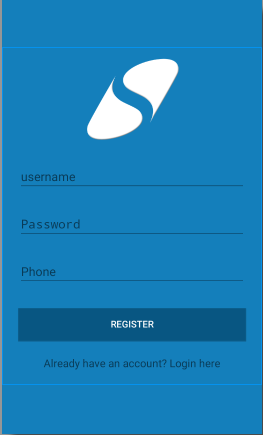
  • For creating the above layout you can use the following code.

activity_main.xml
1
2
3
4
5
6
7
8
9
10
11
12
13
14
15
16
17
18
19
20
21
22
23
24
25
26
27
28
29
30
31
32
33
34
35
36
37
38
39
40
41
42
43
44
45
46
47
48
49
50
51
52
53
54
55
56
57
58
59
60
61
62
63
64
65
66
67
68
69
70
71
72
73
74
75
76
77
78
<?xml version="1.0" encoding="utf-8"?>
<ScrollView xmlns:android="http://schemas.android.com/apk/res/android"
    android:background="@color/colorBackground"
    android:layout_width="fill_parent"
    android:layout_height="fill_parent"
    android:fitsSystemWindows="true">
 
    <LinearLayout
        android:layout_gravity="center_vertical"
        android:orientation="vertical"
        android:layout_width="match_parent"
        android:layout_height="wrap_content"
        android:paddingLeft="24dp"
        android:paddingRight="24dp">
 
        <ImageView
            android:background="@drawable/logo"
            android:layout_gravity="center_horizontal"
            android:layout_width="150dp"
            android:layout_height="150dp" />
 
        <android.support.design.widget.TextInputLayout
            android:layout_width="match_parent"
            android:layout_height="wrap_content"
            android:layout_marginTop="8dp"
            android:layout_marginBottom="8dp">
            <EditText android:id="@+id/editTextUsername"
                android:layout_width="match_parent"
                android:layout_height="wrap_content"
                android:inputType="textEmailAddress"
                android:hint="username" />
        </android.support.design.widget.TextInputLayout>
 
        <android.support.design.widget.TextInputLayout
            android:layout_width="match_parent"
            android:layout_height="wrap_content"
            android:layout_marginTop="8dp"
            android:layout_marginBottom="8dp">
            <EditText android:id="@+id/editTextPassword"
                android:layout_width="match_parent"
                android:layout_height="wrap_content"
                android:inputType="textPassword"
                android:hint="Password"/>
        </android.support.design.widget.TextInputLayout>
 
        <android.support.design.widget.TextInputLayout
            android:layout_width="match_parent"
            android:layout_height="wrap_content"
            android:layout_marginTop="8dp"
            android:layout_marginBottom="8dp">
            <EditText android:id="@+id/editTextPhone"
                android:layout_width="match_parent"
                android:layout_height="wrap_content"
                android:inputType="textEmailAddress"
                android:hint="Phone" />
        </android.support.design.widget.TextInputLayout>
 
        <android.support.v7.widget.AppCompatButton
            android:id="@+id/buttonRegister"
            android:layout_width="fill_parent"
            android:layout_height="wrap_content"
            android:background="@color/colorPrimary"
            android:textColor="@color/colorAccent"
            android:layout_marginTop="24dp"
            android:layout_marginBottom="24dp"
            android:padding="12dp"
            android:text="Register"/>
 
        <TextView android:id="@+id/linkSignup"
            android:layout_width="fill_parent"
            android:layout_height="wrap_content"
            android:layout_marginBottom="24dp"
            android:text="Already have an account? Login here"
            android:gravity="center"
            android:textSize="16dip"/>
 
    </LinearLayout>
</ScrollView>

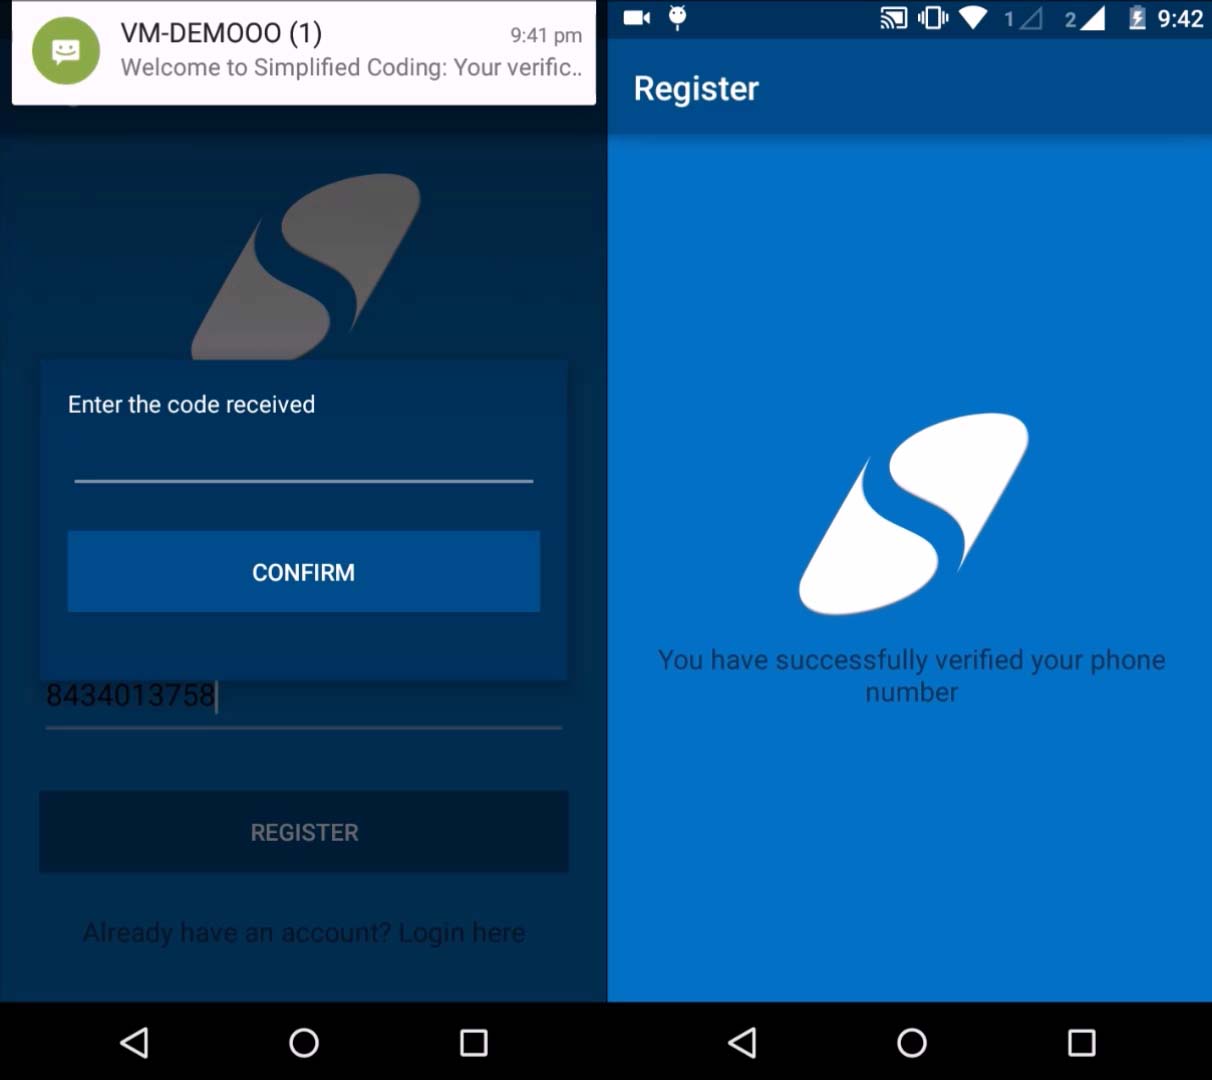
  • After user will tap the REGISTER button, a dialog box will appear to enter the confirmation code sent. For this dialog box we need to create a layout resource file. Create dialog_confirm.xml file and write the following code.

dialog_confirm.xml
1
2
3
4
5
6
7
8
9
10
11
12
13
14
15
16
17
18
19
20
21
22
23
24
25
26
27
28
29
30
31
32
33
34
<?xml version="1.0" encoding="utf-8"?>
<LinearLayout xmlns:android="http://schemas.android.com/apk/res/android"
    android:padding="@dimen/activity_horizontal_margin"
    android:layout_margin="@dimen/activity_horizontal_margin"
    android:layout_width="match_parent"
    android:layout_height="match_parent"
    android:background="@color/colorPrimaryDark"
    android:orientation="vertical">
 
    <TextView
        android:textColor="@color/colorAccent"
        android:text="Enter the code received"
        android:layout_width="wrap_content"
        android:layout_height="wrap_content" />
 
    <EditText
        android:id="@+id/editTextOtp"
        android:layout_width="match_parent"
        android:layout_height="wrap_content"
        android:inputType="textEmailAddress" />
 
    <android.support.v7.widget.AppCompatButton
        android:id="@+id/buttonConfirm"
        android:layout_width="fill_parent"
        android:layout_height="wrap_content"
        android:layout_marginBottom="24dp"
        android:layout_marginTop="24dp"
        android:background="@color/colorPrimary"
        android:padding="12dp"
        android:text="Confirm"
        android:textColor="@color/colorAccent" />
 
 
</LinearLayout>

  • Now come to MainActivity.java. 

ActivityMain.java
Java
1
2
3
4
5
6
7
8
9
10
11
12
13
14
15
16
17
18
19
20
21
22
23
24
25
26
27
28
29
30
31
32
33
34
35
36
37
38
39
40
41
42
43
44
45
46
47
48
49
50
51
52
53
54
55
56
57
58
59
60
61
62
63
64
65
66
67
68
69
70
71
72
73
74
75
76
77
78
79
80
81
82
83
84
85
86
87
88
89
90
91
92
93
94
95
96
97
98
99
100
101
102
103
104
105
106
107
108
109
110
111
112
113
114
115
116
117
118
119
120
121
122
123
124
125
126
127
128
129
130
131
132
133
134
135
136
137
138
139
140
141
142
143
144
145
146
147
148
149
150
151
152
153
154
155
156
157
158
159
160
161
162
163
164
165
166
167
168
169
170
171
172
173
174
175
176
177
178
179
180
181
182
183
184
185
186
187
188
189
190
191
192
193
194
195
196
197
198
199
200
201
202
203
204
205
206
207
208
209
210
211
212
213
214
215
package net.simplifiedcoding.androidotp;
 
import android.app.AlertDialog;
import android.app.ProgressDialog;
import android.content.Intent;
import android.support.v7.app.AppCompatActivity;
import android.os.Bundle;
import android.support.v7.widget.AppCompatButton;
import android.view.LayoutInflater;
import android.view.View;
import android.widget.EditText;
import android.widget.Toast;
 
import com.android.volley.AuthFailureError;
import com.android.volley.NetworkResponse;
import com.android.volley.Request;
import com.android.volley.RequestQueue;
import com.android.volley.Response;
import com.android.volley.VolleyError;
import com.android.volley.toolbox.JsonObjectRequest;
import com.android.volley.toolbox.StringRequest;
import com.android.volley.toolbox.Volley;
 
import org.json.JSONException;
import org.json.JSONObject;
 
import java.util.HashMap;
import java.util.Map;
 
public class MainActivity extends AppCompatActivity implements View.OnClickListener {
 
    //Creating views
    private EditText editTextUsername;
    private EditText editTextPassword;
    private EditText editTextPhone;
    private EditText editTextConfirmOtp;
 
    private AppCompatButton buttonRegister;
    private AppCompatButton buttonConfirm;
 
    //Volley RequestQueue
    private RequestQueue requestQueue;
 
    //String variables to hold username password and phone
    private String username;
    private String password;
    private String phone;
 
    @Override
    protected void onCreate(Bundle savedInstanceState) {
        super.onCreate(savedInstanceState);
        setContentView(R.layout.activity_main);
 
        //Initializing Views
        editTextUsername = (EditText) findViewById(R.id.editTextUsername);
        editTextPassword = (EditText) findViewById(R.id.editTextPassword);
        editTextPhone = (EditText) findViewById(R.id.editTextPhone);
 
        buttonRegister = (AppCompatButton) findViewById(R.id.buttonRegister);
 
        //Initializing the RequestQueue
        requestQueue = Volley.newRequestQueue(this);
 
        //Adding a listener to button
        buttonRegister.setOnClickListener(this);
    }
 
    //This method would confirm the otp
    private void confirmOtp() throws JSONException {
        //Creating a LayoutInflater object for the dialog box
        LayoutInflater li = LayoutInflater.from(this);
        //Creating a view to get the dialog box
        View confirmDialog = li.inflate(R.layout.dialog_confirm, null);
 
        //Initizliaing confirm button fo dialog box and edittext of dialog box
        buttonConfirm = (AppCompatButton) confirmDialog.findViewById(R.id.buttonConfirm);
        editTextConfirmOtp = (EditText) confirmDialog.findViewById(R.id.editTextOtp);
 
        //Creating an alertdialog builder
        AlertDialog.Builder alert = new AlertDialog.Builder(this);
 
        //Adding our dialog box to the view of alert dialog
        alert.setView(confirmDialog);
 
        //Creating an alert dialog
        final AlertDialog alertDialog = alert.create();
 
        //Displaying the alert dialog
        alertDialog.show();
 
        //On the click of the confirm button from alert dialog
        buttonConfirm.setOnClickListener(new View.OnClickListener() {
            @Override
            public void onClick(View v) {
                //Hiding the alert dialog
                alertDialog.dismiss();
 
                //Displaying a progressbar
                final ProgressDialog loading = ProgressDialog.show(MainActivity.this, "Authenticating", "Please wait while we check the entered code", false,false);
 
                //Getting the user entered otp from edittext
                final String otp = editTextConfirmOtp.getText().toString().trim();
 
                //Creating an string request
                StringRequest stringRequest = new StringRequest(Request.Method.POST, Config.CONFIRM_URL,
                        new Response.Listener<String>() {
                            @Override
                            public void onResponse(String response) {
                                //if the server response is success
                                if(response.equalsIgnoreCase("success")){
                                    //dismissing the progressbar
                                    loading.dismiss();
 
                                    //Starting a new activity
                                    startActivity(new Intent(MainActivity.this, Success.class));
                                }else{
                                    //Displaying a toast if the otp entered is wrong
                                    Toast.makeText(MainActivity.this,"Wrong OTP Please Try Again",Toast.LENGTH_LONG).show();
                                    try {
                                        //Asking user to enter otp again
                                        confirmOtp();
                                    } catch (JSONException e) {
                                        e.printStackTrace();
                                    }
                                }
                            }
                        },
                        new Response.ErrorListener() {
                            @Override
                            public void onErrorResponse(VolleyError error) {
                                alertDialog.dismiss();
                                Toast.makeText(MainActivity.this, error.getMessage(), Toast.LENGTH_LONG).show();
                            }
                        }){
                    @Override
                    protected Map<String, String> getParams() throws AuthFailureError {
                        Map<String,String> params = new HashMap<String, String>();
                        //Adding the parameters otp and username
                        params.put(Config.KEY_OTP, otp);
                        params.put(Config.KEY_USERNAME, username);
                        return params;
                    }
                };
 
                //Adding the request to the queue
                requestQueue.add(stringRequest);
            }
        });
    }
 
 
    //this method will register the user
    private void register() {
 
        //Displaying a progress dialog
        final ProgressDialog loading = ProgressDialog.show(this, "Registering", "Please wait...", false, false);
 
 
        //Getting user data
        username = editTextUsername.getText().toString().trim();
        password = editTextPassword.getText().toString().trim();
        phone = editTextPhone.getText().toString().trim();
 
        //Again creating the string request
        StringRequest stringRequest = new StringRequest(Request.Method.POST, Config.REGISTER_URL,
                new Response.Listener<String>() {
                    @Override
                    public void onResponse(String response) {
                        loading.dismiss();
                        try {
                            //Creating the json object from the response
                            JSONObject jsonResponse = new JSONObject(response);
 
                            //If it is success
                            if(jsonResponse.getString(Config.TAG_RESPONSE).equalsIgnoreCase("Success")){
                                //Asking user to confirm otp
                                confirmOtp();
                            }else{
                                //If not successful user may already have registered
                                Toast.makeText(MainActivity.this, "Username or Phone number already registered", Toast.LENGTH_LONG).show();
                            }
                        } catch (JSONException e) {
                            e.printStackTrace();
                        }
                    }
                },
                new Response.ErrorListener() {
                    @Override
                    public void onErrorResponse(VolleyError error) {
                        loading.dismiss();
                        Toast.makeText(MainActivity.this, error.getMessage(),Toast.LENGTH_LONG).show();
                    }
                }) {
            @Override
            protected Map<String, String> getParams() throws AuthFailureError {
                Map<String, String> params = new HashMap<>();
                //Adding the parameters to the request
                params.put(Config.KEY_USERNAME, username);
                params.put(Config.KEY_PASSWORD, password);
                params.put(Config.KEY_PHONE, phone);
                return params;
            }
        };
        
        //Adding request the the queue
        requestQueue.add(stringRequest);
    }
 
 
    @Override
    public void onClick(View v) {
        //Calling register method on register button click
        register();
    }
}

  • On success we are starting a new activity that is not yet created. So create a new activity named success. And write the following xml code for the layout file.

activity_success.xml
1
2
3
4
5
6
7
8
9
10
11
12
13
14
15
16
17
18
19
20
21
22
23
24
25
26
27
28
29
30
31
32
33
34
35
<?xml version="1.0" encoding="utf-8"?>
<RelativeLayout xmlns:android="http://schemas.android.com/apk/res/android"
    xmlns:tools="http://schemas.android.com/tools"
    android:layout_width="match_parent"
    android:layout_height="match_parent"
    android:paddingBottom="@dimen/activity_vertical_margin"
    android:paddingLeft="@dimen/activity_horizontal_margin"
    android:paddingRight="@dimen/activity_horizontal_margin"
    android:paddingTop="@dimen/activity_vertical_margin"
    android:background="@color/colorBackground"
    tools:context="net.simplifiedcoding.androidotp.Success">
 
    <LinearLayout
        android:layout_gravity="center_vertical"
        android:orientation="vertical"
        android:layout_width="match_parent"
        android:layout_height="wrap_content"
        android:layout_centerVertical="true"
        android:layout_alignParentStart="true">
 
        <ImageView
            android:background="@drawable/logo"
            android:layout_gravity="center_horizontal"
            android:layout_width="150dp"
            android:layout_height="150dp" />
        <TextView
            android:layout_width="fill_parent"
            android:layout_height="wrap_content"
            android:layout_marginBottom="24dp"
            android:text="You have successfully verified your phone number"
            android:gravity="center"
            android:textSize="16dip"/>
 
    </LinearLayout>
</RelativeLayout>

  • The above code will produce the following layout.
android sms verification

Android SMS Verification

  • For the java file of this activity (Success.java) I haven’t done anything.

Success.java
Java
1
2
3
4
5
6
7
8
9
10
11
12
13
package net.simplifiedcoding.androidotp;
 
import android.support.v7.app.AppCompatActivity;
import android.os.Bundle;
 
public class Success extends AppCompatActivity {
 
    @Override
    protected void onCreate(Bundle savedInstanceState) {
        super.onCreate(savedInstanceState);
        setContentView(R.layout.activity_success);
    }
}

  • At last add internet permission to your manifest file.

AndroidManifest.xml
1
2
3
4
5
6
7
8
9
10
11
12
13
14
15
16
17
18
19
20
21
22
23
<?xml version="1.0" encoding="utf-8"?>
<manifest xmlns:android="http://schemas.android.com/apk/res/android"
    package="net.simplifiedcoding.androidotp">
 
    <uses-permission android:name="android.permission.INTERNET" />
 
    <application
        android:allowBackup="true"
        android:icon="@mipmap/ic_launcher"
        android:label="Register"
        android:supportsRtl="true"
        android:theme="@style/AppTheme">
        <activity android:name=".MainActivity">
            <intent-filter>
                <action android:name="android.intent.action.MAIN" />
 
                <category android:name="android.intent.category.LAUNCHER" />
            </intent-filter>
        </activity>
        <activity android:name=".Success"></activity>
    </application>
 
</manifest>

  • Now run your application.
android sms verification

Android SMS Verification

  • Bingo! Its working absolutely fine. You can get the project from GitHub Repository. Just go to the link given below.

Get Source Code of this Android SMS Verification App from GitHub

Android SMS Verification Application

Some More Android Application Development Tutorial You Must Check 

  • Android Login Example Using PHP, MySQL and Volley
  • Android Email App using JavaMail API
  • Android Custom ListView iwth Images using RecyclerView and Volley

So thats all for this Android SMS Verification Tutorial. Please support by giving your feedbacks with your comments. And don’t hesitate to ask if having queries or confusions regarding this Android SMS Verification Tutorial. Thank You 🙂

Sharing is Caring:

  • Tweet
  • Share on Tumblr
  • More
  • Pocket
  • Print
  • Email

Related

Filed Under: Android Advance, Android Application Development Tagged With: android phone verification, android sms verification, implement otp in your android app, phone verification

About Belal Khan

I am Belal Khan, I am currently pursuing my MCA. In this blog I write tutorials and articles related to coding, app development, android etc.

Comments

  1. vivek says

    November 22, 2015 at 4:53 am

    Thanks belal ,simplified coding is a really very good website for learning…………there is no other website where coding as simpler as simplified coding provides is available…….
    Thanks Once again……………
    Hope today i spelled u correctly

    Reply
    • Belal Khan says

      November 22, 2015 at 5:45 am

      your welcome buddy keep visiting for more tutorials (y)

      Reply
      • vinod says

        January 5, 2017 at 9:26 am

        Belal im trying this code but it gives null (Toaste)message,and executing onErrorResponse()method

        Reply
        • rahul says

          January 10, 2017 at 3:09 pm

          where is SENDERID pls tell me.

          Reply
      • Karan says

        March 8, 2017 at 9:10 am

        Hey belal
        i m using ur code bt when i click on register progress loading is show thn noting will happen ?

        pls help to solve this issue.
        thnx

        Reply
        • manoj says

          April 29, 2017 at 12:21 pm

          same issue comming on my site also pls help

          Reply
      • Haseeb says

        June 21, 2017 at 8:28 am

        how i impliment the JSON method and other code in my localhost domain and android

        Reply
      • Rahul says

        March 6, 2018 at 11:49 am

        Sir how to buy the sms api

        Reply
    • amar singh says

      February 18, 2017 at 12:56 pm

      does it manage session means after login i close app and again then open i dont have to login again

      Reply
    • Ardian says

      October 1, 2017 at 2:48 pm

      Jazakallahu khairan Belal….Insha Allah you have a lot of good deeds

      Reply
  2. priti says

    November 22, 2015 at 8:00 am

    Your tutorial is very useful for us..Thanks

    Reply
    • bhaskar says

      November 20, 2016 at 2:00 pm

      on your above comment i think u done programming can u please help me …i got

      Warning: mysqli::mysqli() [mysqli.mysqli]: (28000/1045): Access denied for user ‘root’@’localhost’ (using password: YES) in G:\wamp\www\android_sms\include\DbConnect.php on line 24
      Failed to connect to MySQL: Access denied for user ‘root’@’localhost’ (using password: YES)

      i got this error in adatabase can u help me how i solve this and please provide me your coding u add the programme

      please reply and help me

      Reply
      • nagaraja t says

        February 16, 2017 at 5:34 am

        leave blank for password.

        Reply
  3. syed nawaz says

    November 25, 2015 at 4:41 am

    hi..
    pls post same tutorial of phonegap apps using html5 css and js.

    Reply
  4. Balakumar says

    November 27, 2015 at 9:12 am

    Hi where the libary file (“com.mcxiaoke.volley:library-aar:1.0.0”) ..Any link or sites ? there

    Reply
    • Belal Khan says

      November 27, 2015 at 12:35 pm

      Just add the line inside the dependencies block in your build.gradle file and it will automatically download and add it to your project.. just make sure your system is connected to internet

      optionally follow this tutorial to know https://www.simplifiedcoding.net/android-volley-tutorial-to-get-json-from-server/
      how you can add volley to your project offline

      Reply
  5. Balakumar says

    December 9, 2015 at 11:43 am

    Hey hi after i am running this code i am getting the error like this

    :[ Error:Execution failed for task ‘:app:transformClassesWithJarMergingForDebug’.
    > com.android.build.api.transform.TransformException: java.util.zip.ZipException: duplicate entry: org/apache/http/message/BasicHeaderElementIterator.class ]..

    How to clear this error ?

    Reply
  6. sam says

    December 9, 2015 at 5:21 pm

    can i get a link to download php file..?

    Reply
  7. sam says

    December 9, 2015 at 8:13 pm

    plz provide any link to download design:23.0.0.

    Reply
    • Belal Khan says

      December 10, 2015 at 4:06 am

      Just add the dependencies to your build.gradle file and it will automatically download and add it to your project

      Reply
      • sam says

        December 10, 2015 at 7:56 am

        but i am using eclipse mars

        Reply
      • praveen singh says

        January 13, 2016 at 7:41 am

        hello bro,
        i have some problem
        see this”java.net.connectException:failed to connect to locakhost/127.0.0.1 (port 80) after 2500ms: isConnected failed: ECONNREFUSED (Connection refused)”
        how can i reduse this problem plz tell me i really need.
        i have loged in cheapsmsbazar and using single sms message key. and localhost. so why ocr this problem.

        Reply
        • Belal Khan says

          January 13, 2016 at 10:17 am

          Try with a live server.. I guess your host is not accessible by your emulator or phone

          Reply
          • himanshu verma says

            June 20, 2017 at 9:01 am

            can you please send me any live server link to test this app?

  8. Sunil Hansda says

    December 10, 2015 at 7:47 pm

    I developed the app using Eclipse and also imported the volley.jar file successfully. But everytime I launch the app it unfortunately stops. I tried to figure out the problem then found that in MainActivity.java the line ” requestQueue = Volley.newRequestQueue(this);” is the reason. Removing this line makes the app load the main layout but could not switch to other when I press the Register button. Waiting eagerly for your reply.

    Reply
  9. santosh says

    February 2, 2016 at 6:01 am

    Thanks u have done very very great job if in future is any need u r help then defenatly i contact u.

    Reply
    • rahul says

      January 10, 2017 at 3:11 pm

      where is SENDERID pls tell me.

      Reply
  10. RItesh says

    February 10, 2016 at 6:02 am

    Can u send me same code in python language that send otp no to mobile via sms for verification of mobile no actually i have created some parts but its not working plsease help.
    My email id is [email protected].
    Thank You
    Thanks in advance.

    Reply
  11. Michael says

    February 12, 2016 at 3:24 am

    I have some problems. Why if i click the register button, that show me “Username or password already registered?”. I had create the php file server and database like your screenshot and set the username and phone as unique. Please give me the solution. Thanks anyway.

    Reply
    • prabakaran says

      March 15, 2016 at 10:31 am

      I am also having same problem. Please advice me ASAP

      Reply
    • Karan Brahmaxatriya says

      June 3, 2016 at 1:56 pm

      I am also having same problem.

      Reply
    • rahul says

      January 10, 2017 at 3:12 pm

      where is SENDERID pls tell me.

      Reply
    • rahul bambale says

      July 3, 2017 at 5:44 pm

      same problem here.pls help me.

      Reply
  12. Garima Mishra says

    February 12, 2016 at 6:43 am

    Hey can u please provide the link to download PHP file? as i am not getting dialog box to confirm the code after Registered

    Reply
  13. SHAMEEM says

    February 19, 2016 at 10:37 am

    I NEED THE EXACT CODING FOR CREATING OTP IN STUDENT PORTAL MOBILE APPLICATION IN ANDROID ENVIRONMENT

    Reply
  14. Thilini says

    February 26, 2016 at 4:08 am

    Hi belal,
    Thank for your tutorials. Is this “Cheap SMS Bazaar” free demo only works in India?

    Reply
  15. Aanchal Saroha says

    February 28, 2016 at 3:41 pm

    hey, i need some help for my website. i am not making a android app, but a client side for my website. do u know coding for client side? where we will capture details and verify otp success message?

    Reply
  16. prabakaran says

    March 15, 2016 at 10:26 am

    I am getting error when i hit the register button it shows “Username or Phone number already registered” nothing happend. then i checked my database its empty no datas are stored in my database…

    Please advice me ASAP

    Reply
    • prabakaran says

      March 17, 2016 at 4:23 am

      waiting for your fast reply

      Reply
      • Chirag says

        March 22, 2016 at 6:42 am

        same thing happening. in Response of Config.TAG_STATUS it is giving “status string as reply” in place of 0

        Reply
  17. vivek says

    March 19, 2016 at 7:40 am

    I am getting invalid sender id ….from where i can get sender id????

    Reply
  18. Chirag says

    March 21, 2016 at 1:22 pm

    Value of type java.lang.String cannot be converted to JSONObject these type of error coming when try to execute your project.

    Downloaded from Github

    Reply
  19. Muhammad Aldi Perdana Putra says

    March 29, 2016 at 8:29 am

    Hey Dude
    Where you place the JSON file?

    Reply
    • Belal Khan says

      March 29, 2016 at 12:59 pm

      Which file you are talking about?

      Reply
  20. karthik says

    March 29, 2016 at 10:19 am

    how to download this full source

    Reply
    • Belal Khan says

      March 29, 2016 at 12:55 pm

      I have given the link to download the source code check at the bottom of the post

      Reply
      • Gopinath says

        June 4, 2016 at 5:29 am

        Hi sir can i develop like this using web services (Restfull Service). because i dont want to do this with using php my sql.

        Reply
  21. karthik says

    March 29, 2016 at 1:23 pm

    i cant download this source , whan im press fb button its go to top of the site

    Reply
  22. karthik says

    March 29, 2016 at 1:28 pm

    when im press regsitration button, its processed and copme to one error, that is..
    1. ” onResponse(Register.java:165)”

    165 line code : JSONObject jsonResponse = new JSONObject(response);

    2. onResponse(Register.java:159)

    159 line code : new Response.Listener()

    how to slove

    3. i cant import a these :

    import com.android.volley.NetworkResponse;
    import com.android.volley.toolbox.JsonObjectRequest;
    import com.android.volley.toolbox.StringRequest;

    Reply
  23. karthik says

    March 29, 2016 at 1:59 pm

    your code also asame prblm in coding lines

    Reply
  24. karthik says

    March 29, 2016 at 2:01 pm

    i cant reply this method kindly use mail chat my id [email protected]

    Reply
  25. sakshi says

    April 1, 2016 at 8:22 am

    i am not getting dialog box to confirm the code after Registered. m using msg91 for otp bt m nt getting dialog box.. plz reply me soon…

    Reply
    • Nawas PK says

      January 18, 2017 at 4:21 pm

      Hello, can please share the php for msg91 or share how to add msg91 details in this php code, I am a learned.

      Reply
  26. aaaa says

    April 20, 2016 at 6:14 am

    hello belal can you help me in creating a login page without password.

    Reply
  27. krishna says

    May 26, 2016 at 7:16 am

    Hi belal i am follow your tutorial to send otp on the mobile device but the api not response properly. please help me to resolve this problem

    Reply
  28. Karan Brahmaxatriya says

    June 3, 2016 at 1:54 pm

    I have some problems. Why if i click the register button, that show me “Username or password already registered?”. I had create the php file server and database like your screenshot and set the username and phone as unique. Please give me the solution. Thanks anyway.

    Reply
    • rahul says

      January 10, 2017 at 3:37 pm

      where is SENDERID pls tell me.

      Reply
    • Ram says

      July 27, 2017 at 5:53 am

      Same issue

      Reply
  29. [email protected] says

    June 10, 2016 at 7:04 am

    hello sir,
    i’ve designed a contacts page in studio….which contains two fields Name and contact No. and a button to submit the details…when i click on the Submit button a message has to be sent to the mentioned mobile number

    how to do it by using URL???

    Hope i’ll get reply from ur side soon

    Thanks in advance

    Reply
  30. Deep Rathod says

    June 24, 2016 at 10:25 am

    Thank you for posting. but i want to send otp in mobile without save otp in database then what can i do..?

    please reply me ASAP..

    Thanks in Advance.

    Reply
  31. Tauseef says

    July 4, 2016 at 5:52 am

    Value <br of type java.lang.String cannot be converted to JSONObject
    Getting this type of Error when posting data

    Reply
    • Anitha says

      July 5, 2016 at 10:27 am

      am also facing same problem did u gt solution?

      Reply
  32. Anitha says

    July 5, 2016 at 10:26 am

    Getting this type of Error when posting data
    Value <br of type java.lang.String cannot be converted to JSONObject
    and also i cant download this source code….Please help me to resolve this problem

    Reply
  33. pro says

    July 11, 2016 at 10:28 am

    not able to download code. after giving my gmail id

    Reply
  34. Pro says

    July 13, 2016 at 7:11 am

    Hi
    Im not able to download Android sms verification, after giving gmail id , what is the problem.

    Reply
  35. Keshav Sharm says

    July 16, 2016 at 8:49 am

    Hello dear
    First of all thanks to you for this great tutorial. I am successfully send promotional sms on my device through codes and api provided by you. But the problem is alert dialog is not showing on the screen. How can confirm without entering otp. Please help.

    Reply
    • abhishek says

      August 11, 2016 at 9:02 am

      when i click on register button registering please wait dialog appears and the entries are saved in my database i did not receive any otp sms

      Reply
      • rahul bambale says

        July 3, 2017 at 5:59 pm

        hello abhishek pls meet me on whatsapp very urgent.8149624338

        Reply
  36. pro says

    July 17, 2016 at 7:32 am

    Hello sir, not able to download the code, pl help me

    Reply
  37. Tarkeshwar Prasad says

    August 2, 2016 at 7:32 am

    Sir Actually i am confusing about {
    “ErrorCode”:”000″,
    “ErrorMessage”:”Success”,
    “JobId”:”381a8090-b230-42fa-ac04-157cc2142bfa”,
    “MessageData”:[
    {
    “MobileNumber”:”919898xxxxxx “,
    “MessageParts”:[
    {
    “MessageId”:”919898xxxxxx -67e3765cdf034f438a432eacb88d0c14″,
    “MessagePartId”:1,
    “MessageText”:”test message”
    }
    ]
    }
    ]
    }

    what will be name and dot extension name of that file

    Reply
  38. shiva says

    August 10, 2016 at 1:35 pm

    hii,Belal
    I m using ur post but i get one error when i m register then i m get otp but i didnt call confirmOtp(); function

    try {
    //Creating the json object from the response
    JSONObject jsonResponse = new JSONObject(response);
    // confirmOtp();
    //If it is success
    if(jsonResponse.getString(Config.TAG_RESPONSE).equalsIgnoreCase(“Success”)){
    confirmOtp();

    //Asking user to confirm otp

    }else{
    //If not successful user may already have registered
    Toast.makeText(MainActivity.this, “Username or Phone number already registered”, Toast.LENGTH_LONG).show();
    }
    } catch (JSONException e) {
    e.printStackTrace();
    }
    }
    },

    ” if(jsonResponse.getString(Config.TAG_RESPONSE).equalsIgnoreCase(“Success”)){
    confirmOtp();”

    this code is not getting execute when I run this tutorial

    Reply
    • Balwant kaur says

      September 26, 2016 at 7:31 am

      i got same problem did u get solution

      Reply
      • Gaurav says

        February 12, 2017 at 8:10 am

        I am also got same problem

        Reply
        • Anshul Srivastava says

          February 21, 2017 at 4:42 am

          You need to echo the “success” in json format in php file by using json_encode function in php.

          $response = ‘success’;

          echo json_encode(array(‘status’ => $response));

          and try this java code in string request:

          if(jsonResponse.getString(“status”).equals(“success”)){
          confirmOtp();
          }else{

          }

          Reply
          • Akanksha says

            March 19, 2017 at 2:05 pm

            In which php file I need to add this and where?

        • rahul bambale says

          July 3, 2017 at 6:00 pm

          pls bro meet me on whatsapp.8149624338

          Reply
  39. vaidehi says

    August 12, 2016 at 5:38 am

    jsonResponse.getString(Config.TAG_RESPONSE).equalsIgnoreCase(“Success”) this condition is not getting executing when I am implementing this and directly display toast msg as “Username or Phone number already registered”

    Reply
  40. vaidehi says

    August 12, 2016 at 7:27 am

    How to get json response back in json format?

    Reply
  41. chocozene says

    August 27, 2016 at 8:26 pm

    hi, how do we do this on html5 instead? and do you know how to do top for login too? thanks

    Reply
  42. vidhyadhar says

    August 31, 2016 at 9:15 am

    {“ErrorCode”:”15″,”ErrorMessage”:”Invalid SenderId”,”JobId”:null,”MessageData”:null}

    I am getting this error
    What is the sender id which i have to put in api string?

    Reply
    • rahul bambale says

      July 3, 2017 at 6:01 pm

      DEMOOO this is sender id

      Reply
  43. Kimmig says

    September 9, 2016 at 8:50 am

    Hi Belal
    Am getting a fatal exception error
    “Unable to start activity ComponentInfo {… / … MainActivity} android.view.InflateException: Binary XML file line #22: Error inflating class android.support.design.widget.TextInputLayout ”
    What could be the issue?

    Reply
  44. finalchat says

    September 19, 2016 at 7:54 am

    Hi belal I have to fill this or not

    user: Your login username.
    password: Your login password.
    msisdn: Single mobile number or multiple mobile numbers separated by comma(10 digits or +91).
    sid: Approved sender id(Only 6 characters).
    msg: Your message content(Minimum 459 characters/3 messages).
    fl: if flash message then 1 or else 0
    gwid: 2 (its for Transactions route.)

    Reply
  45. balwantkaur says

    September 24, 2016 at 5:19 am

    hi we cannot download
    help

    Reply
  46. Hameed Ibrahim says

    September 28, 2016 at 4:59 am

    Hi Belal,
    1. How to get sender id in cheap sms bazaar.
    2. Weather we want to fill our username,password and sender id in register.php .

    Reply
    • rahul bambale says

      January 11, 2017 at 7:46 am

      chepsmsbazar sender id is DEMOOO

      Reply
  47. Ritu says

    September 28, 2016 at 11:14 pm

    Hi belal

    where from i get senderId;
    Could not find in the deshboard;

    Reply
  48. Balwantkaur says

    October 1, 2016 at 7:14 am

    hi belal
    plz check karo and reply do
    in this project
    I m using ur post but i get one error when i m register then i m get otp but i didnt call confirmOtp(); function
    cannot call
    there is an error
    Value 1323851374 of type java.lang.Inger cannot converted to JSONObject

    plz reply
    or else any can solve this type of problem can share with us plz

    Reply
    • Sahil says

      October 9, 2016 at 3:55 pm

      Did you got any solution??

      Reply
  49. Sahil says

    October 9, 2016 at 3:48 pm

    Hello Sir, I’m not able to verify the otp. It is saving the details in my database. it is also sending an otp but the verification screen is unable to open and it is saying that user already exists. Please help me with this.

    Reply
  50. Dalejan nirmalkar says

    November 4, 2016 at 2:54 pm

    {“ErrorCode”:”23″,”ErrorMessage”:”Parameter missing”,”JobId”:null,”MessageData”:null} i got this please help and after how many days sender id is approved

    Reply
  51. Aamrin says

    November 14, 2016 at 9:45 am

    hello sir can u please provide this coding on video .When i run the programme it show error and i can’t understand because i do this first time please sir provide me on video and above u create a table in database i also do but it show error please sir solve this ….give answer as soon as possible.

    Reply
  52. Aamrin says

    November 14, 2016 at 2:55 pm

    ample.user.smsverify E/SmsActivity: Posting params: {[email protected], name=jay, mobile=8745216699}
    11-14 06:07:07.353 2842-3029/com.example.user.smsverify E/SmsActivity: Posting params: {[email protected], name=jay, mobile=8745216699
    I got error when i run the programme how i solve this

    Reply
  53. bhaskar says

    November 20, 2016 at 1:56 pm

    Warning: mysqli::mysqli() [mysqli.mysqli]: (28000/1045): Access denied for user ‘root’@’localhost’ (using password: YES) in G:\wamp\www\android_sms\include\DbConnect.php on line 24
    Failed to connect to MySQL: Access denied for user ‘root’@’localhost’ (using password: YES)

    i got this error in database how i solve this and please give me answer please sir help me to solve this error and reply sonner thanku

    Reply
  54. vinod says

    January 5, 2017 at 9:30 am

    Need your help…!
    when i run this code i got output as null from onErrorResponse()

    Reply
    • rahul says

      January 10, 2017 at 3:15 pm

      where is SENDERID pls anyone tell me.

      Reply
  55. Rakesh says

    January 31, 2017 at 11:33 am

    Thank You Sir.Very Usefully code.

    Reply
  56. Babar says

    February 8, 2017 at 8:28 pm

    Hi Belal,
    Great tutorial, the problem i have is to find a free SMS service where i can use and test this code. Wondering, is it possible to integrate this with Google Voice, i only want to test in US and i have free google voice account. Is it possible to test with google voice ?

    Reply
    • rahul bambale says

      July 3, 2017 at 6:04 pm

      pls sir meet= me on whatsapp.8149624338

      Reply
  57. Nisha says

    February 28, 2017 at 9:57 am

    Can u make tutorial for sending OTP after registration using inbuilt smsManager class

    Reply
  58. ultrasamad says

    March 10, 2017 at 2:24 pm

    How can I implement automatic verification in just like whatsapp, as soon as the message code arrives, instead of the user typing the code by hand?

    Reply
  59. raja a kukad says

    April 23, 2017 at 5:45 am

    hello belal
    can you help me to creating Chatting app like whats app

    Reply
  60. Akshay Rastogi says

    May 2, 2017 at 3:14 am

    you created confirmotp() method but you make clicklistener inside confirmOtp() method and call confirmOtp Method inside confirmOtp() method.????????????

    Reply
  61. subee says

    May 24, 2017 at 5:57 am

    hai belal am suba .. i presently working as app developer . your tutorials are very useful for me . thank you belal

    Reply
  62. Ibrahim says

    June 14, 2017 at 7:15 am

    Will u make tutorial on Firebase Phone Number Authentication

    Reply
  63. Ashutosh singh says

    June 26, 2017 at 1:55 pm

    Sir, I didn’t understood what you mean by “Only 100 mobile numbers are allowed.”
    please reply soon……..

    Reply
  64. Amit says

    June 28, 2017 at 8:10 am

    Bro I want to do Android SMS Verification App – Phone Verification with OTP with FIREBASE Database. Actually i did some activity using FIREBASE so after dat i want to do the ” Android SMS Verification App – Phone Verification with OTP with FIREBASE Database” so plz help me how to do dis one…..tq bro

    Reply
  65. RAVI KUMAR SHARMA says

    August 28, 2017 at 5:24 pm

    Sir Ye jo JSON RESPONSE HE use PHP script me kha par mention krte he ,kunki meri activity ke ander Register vale progressing bar ke baad OTP confirm vala layout open nahi ho rha please give your suggestion,

    Reply
  66. vishal says

    November 15, 2017 at 5:37 am

    hi belal, data is reached in database comptly but I am not getting OTP in alertdiolog and notification also .what is problem can u pls tell me

    Reply
  67. Navneet Kr.Roy says

    June 4, 2018 at 4:35 pm

    I want to use msg91 sms api plz suggest me how can I use this api

    Reply
  68. Raja says

    August 18, 2018 at 2:05 pm

    Hai bro, Wonderful tutorial. Congrats. I need to allow more than 1000 mobile numbers, How can I do?

    Reply
  69. Harpreet Singh says

    August 24, 2018 at 5:29 am

    Can anyone explain me its use and when and how to create this file and get excess

    {
    “ErrorCode”:”000″,
    “ErrorMessage”:”Success”,
    “JobId”:”381a8090-b230-42fa-ac04-157cc2142bfa”,
    “MessageData”:[
    {
    “MobileNumber”:”919898xxxxxx “,
    “MessageParts”:[
    {
    “MessageId”:”919898xxxxxx -67e3765cdf034f438a432eacb88d0c14″,
    “MessagePartId”:1,
    “MessageText”:”test message”
    }
    ]
    }
    ]
    }

    Reply

Leave a Reply to Muhammad Aldi Perdana Putra Cancel reply

Your email address will not be published. Required fields are marked *

Search


Download our Android App

Simplified Coding in Google Play

About Me

Belal Khan

Hello I am Belal Khan, founder and owner of Simplified Coding. I am currently pursuing MCA from St. Xavier's College, Ranchi. I love to share my knowledge over Internet.

Connect With Me

Follow @codesimplified
Simplified Coding

Popular Tutorials

  • Android JSON Parsing – Retrieve From MySQL Database
  • Android Login and Registration Tutorial with PHP MySQL
  • Android Volley Tutorial – Fetching JSON Data from URL
  • Android Upload Image to Server using Volley Tutorial
  • Android TabLayout Example using ViewPager and Fragments
  • Retrieve Data From MySQL Database in Android using Volley
  • Firebase Cloud Messaging Tutorial for Android
  • Android Volley Tutorial – User Registration and Login
  • Android Upload Image to Server Using PHP MySQL
  • Android Navigation Drawer Example using Fragments


About Simplified Coding

Simplified Coding is a blog for all the students learning programming. We are providing various tutorials related to programming and application development. You can get various nice and simplified tutorials related to programming, app development, graphics designing and animation. We are trying to make these things simplified and entertaining. We are writing text tutorial and creating video and visual tutorials as well. You can check about the admin of the blog here and check out our sitemap

Quick Links

  • Advertise Here
  • Privacy Policy
  • Disclaimer
  • About
  • Contact Us
  • Write for Us

Categories

Android Advance Android Application Development Android Beginners Android Intermediate Ionic Framework Tutorial JavaScript Kotlin Android Others PHP Advance PHP Tutorial React Native

Copyright © 2017 · Simplified Coding· All rights Reserved. And Our Sitemap.All Logos & Trademark Belongs To Their Respective Owners·

loading Cancel
Post was not sent - check your email addresses!
Email check failed, please try again
Sorry, your blog cannot share posts by email.