Simplified Coding

  • About
  • Contact Us
  • Advertise
  • Privacy Policy
You are here: Home / Android Application Development / Android Advance / Android Login Example Using PHP, MySQL and Volley

Android Login Example Using PHP, MySQL and Volley

November 14, 2015 by Belal Khan 165 Comments

Hello friends we have already covered a couple of tutorials  for android login example using php mysql.

  1. Android Login Example with Volley Library
  2. Android Login and Registration using PHP and MySQL

But in the above mentioned tutorials, we were not maintaining the login session. Like once user has logged in to our app, user do not need to login again.

So in this android login example we will see how we can do Android User Session Management. And we will give a logout button from where user can logout from our app.

Android Login Example – Video

  • You can check the following video to know exactly what we will be creating in this android log in tutorial.

  • Now if you want to create this android login example, go ahead in this tutorial.

Creating Database and PHP Scripts

  • For this tutorial I am using wamp server.
  • This is my MySQL database.
mysql database

mysql database

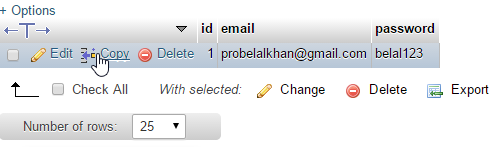
  • As you can see I have a very small table with only three columns (id, email and password). You have to create the same.
  • Now we will create two php script. The first one to connect to the database (dbConnect.php).

dbConnect.php
PHP
1
2
3
4
5
6
7
<?php
define('HOST','localhost');
define('USER','root');
define('PASS','');
define('DB','androiddb');
$con = mysqli_connect(HOST,USER,PASS,DB) or die('Unable to Connect');

Quick Tip: Are you are thinking that closing php tag  ‘ ?> ‘ is missing? Actually we do not need the closing tag for the files having only php code on it. You can still put the ?> closing tag but it will not make any difference.

  • The next script to handle our login request. Create a new php file login.php.

login.php
PHP
1
2
3
4
5
6
7
8
9
10
11
12
13
14
15
16
17
18
19
20
21
22
23
24
25
26
27
28
29
<?php
if($_SERVER['REQUEST_METHOD']=='POST'){
//Getting values
$username = $_POST['email'];
$password = $_POST['password'];
//Creating sql query
$sql = "SELECT * FROM users WHERE email='$username' AND password='$password'";
//importing dbConnect.php script
require_once('dbConnect.php');
//executing query
$result = mysqli_query($con,$sql);
//fetching result
$check = mysqli_fetch_array($result);
//if we got some result
if(isset($check)){
//displaying success
echo "success";
}else{
//displaying failure
echo "failure";
}
mysqli_close($con);
}

Android Login Example

  • Create a new Android Project.
  • Add android volley library to your project dependencies.

dependencies
1
2
3
4
5
6
7
dependencies {
    compile fileTree(dir: 'libs', include: ['*.jar'])
    testCompile 'junit:junit:4.12'
    compile 'com.android.support:appcompat-v7:23.1.0'
    compile 'com.android.support:design:23.0.0'
    compile 'com.mcxiaoke.volley:library-aar:1.0.0'
}

  • Now create a new class named Config.java to store some important constants.

Config.java
Java
1
2
3
4
5
6
7
8
9
10
11
12
13
14
15
16
17
18
19
20
21
22
23
24
25
26
package net.simplifiedcoding.androidloginlogout;
 
/**
* Created by Belal on 11/14/2015.
*/
public class Config {
    //URL to our login.php file
    public static final String LOGIN_URL = "http://192.168.94.1/Android/LoginLogout/login.php";
 
    //Keys for email and password as defined in our $_POST['key'] in login.php
    public static final String KEY_EMAIL = "email";
    public static final String KEY_PASSWORD = "password";
 
    //If server response is equal to this that means login is successful
    public static final String LOGIN_SUCCESS = "success";
 
    //Keys for Sharedpreferences
    //This would be the name of our shared preferences
    public static final String SHARED_PREF_NAME = "myloginapp";
 
    //This would be used to store the email of current logged in user
    public static final String EMAIL_SHARED_PREF = "email";
 
    //We will use this to store the boolean in sharedpreference to track user is loggedin or not
    public static final String LOGGEDIN_SHARED_PREF = "loggedin";
}

Desiging Android Login Activity

  • First we will define colors. Inside values-> colors.xml write the following code.

colors.xml
1
2
3
4
5
6
7
8
<?xml version="1.0" encoding="utf-8"?>
<resources>
    <color name="colorPrimary">#085682</color>
    <color name="colorPrimaryDark">#033855</color>
    <color name="colorAccent">#FFFFFF</color>
    <color name="colorBackground">#147fbb</color>
 
</resources>

  • In the layout file of your login activity write the following code.

activity_login.xml
1
2
3
4
5
6
7
8
9
10
11
12
13
14
15
16
17
18
19
20
21
22
23
24
25
26
27
28
29
30
31
32
33
34
35
36
37
38
39
40
41
42
43
44
45
46
47
48
49
50
51
52
53
54
55
56
57
58
59
60
61
62
63
64
65
66
67
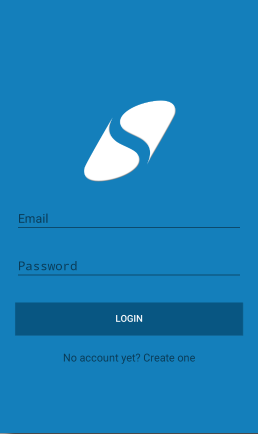
<?xml version="1.0" encoding="utf-8"?>
<ScrollView xmlns:android="http://schemas.android.com/apk/res/android"
    android:background="@color/colorBackground"
    android:layout_width="fill_parent"
    android:layout_height="fill_parent"
    android:fitsSystemWindows="true">
 
    <LinearLayout
        android:layout_gravity="center_vertical"
        android:orientation="vertical"
        android:layout_width="match_parent"
        android:layout_height="wrap_content"
        android:paddingTop="56dp"
        android:paddingLeft="24dp"
        android:paddingRight="24dp">
 
        <ImageView
            android:background="@drawable/logo"
            android:layout_gravity="center_horizontal"
            android:layout_width="150dp"
            android:layout_height="150dp" />
 
        <android.support.design.widget.TextInputLayout
            android:layout_width="match_parent"
            android:layout_height="wrap_content"
            android:layout_marginTop="8dp"
            android:layout_marginBottom="8dp">
            <EditText android:id="@+id/editTextEmail"
                android:layout_width="match_parent"
                android:layout_height="wrap_content"
                android:inputType="textEmailAddress"
                android:hint="Email" />
        </android.support.design.widget.TextInputLayout>
 
        <android.support.design.widget.TextInputLayout
            android:layout_width="match_parent"
            android:layout_height="wrap_content"
            android:layout_marginTop="8dp"
            android:layout_marginBottom="8dp">
            <EditText android:id="@+id/editTextPassword"
                android:layout_width="match_parent"
                android:layout_height="wrap_content"
                android:inputType="textPassword"
                android:hint="Password"/>
        </android.support.design.widget.TextInputLayout>
 
        <android.support.v7.widget.AppCompatButton
            android:id="@+id/buttonLogin"
            android:layout_width="fill_parent"
            android:layout_height="wrap_content"
            android:background="@color/colorPrimary"
            android:textColor="@color/colorAccent"
            android:layout_marginTop="24dp"
            android:layout_marginBottom="24dp"
            android:padding="12dp"
            android:text="Login"/>
 
        <TextView android:id="@+id/linkSignup"
            android:layout_width="fill_parent"
            android:layout_height="wrap_content"
            android:layout_marginBottom="24dp"
            android:text="No account yet? Create one"
            android:gravity="center"
            android:textSize="16dip"/>
 
    </LinearLayout>
</ScrollView>

  • The above code will produce the following layout. We are not creating an Android Registration Form here. User will directly see the login page.
android login example

android login example

  • Now come to the java code (In my case it is LoginActivity.java).

LoginActivity.java
Java
1
2
3
4
5
6
7
8
9
10
11
12
13
14
15
16
17
18
19
20
21
22
23
24
25
26
27
28
29
30
31
32
33
34
35
36
37
38
39
40
41
42
43
44
45
46
47
48
49
50
51
52
53
54
55
56
57
58
59
60
61
62
63
64
65
66
67
68
69
70
71
72
73
74
75
76
77
78
79
80
81
82
83
84
85
86
87
88
89
90
91
92
93
94
95
96
97
98
99
100
101
102
103
104
105
106
107
108
109
110
111
112
113
114
115
116
117
118
119
120
121
122
123
124
125
126
127
128
129
130
131
package net.simplifiedcoding.androidloginlogout;
 
import android.content.Context;
import android.content.Intent;
import android.content.SharedPreferences;
import android.support.v7.app.AppCompatActivity;
import android.os.Bundle;
import android.support.v7.widget.AppCompatButton;
import android.view.Menu;
import android.view.View;
import android.widget.EditText;
import android.widget.Toast;
 
import com.android.volley.AuthFailureError;
import com.android.volley.Request;
import com.android.volley.RequestQueue;
import com.android.volley.Response;
import com.android.volley.VolleyError;
import com.android.volley.toolbox.StringRequest;
import com.android.volley.toolbox.Volley;
 
import java.util.HashMap;
import java.util.Map;
 
public class LoginActivity extends AppCompatActivity implements View.OnClickListener {
 
    //Defining views
    private EditText editTextEmail;
    private EditText editTextPassword;
    private AppCompatButton buttonLogin;
 
    //boolean variable to check user is logged in or not
    //initially it is false
    private boolean loggedIn = false;
 
    @Override
    protected void onCreate(Bundle savedInstanceState) {
        super.onCreate(savedInstanceState);
        setContentView(R.layout.activity_login);
 
        //Initializing views
        editTextEmail = (EditText) findViewById(R.id.editTextEmail);
        editTextPassword = (EditText) findViewById(R.id.editTextPassword);
 
        buttonLogin = (AppCompatButton) findViewById(R.id.buttonLogin);
 
        //Adding click listener
        buttonLogin.setOnClickListener(this);
    }
 
    @Override
    protected void onResume() {
        super.onResume();
        //In onresume fetching value from sharedpreference
        SharedPreferences sharedPreferences = getSharedPreferences(Config.SHARED_PREF_NAME,Context.MODE_PRIVATE);
 
        //Fetching the boolean value form sharedpreferences
        loggedIn = sharedPreferences.getBoolean(Config.LOGGEDIN_SHARED_PREF, false);
 
        //If we will get true
        if(loggedIn){
            //We will start the Profile Activity
            Intent intent = new Intent(LoginActivity.this, ProfileActivity.class);
            startActivity(intent);
        }
    }
 
    private void login(){
        //Getting values from edit texts
        final String email = editTextEmail.getText().toString().trim();
        final String password = editTextPassword.getText().toString().trim();
 
        //Creating a string request
        StringRequest stringRequest = new StringRequest(Request.Method.POST, Config.LOGIN_URL,
                new Response.Listener<String>() {
                    @Override
                    public void onResponse(String response) {
                        //If we are getting success from server
                        if(response.equalsIgnoreCase(Config.LOGIN_SUCCESS)){
                            //Creating a shared preference
                            SharedPreferences sharedPreferences = LoginActivity.this.getSharedPreferences(Config.SHARED_PREF_NAME, Context.MODE_PRIVATE);
 
                            //Creating editor to store values to shared preferences
                            SharedPreferences.Editor editor = sharedPreferences.edit();
 
                            //Adding values to editor
                            editor.putBoolean(Config.LOGGEDIN_SHARED_PREF, true);
                            editor.putString(Config.EMAIL_SHARED_PREF, email);
 
                            //Saving values to editor
                            editor.commit();
 
                            //Starting profile activity
                            Intent intent = new Intent(LoginActivity.this, ProfileActivity.class);
                            startActivity(intent);
                        }else{
                            //If the server response is not success
                            //Displaying an error message on toast
                            Toast.makeText(LoginActivity.this, "Invalid username or password", Toast.LENGTH_LONG).show();
                        }
                    }
                },
                new Response.ErrorListener() {
                    @Override
                    public void onErrorResponse(VolleyError error) {
                        //You can handle error here if you want
                    }
                }){
            @Override
            protected Map<String, String> getParams() throws AuthFailureError {
                Map<String,String> params = new HashMap<>();
                //Adding parameters to request
                params.put(Config.KEY_EMAIL, email);
                params.put(Config.KEY_PASSWORD, password);
 
                //returning parameter
                return params;
            }
        };
 
        //Adding the string request to the queue
        RequestQueue requestQueue = Volley.newRequestQueue(this);
        requestQueue.add(stringRequest);
    }
 
    @Override
    public void onClick(View v) {
        //Calling the login function
        login();
    }
}

  • Now we need to code the next activity (Create a new activity for profile ProfileActivity.java).
  • For this activity we need to create a menu for our logout button. So inside menu -> menu.xml write the following.

menu.xml
1
2
3
4
<?xml version="1.0" encoding="utf-8"?>
<menu xmlns:android="http://schemas.android.com/apk/res/android">
    <item android:id="@+id/menuLogout" android:title="Logout" />
</menu>

  • We need to create only a single TextView in our layout file for this activity (activity_profile.xml).

activity_profile.xml
1
2
3
4
5
6
7
8
9
10
11
12
13
14
15
16
17
18
19
<?xml version="1.0" encoding="utf-8"?>
<LinearLayout xmlns:android="http://schemas.android.com/apk/res/android"
    xmlns:tools="http://schemas.android.com/tools" android:layout_width="match_parent"
    android:orientation="vertical"
    android:layout_height="match_parent" android:paddingLeft="@dimen/activity_horizontal_margin"
    android:paddingRight="@dimen/activity_horizontal_margin"
    android:paddingTop="@dimen/activity_vertical_margin"
    android:paddingBottom="@dimen/activity_vertical_margin"
    tools:context="net.simplifiedcoding.androidloginlogout.ProfileActivity">
 
 
    <TextView
        android:layout_width="wrap_content"
        android:layout_height="wrap_content"
        android:textAppearance="?android:attr/textAppearanceLarge"
        android:text="Large Text"
        android:id="@+id/textView" />
 
</LinearLayout>

  • Write the following code in ProfileActivity.java

ProfileActivity.java
Java
1
2
3
4
5
6
7
8
9
10
11
12
13
14
15
16
17
18
19
20
21
22
23
24
25
26
27
28
29
30
31
32
33
34
35
36
37
38
39
40
41
42
43
44
45
46
47
48
49
50
51
52
53
54
55
56
57
58
59
60
61
62
63
64
65
66
67
68
69
70
71
72
73
74
75
76
77
78
79
80
81
82
83
84
85
86
87
88
89
90
91
92
93
94
95
package net.simplifiedcoding.androidloginlogout;
 
import android.content.Context;
import android.content.DialogInterface;
import android.content.Intent;
import android.content.SharedPreferences;
import android.support.v7.app.AlertDialog;
import android.support.v7.app.AppCompatActivity;
import android.os.Bundle;
import android.view.Menu;
import android.view.MenuItem;
import android.widget.TextView;
 
public class ProfileActivity extends AppCompatActivity {
 
    //Textview to show currently logged in user
    private TextView textView;
 
    @Override
    protected void onCreate(Bundle savedInstanceState) {
        super.onCreate(savedInstanceState);
        setContentView(R.layout.activity_profile);
 
        //Initializing textview
        textView = (TextView) findViewById(R.id.textView);
 
        //Fetching email from shared preferences
        SharedPreferences sharedPreferences = getSharedPreferences(Config.SHARED_PREF_NAME, Context.MODE_PRIVATE);
        String email = sharedPreferences.getString(Config.EMAIL_SHARED_PREF,"Not Available");
 
        //Showing the current logged in email to textview
        textView.setText("Current User: " + email);
    }
 
    //Logout function
    private void logout(){
        //Creating an alert dialog to confirm logout
        AlertDialog.Builder alertDialogBuilder = new AlertDialog.Builder(this);
        alertDialogBuilder.setMessage("Are you sure you want to logout?");
        alertDialogBuilder.setPositiveButton("Yes",
                new DialogInterface.OnClickListener() {
                    @Override
                    public void onClick(DialogInterface arg0, int arg1) {
 
                        //Getting out sharedpreferences
                        SharedPreferences preferences = getSharedPreferences(Config.SHARED_PREF_NAME,Context.MODE_PRIVATE);
                        //Getting editor
                        SharedPreferences.Editor editor = preferences.edit();
 
                        //Puting the value false for loggedin
                        editor.putBoolean(Config.LOGGEDIN_SHARED_PREF, false);
 
                        //Putting blank value to email
                        editor.putString(Config.EMAIL_SHARED_PREF, "");
 
                        //Saving the sharedpreferences
                        editor.commit();
 
                        //Starting login activity
                        Intent intent = new Intent(ProfileActivity.this, LoginActivity.class);
                        startActivity(intent);
                    }
                });
 
        alertDialogBuilder.setNegativeButton("No",
                new DialogInterface.OnClickListener() {
                    @Override
                    public void onClick(DialogInterface arg0, int arg1) {
 
                    }
                });
 
        //Showing the alert dialog
        AlertDialog alertDialog = alertDialogBuilder.create();
        alertDialog.show();
 
    }
 
    @Override
    public boolean onCreateOptionsMenu(Menu menu) {
        //Adding our menu to toolbar
        getMenuInflater().inflate(R.menu.menu, menu);
        return true;
    }
 
    @Override
    public boolean onOptionsItemSelected(MenuItem item) {
        int id = item.getItemId();
        if (id == R.id.menuLogout) {
            //calling logout method when the logout button is clicked
            logout();
        }
        return super.onOptionsItemSelected(item);
    }
}

  • Add Internet Permission to Your AndroidManifest.xml 

AndroidManifest.xml
1
2
3
4
5
6
7
8
9
10
11
12
13
14
15
16
17
18
19
20
21
22
23
24
<?xml version="1.0" encoding="utf-8"?>
<manifest xmlns:android="http://schemas.android.com/apk/res/android"
    package="net.simplifiedcoding.androidloginlogout" >
 
    <uses-permission android:name="android.permission.INTERNET" />
 
    <application
        android:allowBackup="true"
        android:icon="@mipmap/ic_launcher"
        android:label="@string/app_name"
        android:supportsRtl="true"
        android:theme="@style/AppTheme" >
        <activity android:name=".LoginActivity" >
            <intent-filter>
                <action android:name="android.intent.action.MAIN" />
 
                <category android:name="android.intent.category.LAUNCHER" />
            </intent-filter>
        </activity>
        <activity android:name=".ProfileActivity" >
        </activity>
    </application>
 
</manifest>

  • Thats it, run your application now.
android login example

Android Login Example

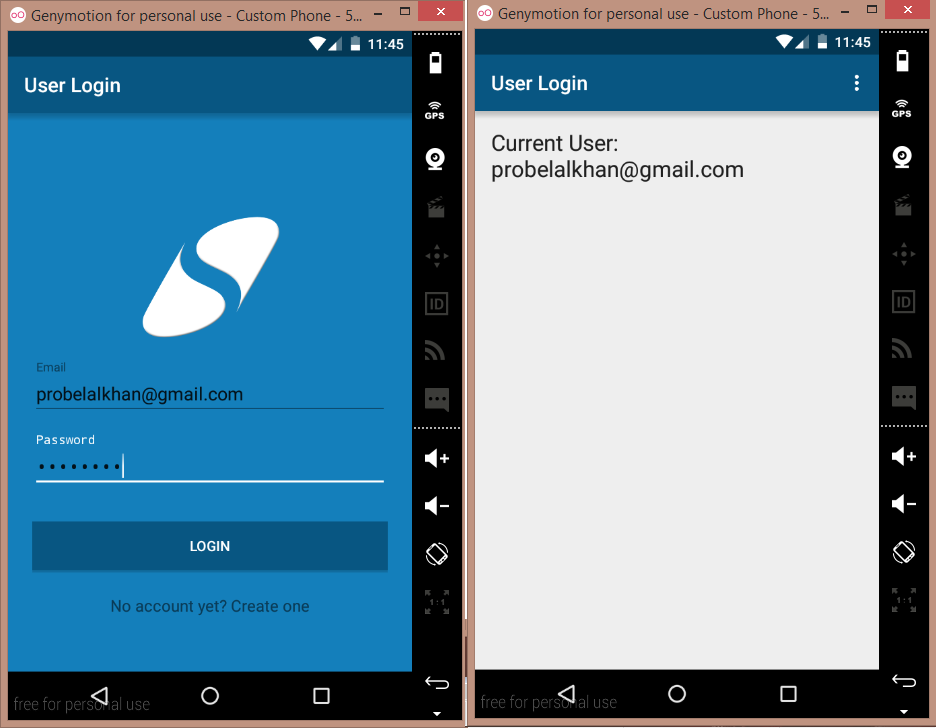
  • Bingo! its working fine.
  • You can also download my source code from github. Visit the link given below.

Download this Android Project from GitHub 

[wp_ad_camp_1]

Common Error with this Android Login Example

  • If you are using wamp or xampp server and getting blank toast message. Then this is often cause when your emulator cannot access your host. So you have to write the correct URL in Config.java file.
  • To know what is your URL open your command prompt and type ipconfig.
ipconfig

ipconfig

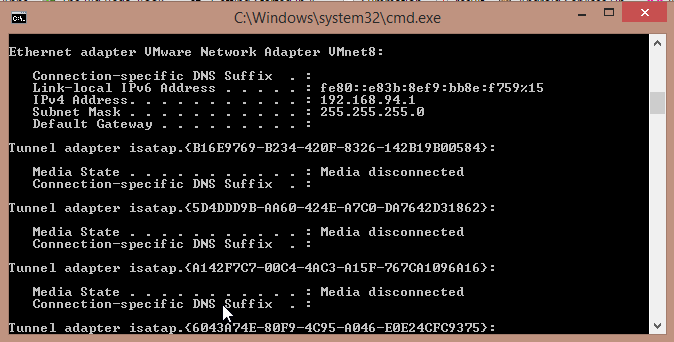
  • Here you will see your IP Address. 192.168.94.1 -> this is my root and I stored my php scripts inside Android/LoginLogout/
  • So my URL is http://192.168.94.1/Android/LoginLogout/login.php
  • To confirm it is correct open your emulator and write http://192.168.94.1/Android/LoginLogout (You have to write your address) in browser and check the browser can access it or not.
emulator

emulator

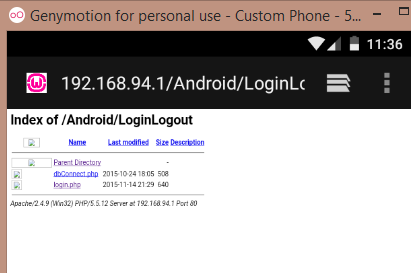
  • If your browser can access your URL then it is fine.
  • If you got more than one IP with ipconfig command. Try accessing all the IPs one by one in your browser to get the correct one.

Some More Android Application Development Tutorial To Check

  • Android Retrofit Tutorial to Insert into MySQL Database
  • Android Spinner Example to Load JSON using Volley
  • Android Volley tutorial to Get JSON from Server
  • Android Session Management using Shared Preferences

So thats all for this Android Login Example friends. Feel free to leave your comments if you are having any doubts or queries. Thank You 🙂

Sharing is Caring:

  • Tweet
  • Share on Tumblr
  • More
  • Pocket
  • Print
  • Email

Related

Filed Under: Android Advance, Android Application Development Tagged With: android login, android login activity, android login example, android login using php mysql

About Belal Khan

I am Belal Khan, I am currently pursuing my MCA. In this blog I write tutorials and articles related to coding, app development, android etc.

Comments

  1. vivek says

    November 15, 2015 at 10:07 am

    thanks bilal i am waiting for thistutorial for a long time

    Reply
    • Belal Khan says

      November 15, 2015 at 10:09 am

      you spelled me wrong 😛 jokes apart
      your welcOme and keep visiting

      Reply
      • Phumi says

        November 18, 2015 at 5:20 pm

        Hi, could you help me out with something? I want to send a notification (message) from my website (php) to an App (Android).
        The website receives data from an Arduino, stores it in my database and once a particular message is seen (Alarm) a notification message has to be sent to the app. I’ve tried using a ‘Pushnotification’ but have been unsuccessful. I don’t know if I am using it wrong or have to use another means of notification.
        The website is http://www.cars.site88.net

        Please help… any suggestions or code will do as I have been at this for more than a month now.

        Reply
  2. oscar says

    November 15, 2015 at 4:28 pm

    Hi friend. Nice tutorial.
    I have aquestion. Some time ago android volley library was not included in SDK android Studio. So I am not sure if we have to import library and then make the dependences or it is already included in SDK and we only need to include the dependences ?

    Best Regards and thanks.

    Reply
    • Belal Khan says

      November 15, 2015 at 5:36 pm

      just include the dependencies and it will automatically download and add volley to ur project

      additionally you can also download and import the .jar file of volley library

      you can check the first volley tutorial i posted

      Reply
      • oscar says

        November 15, 2015 at 8:51 pm

        Hi Belal
        Thanks for the help. I just do it. Now I will try your exemple.

        I come into your totorial just a few days ago, so some times it is difficult to find a tutorial since I can not see any index or inner searcher so when I have o find a tutorial I have to review all listed tutorials-

        Is there any index where I can go directly?-

        Congratulations again for all tutorials I have read in, relly very usefull for me, i am begginer and I am studing from home.

        Regards

        Reply
  3. pol says

    November 16, 2015 at 4:40 am

    I cant download it. can you provide another link?

    Reply
    • Belal Khan says

      November 16, 2015 at 5:01 am

      I emailed you the project at your email address you written on this comment

      Reply
  4. Hiren says

    November 16, 2015 at 5:08 am

    Hey a tutorial on user email verification would be great. Like after registering the user must verify their email by clicking a verification link sent to their email. Also, for this tutorial is there any way to just restrict a user to enter in just a certain email address? Like only @gmail.com is allowed?

    Reply
  5. Rex says

    November 16, 2015 at 1:59 pm

    Hi Belal Khan,

    Wonderful tutorial that stand out from others.

    However, the code doesn’t fully functional in my case. When I run the project on my android device, it keep stuck at the login page, the “Invalid username or password” pops up every time. I can’t successfully proceed to the ProfileActivity page. I am quite sure the server works fine and return “success” as I tested it on Postman. URL address is correct too, otherwise, “Invalid username or password” should not even pops up.

    Can you please help me take a look at my project?
    I can send it to you via email.

    cheers!

    Reply
    • Belal Khan says

      November 16, 2015 at 2:12 pm

      Did you try downloading my project?

      Reply
    • Danii says

      November 16, 2015 at 10:29 pm

      same issue with me..

      Reply
      • Belal Khan says

        November 17, 2015 at 1:43 am

        download my project and check you are getting the error or not

        Reply
        • Danii says

          November 18, 2015 at 10:05 pm

          bro, I’ve downloaded your project.
          when I click on Login button, it shows “invalid username or password” message every time & also I receive a message in logcat: “KnoxVpnUidStorageknoxVpnSupported API value returned is false”.

          Please help!!

          Reply
    • Kashfa Khan says

      December 13, 2015 at 8:58 am

      Replace
      LoginActivity.java line number 79 with this..
      if(response.trim().equalsIgnoreCase(Config.LOGIN_SUCCESS)){

      actually there may be an extra space of success coming from server so trimming the space of response string should work.. try this

      Reply
      • Peter says

        January 13, 2017 at 6:33 pm

        trim is necessary in my case too, because the server returns “success\n” and make sure that you save your file without BOM.

        Reply
    • aman says

      July 1, 2016 at 8:39 am

      check for the conditions the issue is within it , had same problem , now solved

      Reply
  6. Rendell says

    November 16, 2015 at 8:01 pm

    Can you make a retrofit version of authentication? I am really having a hard time making one.

    Reply
    • Belal Khan says

      November 17, 2015 at 1:44 am

      Stay tuned and I will post a tutorial for this 🙂

      Reply
      • Uwotm8 says

        February 1, 2016 at 1:54 pm

        Any updates on the retrofit version of this?

        Thanks

        Reply
  7. Geov says

    November 17, 2015 at 10:50 am

    Hi Belal,

    Thank you for your tutorial . This is very useful for my final task .

    Btw, how to make it be a multi-level user? In case , if a user with the level of ” admin ” will open the admin layout . As for the level of “user ” will open a user layout .

    One more thing , how to make it display ” Current User = ( name ) ” where “name” is the field in mysql table.

    Thanks once again

    Reply
    • Belal Khan says

      November 17, 2015 at 12:32 pm

      Store username in your database as well and then fetch the username to display.
      and for admin and user you have to create separate database.

      Reply
      • Geov says

        November 18, 2015 at 3:13 am

        For the multi level user, i think if i create separate database, its very complex. So what if I make it easy with the dissection “if response = success then intent to admin.class, else if response = success2 then intent to user.class, else then ‘error login’ ”

        Can you help me on php and java class coding? Thanks

        Reply
  8. Phumi says

    November 19, 2015 at 1:11 am

    Hi, could you help me out with something? I want to send a notification (message) from my website (php) to an App (Android).
    The website receives data from an Arduino, stores it in my database and once a particular message is seen (Alarm) a notification message has to be sent to the app. I’ve tried using a ‘Pushnotification’ but have been unsuccessful. I don’t know if I am using it wrong or have to use another means of notification.
    The website is http://www.cars.site88.net

    Please help… any suggestions or code will do as I have been at this for more than a month now.

    Reply
  9. john says

    November 20, 2015 at 11:07 am

    Great tutorial works a treat A+ keep up the good work.

    Reply
  10. Aijay says

    November 21, 2015 at 10:16 am

    Thanks a lot Belal. I have learnt a lot from your tutorials.
    Keep them coming.

    Reply
  11. Sam says

    November 22, 2015 at 10:03 am

    Can u make a retrofit version and using hostinger ? Cause last tutorial u are teaching tht
    In this project you use wamp, if I use hostinger how I get the URL for login.php ? Is it same ??

    Reply
  12. tom says

    November 23, 2015 at 2:04 pm

    i have learn a lot from your tutorial
    how to implement log out ?

    Reply
    • Belal Khan says

      November 23, 2015 at 3:39 pm

      Check this tutorial
      http://www.simplifiedcoding.net/android-login-example-using-php-mysql-and-volley/

      Reply
  13. vinh says

    November 24, 2015 at 5:34 am

    hi I got the following error with layout. can help me? thanks. I have add design library support already

    Rendering Problems The following classes could not be instantiated:
    – android.support.design.widget.TextInputLayout (Open Class, Show Exception, Clear Cache)
    Tip: Use View.isInEditMode() in your custom views to skip code or show sample data when shown in the IDE Exception Details java.lang.IllegalArgumentException: You need to use a Theme.AppCompat theme (or descendant) with the design library.   at android.support.design.widget.ThemeUtils.checkAppCompatTheme(ThemeUtils.java:34)   at android.support.design.widget.TextInputLayout.(TextInputLayout.java:103)   at android.support.design.widget.TextInputLayout.(TextInputLayout.java:96)   at java.lang.reflect.Constructor.newInstance(Constructor.java:422)   at android.view.LayoutInflater.createViewFromTag(LayoutInflater.java:704)   at android.view.LayoutInflater.rInflate_Original(LayoutInflater.java:835)   at android.view.LayoutInflater_Delegate.rInflate(LayoutInflater_Delegate.java:70)   at android.view.LayoutInflater.rInflate(LayoutInflater.java:811)   at android.view.LayoutInflater.rInflateChildren(LayoutInflater.java:798)   at android.view.LayoutInflater.rInflate_Original(LayoutInflater.java:838)   at android.view.LayoutInflater_Delegate.rInflate(LayoutInflater_Delegate.java:70)   at android.view.LayoutInflater.rInflate(LayoutInflater.java:811)   at android.view.LayoutInflater.rInflateChildren(LayoutInflater.java:798)   at android.view.LayoutInflater.inflate(LayoutInflater.java:515)   at android.view.LayoutInflater.inflate(LayoutInflater.java:394) Copy stack to clipboard Failed to find the style corresponding to the id 2147418373 (8 similar errors not shown)

    Reply
  14. RatneZ says

    November 24, 2015 at 6:19 am

    Hey ProBelal i am getting success when i run the php file via postman but when i run my app i am getting “Invalid username and password” error. So plz help me. I have implemeted downloaded as well as the code u hav given on this page.

    Reply
  15. Ryan says

    November 25, 2015 at 3:15 pm

    Hi, Thanks for the tutorial, it looks really good, however i’ve copied your code exactly into android studio through the download and i’ve got my own login.php and connect.php files which work on a postman and i’ve added an email and password into myphpadmin, however when i enter these details into the user login form it doesnt work, i do not get invalid username or password and it doesnt take me anywhere? Please respond via the email I have provided,

    Thanks,

    Ryan

    Reply
  16. spiros says

    November 25, 2015 at 4:34 pm

    Hey Belal khan, nice post. i run your example and i have the same problem, the problem is that sometimes reponse in empty and sometimes returnes success, i check it with using system.out.println(response); before the if(response.equals). So i think the problem is that when you check the if statement is empty=success=false and always have the toast invalid name … Could you tell me what is wrong?

    Reply
  17. santhosh says

    November 27, 2015 at 7:21 am

    Hi belal

    nice tutorail but I am getting an issue

    when i type an email and password it always shows the toast invalid email and password.
    why am i getting this issue.

    Reply
    • Belal Khan says

      November 27, 2015 at 12:38 pm

      Have you tried downloading my project?

      Reply
    • Belal Khan says

      December 13, 2015 at 6:36 am

      On line number 79 of LoginActivity.java

      if(response.equalsIgnoreCase(Config.LOGIN_SUCCESS)){

      change it to

      if(response.trim().equalsIgnoreCase(Config.LOGIN_SUCCESS)){

      and try if it is working

      Reply
  18. Christian Zegarra says

    November 27, 2015 at 10:17 pm

    invalid username or password! Solutions??

    Reply
    • Belal Khan says

      November 28, 2015 at 12:56 pm

      You are doing something wrong for sure.. recheck all the things it should work

      Reply
    • Belal Khan says

      December 13, 2015 at 6:36 am

      On line number 79 of LoginActivity.java

      if(response.equalsIgnoreCase(Config.LOGIN_SUCCESS)){

      change it to

      if(response.trim().equalsIgnoreCase(Config.LOGIN_SUCCESS)){

      and try (y)

      Reply
  19. Alperen says

    December 6, 2015 at 3:07 pm

    Download Link?

    Reply
    • Belal Khan says

      December 7, 2015 at 6:17 am

      It is on the post.. You didnt see?
      But it is locked.. to unlock it use any of the given three buttons

      Reply
  20. Deryk says

    December 9, 2015 at 12:12 am

    I completed this tutorial and ran into the toast message “Invalid Username or Password”. I see that a few individuals also have received the same error. Since I had completed the earlier login tutorial and it worked, I figured there ws some difference in the code and I found a way to make it work. Hope it save someone some time, as the solution wasn’t so obvious.

    In the LoginActivity, the onResponse code is:

    /Creating a string request
    StringRequest stringRequest = new StringRequest(Request.Method.POST, Config.LOGIN_URL,
    new Response.Listener() {
    @Override
    public void onResponse(String response) {
    //If we are getting success from server
    if(response.equalsIgnoreCase(Config.LOGIN_SUCCESS)){
    //Creating a shared preference

    I modified that to match the previous tutorial.

    StringRequest stringRequest = new StringRequest(Request.Method.POST, LOGIN_URL,
    new Response.Listener() {
    @Override
    public void onResponse(String response) {
    if(response.trim().equals(“success”)){
    openProfile();

    I also added the openProfile() from the previous tutorial like this:

    private void openProfile(){
    Intent intent = new Intent(this, ActivityUserProfile.class);
    intent.putExtra(KEY_USERNAME, username);
    startActivity(intent);

    I think the response from server was not functioning correctly. Maybe if has to do with the line
    if(response.equalsIgnoreCase(Config.LOGIN_SUCCESS)){

    Once I changed it to if(response.trim().equals(“success”)){ I was able to login in.

    Reply
    • Danii says

      December 20, 2015 at 8:50 pm

      I’ve changed this according to your code but the toast message is still same “Invalid Username or Password”

      Reply
  21. Navin Gupta says

    December 21, 2015 at 9:26 pm

    Hi,

    Thanks for this and the tutorial on user registration. User registration is working fine but this tutorial is not working. Nothing happens on button click. I am continuing this in the user registration project itself by making two java classes “userloginactivity” and “ProfileActivity”. I followed everything but unable to run it. Please help.

    Regards,
    Navin

    Reply
    • Belal Khan says

      December 22, 2015 at 1:26 am

      May be you are getting an exception .. did you check the logcat?

      Reply
      • sweety says

        January 7, 2016 at 5:34 am

        same error, Invalid username or password. Pls… tells us correct code of this app

        Reply
  22. mark says

    January 11, 2016 at 2:20 pm

    super tutorial Thank you .
    Unfortunately, I have a little problem .
    I do not use a local server as WAMP or co.
    I would like to apply this tutorial on a online server service .
    Unfortunately, I understand only half as I am still very new to the area .
    how does the answer and query the php document ?
    I try it on 000webhost.com
    but unfortunately without success .
    Maybe I can have someone help or has a tip for me .
    Thank you.
    and sorry for my bad english

    Reply
    • Belal Khan says

      January 11, 2016 at 2:30 pm

      Dont use 000webhost use hostinger.. check this post to get a free hostinger account
      https://www.simplifiedcoding.net/android-custom-gridview-images/

      Reply
  23. Steve C. says

    January 18, 2016 at 7:47 am

    Hello Belal, Do you have a tutorial on creating a feed view from MySql using volley but with a sliding menu? I am trying to add a sliding menu to my app in android studio but can’t figure out how to properly code the login and feed into the fragments. I’ve searched all over the internet trying to get help on this. Any help you can give will be much appreciated. Thank you!

    Reply
  24. Kenny says

    January 18, 2016 at 6:37 pm

    cant make it work sir, it keeps on saying invalid ursername or password. i already downloaded your files and copied it but its just the same. i think something’s wrong in this part:

    //Creating a string request
    StringRequest stringRequest = new StringRequest(Request.Method.POST, Config.LOGIN_URL, new Response.Listener() {
    @Override
    public void onResponse(String response) {
    //If we are getting success from server
    if(response.trim().equals(Config.LOGIN_SUCCESS)){
    //Creating a shared preference
    sharedpreferences = getSharedPreferences(Config.SHARED_PREF_NAME, Context.MODE_PRIVATE);

    //Creating editor to store values to shared preferences
    SharedPreferences.Editor editor = sharedpreferences.edit();

    //Adding values to editor
    editor.putBoolean(Config.LOGGEDIN_SHARED_PREF, true);
    editor.putString(Config.EMAIL_SHARED_PREF, email);

    //Saving values to editor
    editor.commit();

    //Starting profile activity
    Intent intent = new Intent(MainActivity.this, MenuHome.class);
    startActivity(intent);
    }else{
    //If the server response is not success
    //Displaying an error message on toast
    Toast.makeText(MainActivity.this, “Invalid username or password”, Toast.LENGTH_LONG).show();
    }
    }
    },
    new Response.ErrorListener() {
    @Override
    public void onErrorResponse(VolleyError error) {
    //You can handle error here if you want
    }
    }){
    @Override
    protected Map getParams() throws AuthFailureError {
    Map params = new HashMap();
    //Adding parameters to request
    params.put(Config.KEY_EMAIL, email);
    params.put(Config.KEY_PASSWORD, password);

    //returning parameter
    return params;
    }
    };

    please help sir! 🙁

    Reply
    • sai theja says

      February 5, 2016 at 6:25 pm

      hey,.. did you solve the problem?Even I am facing the same,..please tell me if you have solved,…plzzzz,….

      Reply
  25. Nyto says

    January 26, 2016 at 10:04 pm

    Hello belal, thanks for your tutorial but i want to keep the Mail on the EditTExt Email I dont know how to get the value of mail and auto-complet the Edit text.
    thanks for your answer.

    Reply
  26. Ashraf says

    January 27, 2016 at 1:29 pm

    In my case app is running well but when i am clicking n login button then it is not functioning properly.I remains in same activity and also create one account button also not working properly,it is also not giving any response??????

    Reply
  27. Chris says

    January 29, 2016 at 3:22 pm

    Hi,

    Nice tutorial however I am having some issues. I’m getting a ClassCastException that looks like the following:

    E/Volley: [38488] NetworkDispatcher.run: Unhandled exception java.lang.ClassCastException: libcore.net.url.FileURLConnection cannot be cast to java.net.HttpURLConnection
    java.lang.ClassCastException: libcore.net.url.FileURLConnection cannot be cast to java.net.HttpURLConnection
    at com.android.volley.toolbox.HurlStack.createConnection(HurlStack.java:152)
    at com.android.volley.toolbox.HurlStack.openConnection(HurlStack.java:162)
    at com.android.volley.toolbox.HurlStack.performRequest(HurlStack.java:102)
    at com.android.volley.toolbox.BasicNetwork.performRequest(BasicNetwork.java:93)
    at com.android.volley.NetworkDispatcher.run(NetworkDispatcher.java:105)

    Some help would be appreciated.

    Thank you.

    Reply
    • Chris says

      February 1, 2016 at 5:48 pm

      I figured out that this was to do with where I had my login.php file – however now I’ve uploaded it to a stable server, I get this error when trying to login on the app:

      BasicNetwork.performRequest: Unexpected response code 500 for

      Can you please help?

      thanks

      Reply
      • Chris says

        February 3, 2016 at 1:47 pm

        I got it to work after trying to change many things, I tried all these things in one go so do as I did and it should work:

        1) On your MySQL database (PhpMyAdmin lets you do this with ease) create a new user (not root), give it all privileges and let the host be set to “Any Host”
        2) Change dbConnect.php to suit your credentials – make sure you have the php files in the same server the MySQL database is on, that way you can use ‘localhost’ as the hostname. Make sure username and pass match the new one you just entered (I also added ?> at the end of dbConnect.php, not sure if this made any difference)
        3) In ‘login.php’ at a semi colon at the end of the SQL statement (as well as the one after the php line) so it looks like this:

        $sql = “SELECT * FROM users WHERE email=’$username’ AND password=’$password’;”;

        This worked for me.

        I advise that, once you get this working, you should change this statement into a PHP prepared statement, so this sort of query is vulnerable to SQL injection attacks.

        Hope you all have as much luck with this as I did today!

        Thanks

        Reply
  28. sai theja says

    February 5, 2016 at 6:21 pm

    thank you so much for the tutorial.But i am unable to login,its showing invalid username or password.I am using 000webhost.com for the database.Please reply me soon,.. I have to submit it as a project in my college by monday.
    Plzzzzzz,.. help meee,…… 🙂

    Reply
  29. Michael says

    February 8, 2016 at 5:05 am

    login.php is not properly sending a response message. dbConnect is working as intended however something is happening that is causing neither success or failure to be sent. I have confirmed this by hard coding $username and $password. Any response by author is appreciated.

    Reply
  30. xGiew says

    February 10, 2016 at 7:15 pm

    hey belal

    I use your codr and this error is happend to me
    02-10 22:13:02.281 4999-7118/com.example.nouf.gp I/System.out: KnoxVpnUidStorageknoxVpnSupported API value returned is false

    what is thats mean? any help people?

    Reply
  31. uday says

    February 11, 2016 at 9:55 am

    can you give me your username and password for your domain on hostinger because i am unable to run the project

    Reply
  32. Mounir Hafsa says

    February 12, 2016 at 11:34 am

    I Kept looking for an application like this for 2 weeks ! untill i found you !
    thank you so much ! everything is working perfectly .
    im making an app for my final year project ! thanks a million ! .

    Reply
    • Gautam says

      July 21, 2018 at 2:30 pm

      I use the exact code as above—works on emulator but causes error on real device–plz help—
      Errors are
      Volley.noConnectionErro
      Device has internet which I checked for sure

      Reply
      • Belal Khan says

        July 28, 2018 at 1:45 pm

        Your API is deployed in a real server or you are using xampp for real device as well. Xampp will not work for real device unless your device is connected with your computer using hotspot.

        Reply
  33. Mounir Hafsa says

    February 12, 2016 at 2:35 pm

    Can you show us , how to Post Data into Database , after a successful Login ?

    Reply
    • Belal Khan says

      February 13, 2016 at 4:49 pm

      Thanks buddy keep visiting. you can use Volley’s StringRequest to post data on mysql database..

      Reply
      • aman says

        April 11, 2016 at 10:21 am

        hello, i want to insert name, age ,address and image in android will you help me?

        Reply
  34. Michael says

    February 13, 2016 at 8:24 am

    When i have login and go to profile page, why it cannot exit the app when i try to touch the back button hardware ? It always go to ProfileActivity when i try to touch the back button hardware. Please give me the solution to get exit from the app when i touch the back button hardware. Thanks in advance.

    Reply
  35. xGiew says

    February 13, 2016 at 11:48 am

    people I need help pleeease
    I still work in the login page for a week
    I try many tutorials and the same error happed with me
    when I click on login button nothing happened

    pleeease who can help me :(((((

    Reply
    • xGiew says

      February 13, 2016 at 11:51 am

      I work in localhost xampp
      and every thing is the same on the belal tutorial
      I also try his application and the same error (when I click login nothing )

      Reply
      • Belal Khan says

        February 13, 2016 at 4:48 pm

        Just confirm that your localhost is accessible by your emulator..
        try opening the localhost in your emulator’s browser.
        and check it opens or not

        Reply
        • Dave says

          February 27, 2016 at 1:18 am

          First of all, Belal Khan thank you for your time and for your tutorial this help me a lot and after a little bit of coding and with the same issues like other people here regarding Invalid Login i have found a solution is like utf8 or non ASCII characters…….

          Just do the following:
          SEARCH LINE 82* on LoginActivity.java

          public void onResponse(String response) {
          //If we are getting success from server
          if(response.trim().equalsIgnoreCase(Config.LOGIN_SUCCESS)){

          AND CHANGE FOR THIS:

          public void onResponse(String response) {
          //If we are getting success from server
          String final_response= response.replaceAll(“[^\\x00-\\x7F]”, “”); // will clean non ASCII characters
          if(final_response.trim().equalsIgnoreCase(Config.LOGIN_SUCCESS)){

          Reply
        • Istvan says

          September 5, 2017 at 7:24 am

          Hy belal. Pleasehelp. My problem. Aide android app. Your code download and lib download okay. I run aide the your code, and 3 error.
          Creating a string request
          StringRequest stringRequest = new StringRequest(Request.Method.POST, Config.LOGIN_URL,
          new Response.Listener() {
          @Override
          public void onResponse(String response) {
          //If we are getting success from server
          if(response.equalsIgnoreCase(Config.LOGIN_SUCCESS)){
          //Creating a shared preference
          SharedPreferences sharedPreferences = LoginActivity.this.getSharedPreferences(Config.SHARED_PREF_NAME, Context.MODE_PRIVATE);

          //Creating editor to store values to shared preferences
          SharedPreferences.Editor editor = sharedPreferences.edit();

          //Adding values to editor
          editor.putBoolean(Config.LOGGEDIN_SHARED_PREF, true);
          editor.putString(Config.EMAIL_SHARED_PREF, email);

          //Saving values to editor
          editor.commit();

          //Starting profile activity
          Intent intent = new Intent(LoginActivity.this, ProfileActivity.class);
          startActivity(intent);
          }else{
          //If the server response is not success
          //Displaying an error message on toast
          Toast.makeText(LoginActivity.this, “Invalid username or password”, Toast.LENGTH_LONG).show();
          }
          }
          },
          new Response.ErrorListener() {
          @Override
          public void onErrorResponse(VolleyError error) {
          //You can handle error here if you want
          }
          }){

          please help

          Reply
  36. Byron says

    February 13, 2016 at 7:21 pm

    Hi, I don’t know how you got yours working, but I found out there is a problem with the “String response” causing to flag the “Invalid username and password.”

    “StringRequest stringRequest = new StringRequest(Request.Method.POST, Config.LOGIN_URL,
    new Response.Listener() {
    @Override
    public void onResponse(String response) {
    //If we are getting success from server
    if(response.equalsIgnoreCase(Config.LOGIN_SUCCESS)){”

    I use system.out to debug the string, and I found that length of the string is different compare to the Config.Login_SUCCESS.

    Config.Login_SUCCESS.length() displays 7 while String response.length() displays 8. This is why (response.equalsIgnoreCase(Config.LOGIN_SUCCESS) returns false. I checked the volleyLogin.php and echo “SUCCESS” is the same length as Config.LOGIN_SUCCESS.

    I don’t know what caused the string length to increase from 7 to 8. I think there’s a problem with the dbConnect.php, because when you output a string “echo ‘sdfslkdjf'”, I found out the string response in changed.

    Can you please check the php files? I also download the project, but same problem. Thanks.

    Reply
    • Belal Khan says

      February 14, 2016 at 7:42 am

      May be the server is returning the string with an additional space.. in that case to be more sure use json as the response..
      You can also try by trimming the response using the trim() method.

      Reply
    • Volkan says

      July 2, 2016 at 12:59 pm

      Same here… Spending 3 hours and I found what caused it. There was an extra character in “dbConnect.php”. I fixed it and working properly. I hope your problem will be solved.

      Reply
      • Tze Ha says

        September 6, 2016 at 6:47 am

        may i know what is the extra character in “dbConnect,php”? I have the problem to login in, always got invalid username and password, i don’t know how to solve it, please share with me, thanks

        Reply
  37. Gleb says

    February 16, 2016 at 6:56 pm

    Hello , Belal Khan ! Thank you for all your tutorials. Im working on my project which founded on your examples and all working great, but can you please tell or make a tutorial how to make login for user (user_activity) and login for admin (admin_activity) separately ? I tried to make verification by E-mail (if editTextLogin.getText().toString()=”[email protected]” for example then go to admin_ativity else go to user_activity) . Thats not a real code, thats just for example, but real code doesnt work. Help me, please

    Reply
  38. Mpetko says

    February 17, 2016 at 1:43 pm

    Hello sir,

    I am having some problems with my app. Android monitor delivers this messages to me when i click on my login button.
    E/Volley: [205196] BasicNetwork.performRequest: Unexpected response code 400 for http:/link.php

    And the Toast message says Invalid username or password.

    Do you maybe know how I can fix it?

    Reply
  39. Jasmin_3 says

    February 18, 2016 at 7:50 am

    Really thank you very much Belal =)

    your tutorial help me alot in understanding how to code the login page in my project. I do some changes because I used android studio with phpmyadmin on Hostinger, and its work correctly =)

    – But in my project I have 3 different user (admin, manager, customer) who should each access three different interfaces, how could I do it, do you have any idea?
    – can you make tutorial for that I am sure it will help others as well …

    Thank you again, you are the best <3

    Reply
  40. Maher says

    February 18, 2016 at 4:25 pm

    the login is work fine.

    but i have database contain 3 three table (admin,employee,student).
    when i press login button i want the app check who is login if he is the teacher take him to teacher activity page , if student take him to student activity page…

    any idea how to implement it??

    Reply
  41. Shailesh Appukuttan says

    March 8, 2016 at 9:53 pm

    Like many here I was having trouble with the login failing even for correct inputs. After spending 4-5 hours on this one problem, the solution turned out to be a small little command: ‘exit();’

    The cause of the problem: data analytics returned as part of query results by sites such as 000webhost.
    So, the actual output turned out to be:
    success

    To avoid having the last few lines of the analytics code, just add exit(); at the end of the php file, such as:
    //if we got some result
    if(isset($check)){
    echo “success”;
    }else{
    echo “fail”;
    }
    mysqli_close($con);
    exit();
    }

    And now this works! 🙂

    Reply
    • Shailesh Appukuttan says

      March 8, 2016 at 9:58 pm

      small edit above (got cut out):
      So, the actual output turned out to be:

      success
      …Hosting24 Analytics Code…
      ….script type=”text/javascript” src=”http://stats.hosting24.com/count.php”>
      …End Of Analytics Code ……

      Reply
    • javier says

      July 24, 2016 at 5:12 am

      Thank you very much, I am using 000webhost and your solution works!

      Reply
  42. amit says

    March 10, 2016 at 4:49 pm

    please you can send login using PHP on my mail because i can’t download it please help me

    Reply
  43. indodimas says

    March 18, 2016 at 8:50 pm

    i got this.. and worked
    just add

    its work. sorry for bad english. thanks for belal or balveeer hahaha ty

    Reply
    • indodimas says

      March 18, 2016 at 8:52 pm

      () without (

      Reply
  44. nidhi modi says

    March 28, 2016 at 3:55 pm

    Hello

    Thanx for tutorial it worked but can u send me the code for creating session management for login an logout
    Plzz just help me out…
    Thanx.

    Reply
    • Belal Khan says

      March 29, 2016 at 2:31 am

      You can download the code from the link given below..

      Reply
  45. hanan says

    March 31, 2016 at 10:17 am

    hi belal thank you alot…..

    when i click on the login button there is no action at all
    i think the problem is in this part
    StringRequest stringRequest = new StringRequest(Request.Method.POST, Config.LOGIN_URL,
    new Response.Listener() {

    @Override
    public void onResponse(String response) {
    //If we are getting success from server
    if(response.trim().equals(“success”)){

    openProfile();

    }else{
    //If the server response is not success
    //Displaying an error message on toast
    Toast.makeText(MainActivity.this, “Invalid id or password”, Toast.LENGTH_LONG).show();
    }
    }
    },

    Reply
    • hanan says

      March 31, 2016 at 12:26 pm

      also ,,,,
      i add a toast message her

      new Response.ErrorListener() {
      @Override
      public void onErrorResponse(VolleyError error) {
      //You can handle error here if you want

      Toast.makeText(MainActivity.this, “Problem in Button “, Toast.LENGTH_LONG).show();

      }

      and when i click the button this message apeare (Problem in Button )

      have any idea about this problem

      thnx ..

      Reply
  46. siva says

    April 2, 2016 at 11:38 am

    hey buddy your website really help me..

    Reply
  47. Prakhar says

    April 8, 2016 at 7:36 pm

    Hi Belal,
    M getting this error could you please help very urgetn

    Unexpected response code 404 for http://192.X.X.X/Android/LoginLogout/login.php

    Reply
    • MuhammadAliTheLegend says

      June 18, 2016 at 3:40 am

      404 code means that you cannot connect with your server. okay now there is several option.
      1. if you did not change anything to Bellal’s code maybe you should change the IP or change the location of PHP file in the htdoc(if you are using xampp) makesure the location of PHP file is inside htdoc/Android/LoginLogout/login.php

      Reply
  48. Ahmet says

    April 13, 2016 at 1:04 pm

    Hi Belal,

    I wanna use my online db from hostinger mysql. I changed connectdb and login.php for my own tables, and connect to my db. but it didnt worked for me, what else i can do ?

    Reply
  49. Miguel says

    April 17, 2016 at 3:21 pm

    Hi Belal, thanks for tutorial. One question, I have a table with fields, id, email, password, names. What I do is that in the ProfileActivity display the name of the user who is logged. Thanks!!

    Reply
  50. Fernando says

    April 22, 2016 at 6:47 am

    compile ‘com.mcxiaoke.volley:library-aar:1.0.0’ IS DEPRECATED!

    You should edit this amazing tutorial, with this dependecy all work fine:

    compile ‘com.android.volley:volley:1.0.0’

    Thanks.

    Reply
    • Belal Khan says

      April 22, 2016 at 2:11 pm

      Yeah you are right.. but the method is still the same

      Reply
  51. Utif Milkedori says

    May 3, 2016 at 11:38 pm

    this app work successfully
    but I found bug on ProfileActivity cannot back ~> finish(); . I must press home button to close this app..
    whats going wrong?

    Reply
  52. manjusha says

    May 13, 2016 at 7:19 am

    sir i am trying to connect to remote database .when put correct username and password to login ,it is always giving me error -incorrect username & password.
    sir please help me

    Reply
  53. Darsh says

    May 16, 2016 at 12:35 pm

    StringRequest stringRequest = new StringRequest(Request.Method.POST, Config.LOGIN_URL,

    My code stops working from here
    I gave toasts before this line and after this line

    Reply
    • Mustafa says

      May 31, 2016 at 11:20 pm

      Same here, the code stops working at this line.

      Anyone solved the issue?

      Reply
      • ranjana says

        June 8, 2016 at 2:52 pm

        same here, its not working after the above code,
        please help i want to know what is going wrong in my code ,

        Reply
  54. Babar Ali says

    May 22, 2016 at 8:48 pm

    You made my day..!!! Thanks Alot bro… I had to use this in my Final year project thanks thanks thanks… Keep sharing knowledge… 🙂

    Reply
  55. MuhammadAliTheLegend says

    June 7, 2016 at 3:38 am

    thanks bro … you are freakin genius keep up sharing your knowledge …

    Reply
  56. Donny says

    June 15, 2016 at 5:57 am

    Hi belal,after I click button login , but nothing response, whats wrong???

    Reply
    • MuhammadAliTheLegend says

      June 18, 2016 at 3:33 am

      you try toast from onErrorResponse() see if you actually stuck there.
      if you get invalid email and password that means you have connection problem.

      Reply
  57. shivam tandon says

    June 25, 2016 at 9:39 pm

    I have applied the code given by you but nothing happens when I click the login button.I have used the correct ip address as well. please help.

    Reply
  58. Faisal says

    July 3, 2016 at 12:00 pm

    Hi belal

    Just I try your example it’s very good
    I have some problem
    When l login success I need show user id also
    Please help me

    Reply
  59. Ayush Shrivastava says

    July 6, 2016 at 8:51 pm

    Now what if i want to make something in which user first needs to create its account and then rest ?
    creating an acoount and accessing it after

    Reply
  60. Marco Di Iorio says

    July 13, 2016 at 6:21 am

    hi, great tutorial; but after created two script php (login.php and dbConnect.php) where i must put these two scripts php?
    Thanks

    Reply
  61. Marco says

    July 13, 2016 at 7:57 pm

    i have this error:”W/NetworkManagementSocketTagger: untagSocket(46) failed with errno -2″…why?
    When i try to login i have this error:”invalid username or password”…. data are correct!
    why i have this error?

    THANKS

    Reply
  62. Kathan says

    July 20, 2016 at 4:38 am

    Hello sir,
    When i am using this project on Wamp server it is working ok.
    But when transfered this project on hostinger always get invalid username password error
    Checked SQLconnection php script but no issue found.

    Reply
  63. Javier says

    July 24, 2016 at 5:23 am

    Thank you very much. Your tutorial was very useful. I had the “Invalid username or password” problem due to I am using 000webhos, however I could fix it by adding exit() in the login.php.
    Greetings from Mexico!

    Reply
  64. Ali SARIGÜL says

    July 25, 2016 at 8:15 am

    Hi Belal,

    I still have invalid username/password problem. And i changed the 79-LINE to if(response.trim().equalsIgnoreCase(Config.LOGIN_SUCCESS)){

    Btw thanks for tutorial

    Reply
  65. Attaullah says

    August 4, 2016 at 7:12 am

    Salam! Thank you for making this tutorial…i download the code and import in to android studio and after run the the app without any error, but i run the app nothing will happen what was the problem?? i doesn’t change anything even url.

    Reply
  66. vicky says

    August 6, 2016 at 1:41 am

    Hello sir,

    Login is working fine…

    can you let me know, how to display process dialog during login & where should i place this code into loginActivity.java?

    help me!
    Thanks

    Reply
  67. secretercesph01 says

    August 8, 2016 at 3:10 pm

    Hello. How to make this this tutorial of yours to not accept same email?

    Reply
  68. Tze Ha says

    August 17, 2016 at 2:40 am

    Hi! Belal,

    I followed your tutorial exactly, but the problem is when i key in the username and password, the app always said “Invalid username and password”, i don’t know what happen, The emulator can link with my php, mean that, my connection no problem, buy why still can’t login ??

    Reply
  69. Sidharth Yatish says

    August 18, 2016 at 7:36 pm

    Hello, nice tutorials. Thank you. My database is itself hosted by a third party and have given me the hostname,username and password for manipulating the db. Since the entry point to DB is itself secured, how can I send the requests via volley?

    Reply
  70. Kishore Kumar says

    September 9, 2016 at 10:50 am

    Hi belal
    Just I try your example it’s successfully running but
    I had some problem
    When l login success, It will only show the current user name but i didn’t saw the logout option in that page
    Please help me

    Reply
  71. Neyomal says

    September 12, 2016 at 4:42 pm

    Hi Belal,

    Tx lot for the tutorial. It’s really helpful. I want to modify jason request. In my case I am not passing User Name and Password as strings. Instead I want to pass a JSON string.

    String jsonString= “{\n” +
    ” \”user_auth\”: {\n” +
    ” \”provider\”: \”direct\”,\n” +
    ” \”user\”: {\n” +
    ” \”email\”: \”[email protected]\”,\n” +
    ” \”password\”: \”mypassword\”\n” +
    ” }\n” +
    ” }\n” +
    “} “;

    So what modification do I have to make to this script since in your example you are directly passing user name and password retrieved from text box. Appreciate your help on this one.

    Reply
  72. Yashika Khurana says

    September 16, 2016 at 5:18 pm

    E/AndroidRuntime: FATAL EXCEPTION: main
    Process: com.example.yashika.login, PID: 26799
    java.lang.RuntimeException: Unable to start activity ComponentInfo{com.example.yashika.login/com.example.yashika.login.LoginActivityy}: android.view.InflateException: Binary XML file line #17: Binary XML file line #17: Error inflating class android.support.design.widget.TextInputLayout
    at android.app.ActivityThread.performLaunchActivity(ActivityThread.java:2439)
    at android.app.ActivityThread.handleLaunchActivity(ActivityThread.java:2499)
    at android.app.ActivityThread.access$900(ActivityThread.java:166)
    at android.app.ActivityThread$H.handleMessage(ActivityThread.java:1360)
    at android.os.Handler.dispatchMessage(Handler.java:102)
    at android.os.Looper.loop(Looper.java:148)
    at android.app.ActivityThread.main(ActivityThread.java:5468)
    at java.lang.reflect.Method.invoke(Native Method)
    at com.android.internal.os.ZygoteInit$MethodAndArgsCaller.run(ZygoteInit.java:726)
    at com.android.internal.os.ZygoteInit.main(ZygoteInit.java:616)
    Caused by: android.view.InflateException: Binary XML file line #17: Binary XML file line #17: Error inflating class android.support.design.widget.TextInputLayout
    at android.view.LayoutInflater.inflate(LayoutInflater.java:539)
    at android.view.LayoutInflater.inflate(LayoutInflater.java:423)
    at android.view.LayoutInflater.inflate(LayoutInflater.java:374)
    at android.support.v7.app.AppCompatDelegateImplV7.setContentView(AppCompatDelegateImplV7.java:280)
    at android.support.v7.app.AppCompatActivity.setContentView(AppCompatActivity.java:140)
    at com.example.yashika.login.LoginActivityy.onCreate(LoginActivityy.java:44)
    at android.app.Activity.performCreate(Activity.java:6556)
    at android.app.Instrumentation.callActivityOnCreate(Instrumentation.java:1108)
    at android.app.ActivityThread.performLaunchActivity(ActivityThread.java:2392)
    at android.app.ActivityThread.handleLaunchActivity(ActivityThread.java:2499) 
    at android.app.ActivityThread.access$900(ActivityThread.java:166) 
    at android.app.ActivityThread$H.handleMessage(ActivityThread.java:1360) 
    at android.os.Handler.dispatchMessage(Handler.java:102) 
    at android.os.Looper.loop(Looper.java:148) 
    at android.app.ActivityThread.main(ActivityThread.java:5468) 
    at java.lang.reflect.Method.invoke(Native Method) 
    at com.android.internal.os.ZygoteInit$MethodAndArgsCaller.run(ZygoteInit.java:726) 
    at com.android.internal.os.ZygoteInit.main(ZygoteInit.java:616) 
    Caused by: android.view.InflateException: Binary XML file line #17: Error inflating class android.support.design.widget.TextInputLayout
    at android.view.LayoutInflater.createViewFromTag(LayoutInflater.java:776)
    at android.view.LayoutInflater.createViewFromTag(LayoutInflater.java:704)
    at android.view.LayoutInflater.rInflate(LayoutInflater.java:835)
    at android.view.LayoutInflater.rInflateChildren(LayoutInflater.java:798)
    at android.view.LayoutInflater.rInflate(LayoutInflater.java:838)
    at android.view.LayoutInflater.rInflateChildren(LayoutInflater.java:798)
    at android.view.LayoutInflater.inflate(LayoutInflater.java:515)
    at android.view.LayoutInflater.inflate(LayoutInflater.java:423) 
    at android.view.LayoutInflater.inflate(LayoutInflater.java:374) 
    at android.support.v7.app.AppCompatDelegateImplV7.setContentView(AppCompatDelegateImplV7.java:280) 
    at android.support.v7.app.AppCompatActivity.setContentView(AppCompatActivity.java:140) 
    at com.example.yashika.login.LoginActivityy.onCreate(LoginActivityy.java:44) 
    at android.app.Activity.performCreate(Activity.java:6556) 
    at android.app.Instrumentation.callActivityOnCreate(Instrumentation.java:1108) 
    at android.app.ActivityThread.performLaunchActivity(ActivityThread.java:2392) 
    at android.app.ActivityThread.handleLaunchActivity(ActivityThread.java:2499) 
    at android.app.ActivityThread.access$900(ActivityThread.java:166) 
    at android.app.ActivityThread$H.handleMessage(ActivityThread.java:1360) 
    at android.os.Handler.dispatchMessage(Handler.java:102) 
    at android.os.Looper.loop(Looper.java:148) 
    at android.app.ActivityThread.main(ActivityThread.java:5468) 
    at java.lang.reflect.Method.invoke(Native Method) 
    at com.android.internal.os.ZygoteInit$MethodAndArgsCaller.run(ZygoteInit.java:726) 
    at com.android.internal.os.ZygoteInit.main(ZygoteInit.java:616) 
    Caused by: java.lang.ClassNotFoundException: Didn’t find class “android.support.design.widget.TextInputLayout” on path: DexPathList[[zip file “/data/app/com.example.yashika.login-2/base.apk”],nativeLibraryDirectories=[/data/app/com.example.yashika.login-2/lib/arm64, /vendor/lib64, /system/lib64]]
    at dalvik.system.BaseDexClassLoader.findClass(BaseDexClassLoader.java:56)
    at java.lang.ClassLoader.loadClass(ClassLoader.java:511)
    at java.lang.ClassLoader.loadClass(ClassLoader.java:469)
    at android.view.LayoutInflater.createView(LayoutInflater.java:583)
    at android.view.LayoutInflater.createViewFromTag(LayoutInflater.java:764)
    at android.view.LayoutInflater.createViewFromTag(LayoutInflater.java:704) 
    at android.view.LayoutInflater.rInflate(LayoutInflater.java:835) 
    at android.view.LayoutInflater.rInflateChildren(LayoutInflater.java:798) 
    at android.view.LayoutInflater.rInflate(LayoutInflater.java:838) 
    at android.view.LayoutInflater.rInflateChildren(LayoutInflater.java:798) 
    at android.view.LayoutInflater.inflate(LayoutInflater.java:515) 
    at android.view.LayoutInflater.inflate(LayoutInflater.java:423) 
    at android.view.LayoutInflater.inflate(LayoutInflater.java:374) 
    at android.support.v7.app.AppCompatDelegateImplV7.setContentView(AppCompatDelegateImplV7.java:280) 
    at android.support.v7.app.AppCompatActivity.setContentView(AppCompatActivity.java:140) 
    at com.example.yashika.login.LoginActivityy.onCreate(LoginActivityy.java:44) 
    at android.app.Activity.performCreate(Activity.java:6556) 
    at android.app.Instrumentation.callActivityOnCreate(Instrumentation.java:1108) 
    at android.app.ActivityThread.performLaunchActivity(ActivityThread.java:2392) 
    at android.app.ActivityThread.handleLaunchActivity(ActivityThread.java:2499) 
    at android.app.ActivityThread.access$900(ActivityThread.java:166) 
    at android.app.ActivityThread$H.handleMessage(ActivityThread.java:1360) 
    at android.os.Handler.dispatchMessage(Handler.java:102) 
    at android.os.Looper.loop(Looper.java:148) 
    at android.app.ActivityThread.main(ActivityThread.java:5468) 
    at java.lang.reflect.Method.invoke(Native Method) 
    at com.android.internal.os.ZygoteInit$MethodAndArgsCaller.run(ZygoteInit.java:726) 
    at com.android.internal.os.ZygoteInit.main(ZygoteInit.java:616) 
    Suppressed: java.lang.ClassNotFoundException: Didn’t find class “android.support.design.widget.TextInputLayout” on path: DexPathList[[dex file “/data/data/com.example.yashika.login/files/instant-run/dex/slice-volley_c29e2c439243134cc7c4de46f793be7a39277f65-classes.dex”, dex file “/data/data/com.example.yashika.login/files/instant-run/dex/slice-support-annotations-23.4.0_f9ec1cace9a6ca1410b48dac94f556dfe9154cb5-classes.dex”, dex file “/data/data/com.example.yashika.login/files/instant-run/dex/slice-slice_9-classes.dex”, dex file “/data/data/com.example.yashika.login/files/instant-run/dex/slice-slice_8-classes.dex”, dex file “/data/data/com.example.yashika.login/files/instant-run/dex/slice-slice_7-classes.dex”, dex file “/data/data/com.example.yashika.login/files/instant-run/dex/slice-slice_6-classes.dex”, dex file “/data/data/com.example.yashika.login/files/instant-run/dex/slice-slice_5-c
    Application terminated.
    i am getting error.please help me.

    Reply
    • Spectre says

      March 23, 2017 at 10:12 am

      hey would you solved these code error……………..
      if yes pls reply me………!!!

      Reply
  73. shayke says

    October 3, 2016 at 10:15 pm

    I too have download this demo for login and also got the invalid username or password error.

    I was going to debug but came up with a different and quicker solution :

    first I added this to the error message toast for the invalid username : , response.trim()+”Invalid username or password”

    so it looks like this :
    Toast.makeText(LoginActivity.this, response.trim()+”Invalid username or password”, Toast.LENGTH_LONG).show();

    This gives me an output directly to the screen to see the response. (I thought it could be a different response at different times)

    This showed me an error in line 18 on the login.php script so I opened it and saw that the name of the table that the script was looking for was different to the name I gave the table in the sql (it doesn’t say in the tutorial what name it should be.)
    after changing the name of the table (either in the login.php script or on the sql server) it worked perfectly.

    Then I remembered that I had implemented the trim change suggested – so I tested it without the trim and it also worked fine.

    hope this helps.

    Reply
    • Aliyu Chika says

      April 15, 2017 at 12:10 am

      That’s very good observation and simple solution to many on this web site. The problem of “invalid username or password’ lies in the php code. If you replace Toast.makeText(LoginActivity.this,…… statement with the following :

      Toast.makeText(LoginActivity.this, response.trim()+”Invalid username or password”, Toast.LENGTH_LONG).show();

      you will be displayed with the error on your php code that needs correction.

      My salute goes to shayke,

      Reply
      • shayke says

        April 15, 2017 at 5:59 am

        Thanks Aliyu Chika – much appreciated

        Reply
        • d43_ says

          June 29, 2017 at 10:59 pm

          Thank you shayke !

          This really works like a charm. I’ve been figuring what the problem with the code all night long, reading all comments, and your comment really helps me so much ! From your 1 line of code I can figure out what is my problem with my .php file

          Reply
  74. eko hadi santoso says

    October 3, 2016 at 11:56 pm

    very best tutorial 🙂

    Reply
  75. Danny says

    October 5, 2016 at 12:17 pm

    please I cant download the project

    Reply
  76. pavan says

    October 12, 2016 at 1:43 pm

    Please Send me the project code

    Reply
  77. miss s says

    October 18, 2016 at 6:58 am

    Hi, I’m a beginner in android development. Help me. I’m stuck in this error in ProfileActivity.java 🙁

    @Override
    public boolean onCreateOptionsMenu(Menu menu) {
    //Adding our menu to toolbar
    getMenuInflater().inflate(R.menu.menu, menu);
    return true;
    }

    Reply
  78. MrX says

    November 3, 2016 at 11:37 am

    helllo thenks for your awesome tutorial. But i have a little problem. I have success for login but if i’m not log out the app, i cannot back to my home, when i click back button its always bring me on my profile activity. can anybody give me a solution? thanks before

    Reply
  79. Avikal Prakash says

    November 7, 2016 at 6:31 pm

    Thanks for the great tutorial . But I’m facing one problem. After successfully login it can’t go out from the app.
    I try this code for go out
    @Override
    public void onBackPressed() {
    //Execute your code here
    finish();
    }
    But don’t working..
    Please Sir help me……………………

    Reply
  80. Suman Ghimire says

    November 14, 2016 at 11:36 am

    i am having following error in logcat.

    com.android.volley.serverError

    Unexpected response code 405

    Reply
  81. konyil says

    November 17, 2016 at 1:42 am

    I copied your code, and I keep getting “Invalid username and password” response
    Please, give me a hint what I did wrong ?

    Reply
    • Shayke says

      November 17, 2016 at 3:36 am

      Whats your db name and table name ? Check the php files to see if they are the same as the sql server. That was my problem.

      Reply
      • konyil says

        November 17, 2016 at 5:03 am

        I did it, but the Toast keep showing same problem

        Reply
  82. shayke says

    November 17, 2016 at 7:49 am

    add this to the error message toast for the invalid username :

    , response.trim()+”Invalid username or password”

    so it looks like this :

    Toast.makeText(LoginActivity.this, response.trim()+”Invalid username or password”, Toast.LENGTH_LONG).show();

    what is your error now ?

    Reply
  83. Avi says

    November 17, 2016 at 1:45 pm

    Thanks for the great tutorial . But I’m facing one problem. After successfully login it can’t go out from the app.
    I try this code for go out
    @Override
    public void onBackPressed() {
    //Execute your code here
    finish();
    }
    But don’t working..
    Please Sir help me

    Reply
  84. Rishabh says

    November 24, 2016 at 7:43 am

    Can you help me with user image on regiatration.

    Thanks

    Rishabh

    Reply
  85. Bala says

    November 24, 2016 at 1:10 pm

    I used this tutorial it worked fine. But today its showing this error. I went through all resources but i cannot find a solution.
    error: E/Volley: [77579] BasicNetwork.performRequest: Unexpected response code 403

    Reply
  86. shay-ke says

    November 26, 2016 at 6:27 am

    This is an error code from your web server : The 403 Forbidden error is an HTTP status code which means that accessing the page or resource you were trying to reach is absolutely forbidden for some reason.

    Reply
  87. javed alam says

    January 10, 2017 at 4:00 am

    Bro thanks a lot… I was searching for this and finally i found what i was looking for… keep helping us.. keep going..

    Thanks You..

    Reply
  88. afsar says

    January 19, 2017 at 8:29 am

    app is running but login button is not functioning …no changes on clicking it ..plz help us with required changes in the code …

    Reply
    • Khame says

      January 25, 2017 at 1:09 pm

      Hi
      You probably forgot to add:

      in androidmanifest.xml

      Reply
      • Khame says

        January 25, 2017 at 1:11 pm

        Site cut code.

        android.permission.INTERNET

        Reply
  89. Train says

    January 22, 2017 at 6:53 am

    Thanks for the tutorial..i got a question.. How do u display Username instead of email. Like in Logging in you enter email and password then when you get to main screen it will display the user name.

    Reply
  90. Khames says

    January 23, 2017 at 9:14 pm

    Hi
    Great toutorial. Everything works.
    But i have question about menu.
    If logout is only one position in menu it works like it should, but when i add one more position it doesnt. There is no reaction on click, other 2 options works.

    Code:
    public boolean onOptionsItemSelected(MenuItem item) {
    switch(item.getItemId())
    {
    case R.id.menuLogout:
    if (id == R.id.menuLogout)
    {
    logout();
    }
    break;
    case R.id.menulist:
    Intent intent_menu_list = new Intent(this, ListActivity.class);
    this.startActivity(intent_menu_list);
    break;
    case R.id.menuspot:
    Intent intent_menu_add = new Intent(this, AddActivity.class);
    this.startActivity(intent_menu_addspot);
    break;

    default:
    return super.onOptionsItemSelected(item);
    }

    return true;
    }

    Any sugestions ?

    Reply
    • Khame says

      January 24, 2017 at 1:44 pm

      I found it. in case R.id.menuLogout, remove “if”
      Maybe some one will need:

      public boolean onOptionsItemSelected(MenuItem item) {
      switch (item.getItemId()) {
      case R.id.menuLogout:
      logout();
      return true;
      case R.id.menuPrefixlist:
      Intent intent_menu_prefixlist = new Intent(this, PrefixListActivity.class);
      this.startActivity(intent_menu_prefixlist);
      return true;
      case R.id.menuAddspot:
      Intent intent_menu_addspot = new Intent(this, AddSpotActivity.class);
      this.startActivity(intent_menu_addspot);
      return true;
      case R.id.menuHelp:
      Intent intent_menu_help = new Intent(this, HelpActivity.class);
      this.startActivity(intent_menu_help);
      return true;
      default:
      return super.onOptionsItemSelected(item);
      }
      }

      Reply
  91. Lorenz Maghirang says

    February 15, 2017 at 2:53 pm

    After I’ve finished everything and then I run the app. The login button from my app seems unclickable. How do make this clickable.

    Reply
  92. Khame says

    February 20, 2017 at 12:59 am

    HI
    U must missed some part of tut.
    As i think u didnt do java part just layout

    Reply
  93. ADEL says

    March 9, 2017 at 10:32 am

    thanks Belal you are the best , you help me many time with your codes i appreciate that .
    Adel, from tunisia .

    Reply
  94. Rushikesh says

    March 21, 2017 at 1:20 pm

    Hi Belal,
    My PHP file is not returing success
    Please help for the same

    Reply
  95. Spectre says

    March 23, 2017 at 10:08 am

    hey Belal with this with code myapplication get terminate…………

    would you give any suggestion

    Reply
  96. Arya Rezza Anantya says

    April 12, 2017 at 5:58 am

    please, send project to my email

    Reply
  97. MangKanorSpotted says

    April 26, 2017 at 1:19 pm

    I can’t Login ..i don’t know where to store my login.php …

    Reply
  98. Rahul verma says

    May 27, 2017 at 1:07 pm

    igot this error “com.android.volley.ServerError” most of time when i use post method.

    plz tell me why this error occur.

    Reply
  99. Manali says

    June 7, 2017 at 6:51 am

    When I try to login I have this error: “Invalid username or password”…. data are correct!
    I am using Xampp and my php script is returning me “success” message on correct login.
    Plz help me ASAP.

    Reply
  100. Siddhu says

    June 11, 2017 at 5:14 pm

    Hi bro please help me how align a length text
    If I align text by using xml
    But when I run the app it can’t display
    What I designed in xml

    Reply
  101. martin says

    June 27, 2017 at 12:55 pm

    i got error message, unfortune application has stoped. what happen bellal?

    Reply
  102. Maicon says

    May 18, 2018 at 9:30 pm

    How can I change the url with a specific port volley request?

    Example:
    public static final String LOGIN_URL = “http://myip:8888/Android/LoginLogout/login.php”;

    please help me.

    Reply
  103. tio rahmayuda says

    September 19, 2018 at 11:03 am

    i think this file php missing “?>”

    Reply
    • Belal Khan says

      September 19, 2018 at 1:18 pm

      That is not necessary for the files having only php code

      Reply
      • tio rahmayuda says

        September 24, 2018 at 1:33 pm

        sory. hehe
        need time to know when my false,
        i forget permission internet ..

        Reply
  104. Astria says

    October 5, 2018 at 8:35 am

    Hey ! Your website is really help me a lot.
    Thankyou bro.
    I dont have any error in it.
    But I want to ask you one question.
    I hope you can help me.
    How can i display all my data from mysql to user interface.?
    Yours is only for email. Could you please help me?

    this is my loginprocess.php . I joined 3 tables on my database.

    How can i retrieve the data according my php script?
    Thankyou.

    Reply

Leave a Reply to Istvan Cancel reply

Your email address will not be published. Required fields are marked *

Search


Download our Android App

Simplified Coding in Google Play

About Me

Belal Khan

Hello I am Belal Khan, founder and owner of Simplified Coding. I am currently pursuing MCA from St. Xavier's College, Ranchi. I love to share my knowledge over Internet.

Connect With Me

Follow @codesimplified
Simplified Coding

Popular Tutorials

  • Android JSON Parsing – Retrieve From MySQL Database
  • Android Login and Registration Tutorial with PHP MySQL
  • Android Volley Tutorial – Fetching JSON Data from URL
  • Android Upload Image to Server using Volley Tutorial
  • Android TabLayout Example using ViewPager and Fragments
  • Retrieve Data From MySQL Database in Android using Volley
  • Firebase Cloud Messaging Tutorial for Android
  • Android Volley Tutorial – User Registration and Login
  • Android Upload Image to Server Using PHP MySQL
  • Android Navigation Drawer Example using Fragments


About Simplified Coding

Simplified Coding is a blog for all the students learning programming. We are providing various tutorials related to programming and application development. You can get various nice and simplified tutorials related to programming, app development, graphics designing and animation. We are trying to make these things simplified and entertaining. We are writing text tutorial and creating video and visual tutorials as well. You can check about the admin of the blog here and check out our sitemap

Quick Links

  • Advertise Here
  • Privacy Policy
  • Disclaimer
  • About
  • Contact Us
  • Write for Us

Categories

Android Advance Android Application Development Android Beginners Android Intermediate Ionic Framework Tutorial JavaScript Kotlin Android Others PHP Advance PHP Tutorial React Native

Copyright © 2017 · Simplified Coding· All rights Reserved. And Our Sitemap.All Logos & Trademark Belongs To Their Respective Owners·

loading Cancel
Post was not sent - check your email addresses!
Email check failed, please try again
Sorry, your blog cannot share posts by email.